Introduction to Box with Free Gifts #
Introducing Free Gifts in Box — a powerful way to reward customers while they build their box 🎁
This feature lets you offer free products based on how much customers spend in your box. As customers interact with your box, the free gift can be automatically added or offered for selection, depending on how you set it up.
Common Use Cases #
Reward based on box value or quantity #
Offer a free gift when the box reaches a defined condition — such as number of items or total value.
This works especially well with Tiered quantity boxes
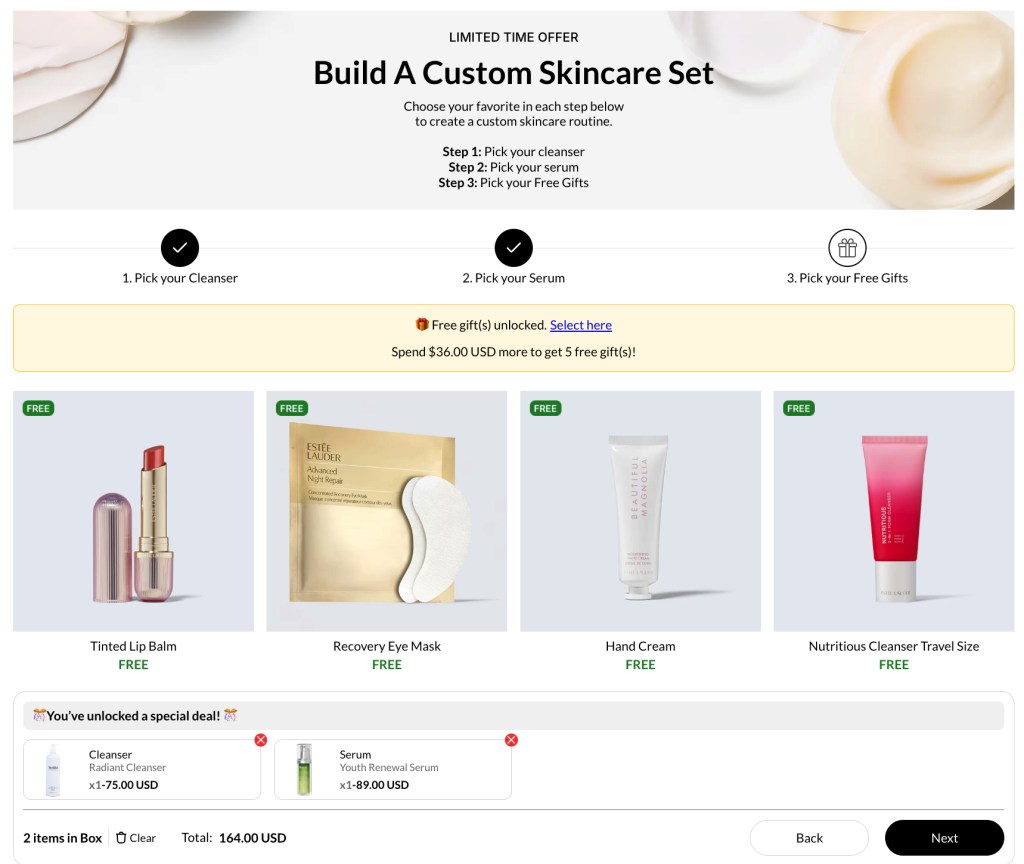
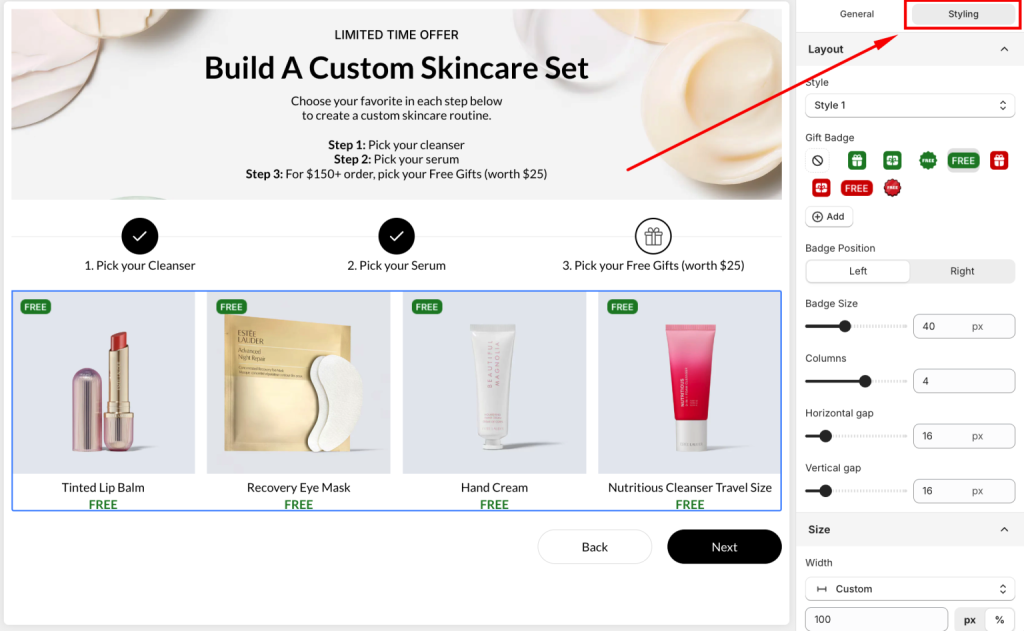
- Build A Custom Skincare Set
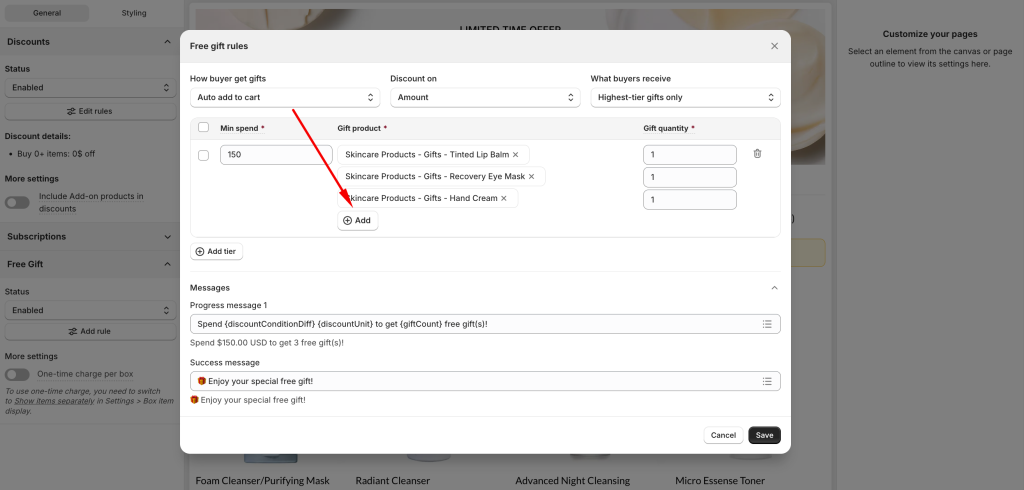
- For $100+ order, pick 1 free gift
- For $150+ order, pick 2 free gifts
- For $200+ order, pick 5 free gifts
Offer gifts tied to specific box selections #
Trigger exclusive free gifts depending on the box size.
You can:
- Assign specific gifts for each predefined box size (Small / Medium / Large)
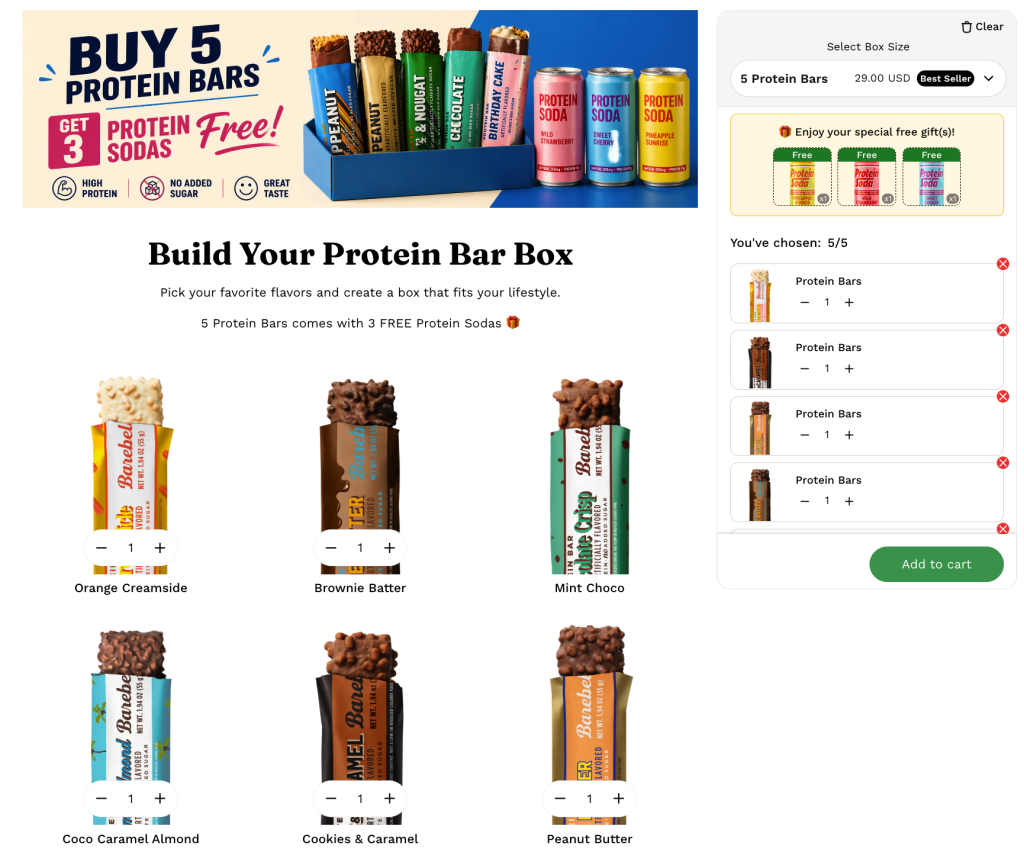
- Build Your Protein Bars Box
- 5-bar box → Get 3 free protein sodas
- Build Your Protein Bars Box
Enhance promotional box campaigns #
Use Free Gifts to strengthen your box offers during campaigns like Mother’s Day, Father’s Day, Black Friday, or seasonal launches.
Instead of a generic discount, customers receive a visible reward while building the box, making the promotion feel more valuable and immediate during special ocasions.

How Free Gift with Box works #
Before setting up, it’s important to understand how Free Gifts behave inside the box.
Free Gifts follow two core behaviors, depending on how customers receive the reward:
1. Auto add to cart #
💡 The free gift is automatically added once the condition is met.
As customers build their box:
- When the condition is satisfied → the gift is instantly added
- If the condition is no longer met → the gift is removed
This creates a seamless experience where customers don’t need to take any extra action.
2. Customer manually chooses #
💡 Customers are prompted to select their free gift.
When the condition is met:
- A list of available gifts is shown
- Customers choose their preferred gift
- The selected gift is then added to the box
This gives customers more flexibility and increases perceived value.
Set up Free Gift with Box #
Free Gifts can be applied to different box types. The setup is similar, but free gift conditions may vary depending on the box type.
Step 1: Create or open your box #
Go to Box Builder and open or create the box where you want to offer free gifts.
You can use any box type:
- Regular Box
- Tiered Quantity Discount Box
- Fixed Box Price
- Predefined Box Size
Set up your box content and discount as usual.
Step 2: Go to the Free Gift discount #
Inside your box setup:
- Open the Discount & Subscription tab
- Scroll to the Free Gift section
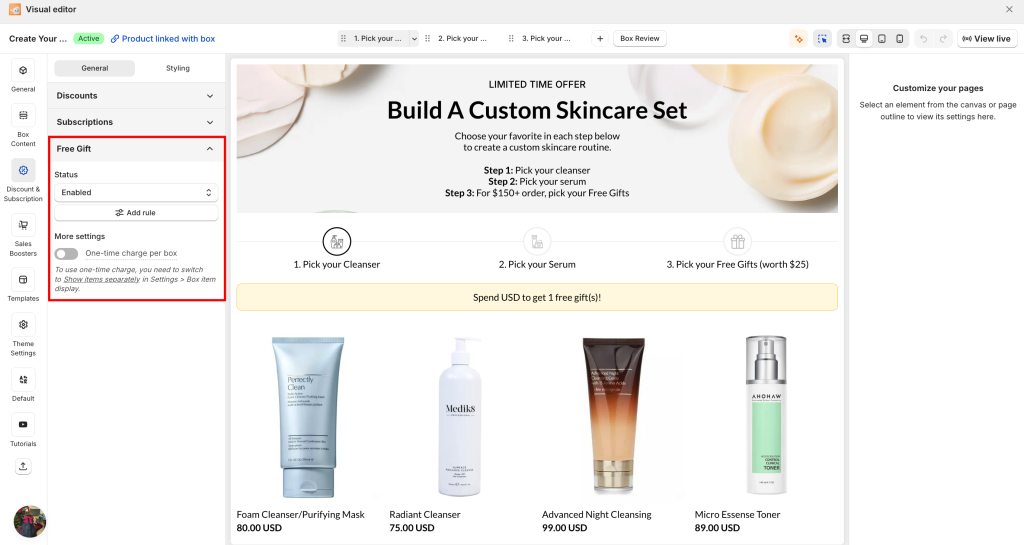
- Click Add rule to open the Free Gift setup modal.
Box types & Free Gift logic #
| Box types | Free Gift logic | Screenshot |
| Regular Box / Tiered Quantity Discount | Free gifts are triggered based on quantity or amount | 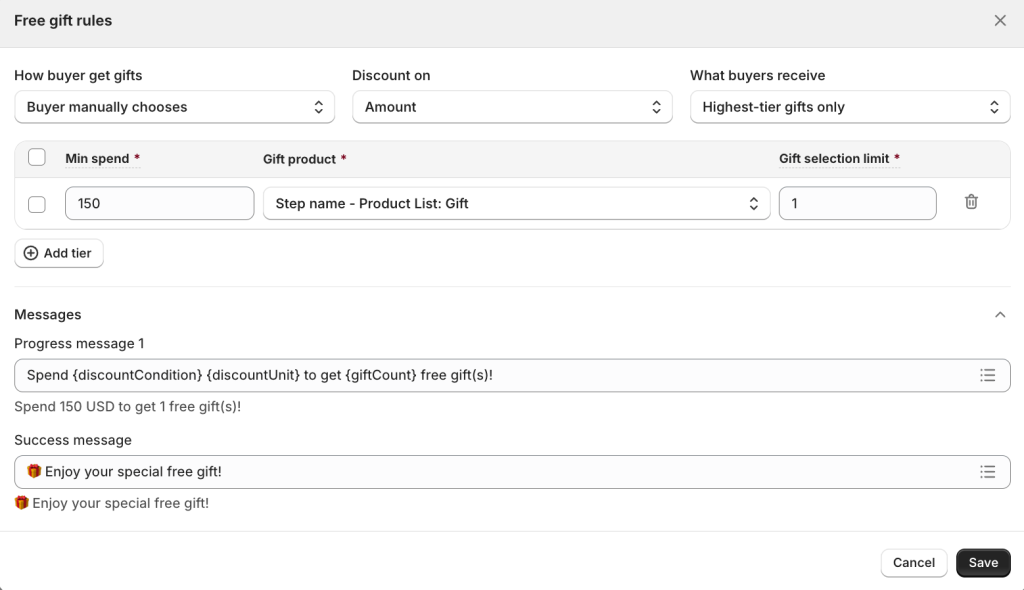 |
| Fixed Box Price | Free gifts are applied to a fixed-price box. | 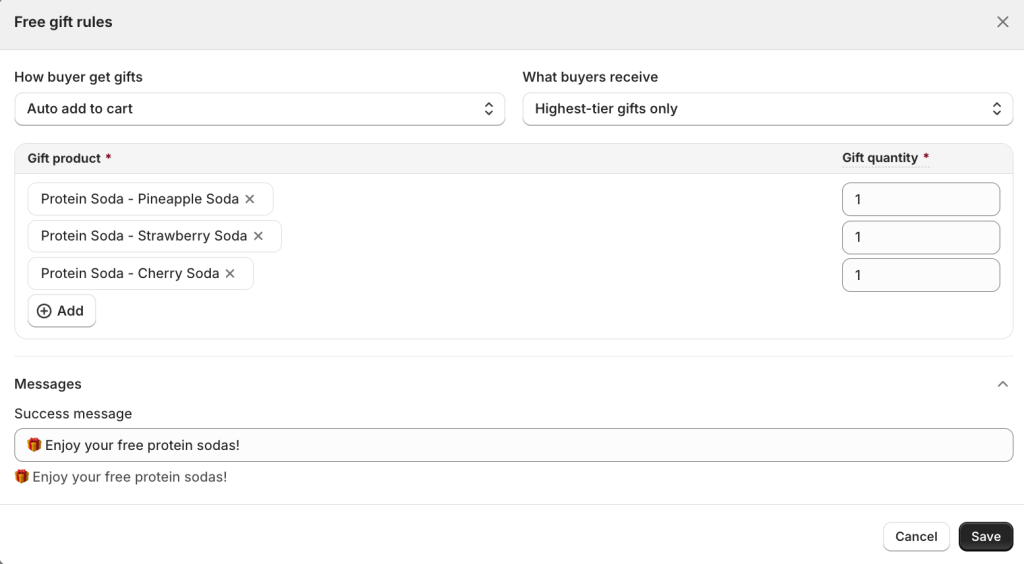 |
| Predefined Box Size | Free gifts can be configured for each box size. | 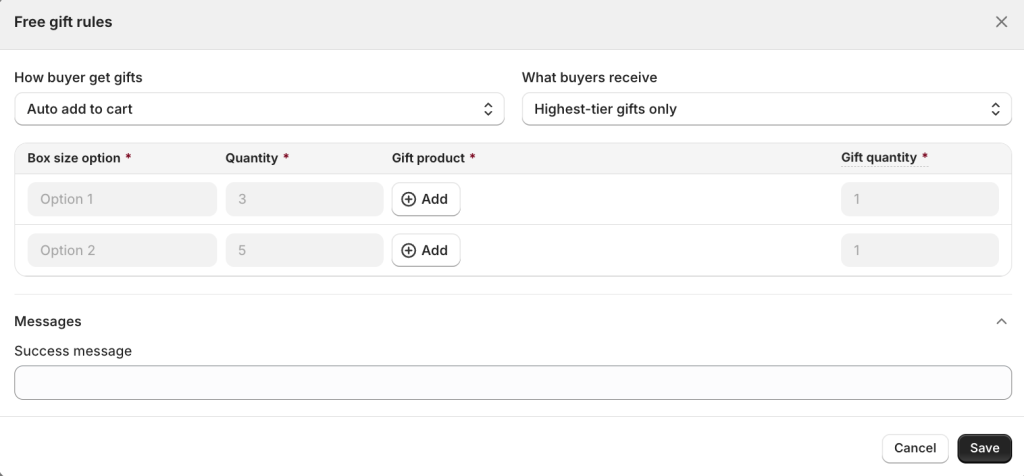 |
Key settings for Free Gifts #
These settings control how free gifts are triggered and applied in your box:
| Settings | Description | Example |
| How buyer get gifts | Define how the free gift is applied when conditions are met – Auto add to cart – Buyer manually chooses We’ll cover this in more detail in the How customers receive gifts section. | 1. Auto add to cart: “Add 4 items → Free Candle is automatically added” 2. Customer chooses: “Add 4 items → Choose 1 free gift (Candle or Soap)” |
| Discount on (for Regular Box/Tiered Quantity Discount) | Define what customers need to do to unlock the gift – Quantity – Amount | 1. Quantity: “Add 4 items → Get 1 free serum sample” 2. Amount: “Spend $50 → Get a free Tote Bag” |
| What buyers receiver (for Regular Box/Tiered Quantity Discount/Predefined Box Size) | Define how gifts are applied when multiple tiers are unlocked – All unlocked gifts: Customers receive gifts from every tier they reach. – Highest-tier gifts only: Customers receive gifts from the highest tier only (not combined). | 1. All unlocked gifts: “Buy 4 items → Free Candle Buy 6 items → Free Candle + Free Soap” 2. Highest tier gifts only: “Buy 4 items → Free Candle Buy 6 items → Free Soap (only)” |
How buyers get gifts #
Once customers meet your conditions, you can control how free gifts are applied in the box — either automatically added or selected by the customer.
Auto add to cart #
Free gifts are automatically added once the condition is met.
To configure:
- Select the gift product(s) to auto add
- Set the gift quantity (number of items added per tier)
👉 Customers don’t need to take any action — gifts are added instantly.
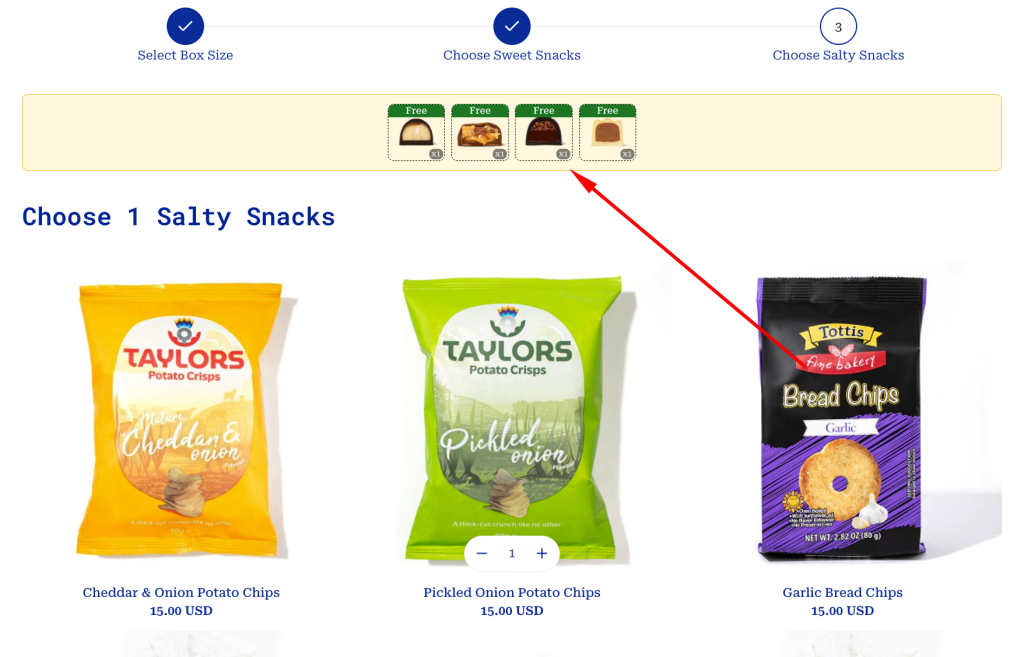
👉 Gifts will be visually shown in the Free Gifts Bar. You can configure this later.
Buyer manually chooses #
Customers can choose their free gift from a list of options.

To configure:
- Create or select an existing Product List: Gift
- Set a gift selection limit (how many gifts customers can choose)
👉 Customers will select their preferred gift after qualifying.
💡 The Product List: Gift controls which gifts are available for selection. You can configure this in the later step.
Step 3: Set up Free Gifts Bar #
In addition to setting up the logic, it’s important to clearly communicate the offer to customers. The Free Gifts Bar helps highlight available rewards and motivates customers to unlock them as they build their box.
👉 Read the detailed guide to Free Gifts Bar
Step 4: Set up Product List: Gift (For Buyer manually chooses) #
The Product List: Gift is used when customers select their free gift manually.
👉 Read the detailed guide to Product List: Gift
Step 5: Save the Box #
Make sure the Free Gift discount is enabled, then save your box.
Once saved, test the experience on your storefront:
- Add products to the box
- When customers reach the required condition or tier:
- Gifts will be automatically added, or
- Customers can choose from available free gifts, depending on your setup

What’s Next? #
💡 Learn to set up Free Gifts Bar and start promoting your gifts offers to customers.
💡 Want customers to pick their own gifts? Try setting up a Product List: Gift.
👉 Explore the best practices to Free Gifts setup in the box.
💬 Need Help? #
Questions? Stuck somewhere?
We’re always here to help! Just reach out via our in-app live chat for 24/7 support.