There are 3 approaches to configuring extra fees for custom options. Depending on the option type you use and your specific needs, you can choose the most suitable approach.
To add a cost to an option or option value, you link it with an existing product in your store.
The price of the linked product becomes the price of the option.
This means you need to create the products you want to link with the option values before setting up the option set.
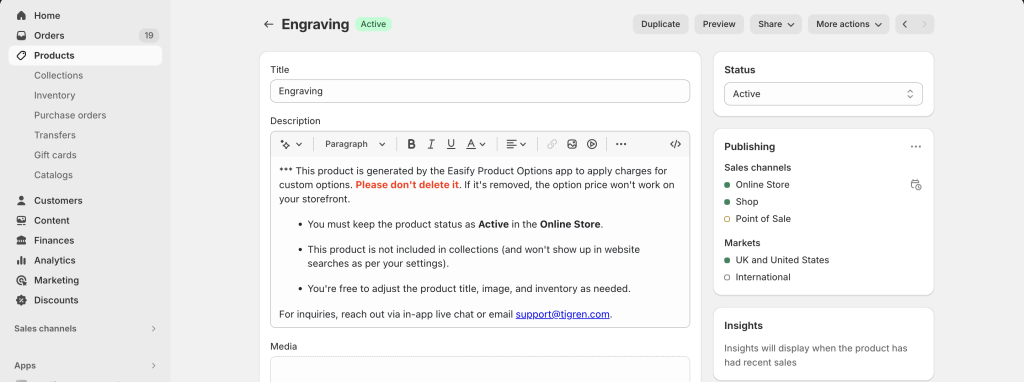
All Add-on Products must have Active status and be published on the Online Store. If they aren’t, you may encounter issues where extra prices are not included in the cart and checkout, resulting in an incorrect order total.
If you want to use Add-on Products but don’t want them to appear in the storefront (as they’re not intended for separate purchases), follow this guide to learn how to hide them.
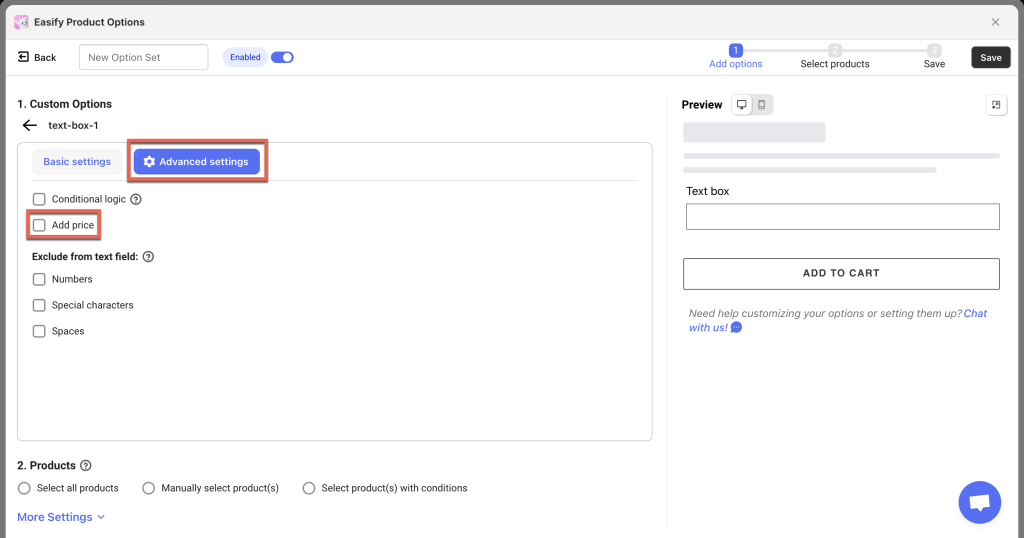
To begin with, create your option set and select the preferred option type (from the supported types listed above).
a. For option types without set values (e.g., Text Box, Text Area, Number Box, Switch, File Upload, Date Range, Date Picker, Time Picker, Color Picker, Font Picker, Quantity):
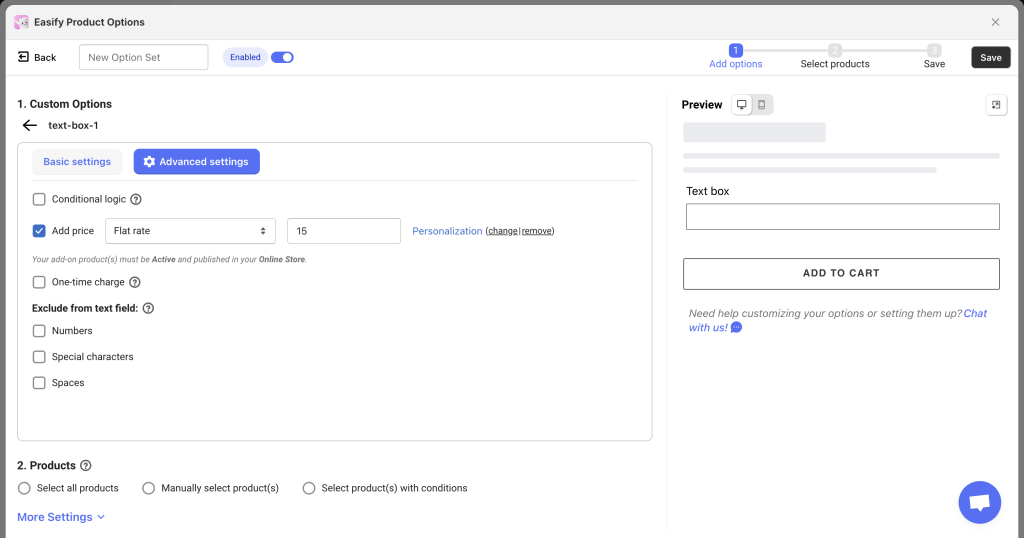
Open the Advanced Settings tab.
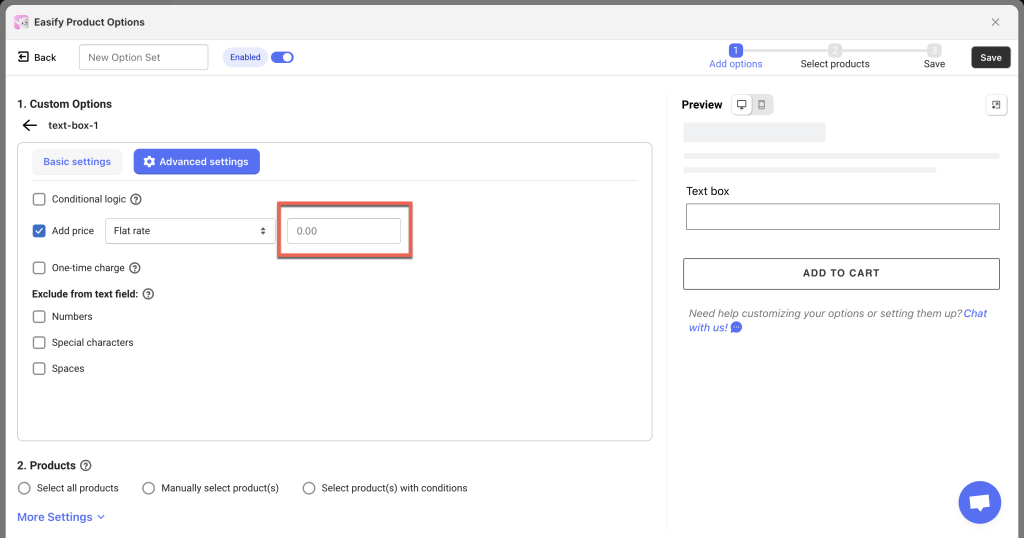
Check the Add Price checkbox.
Click on the Price field to open a popup for setting extra prices.
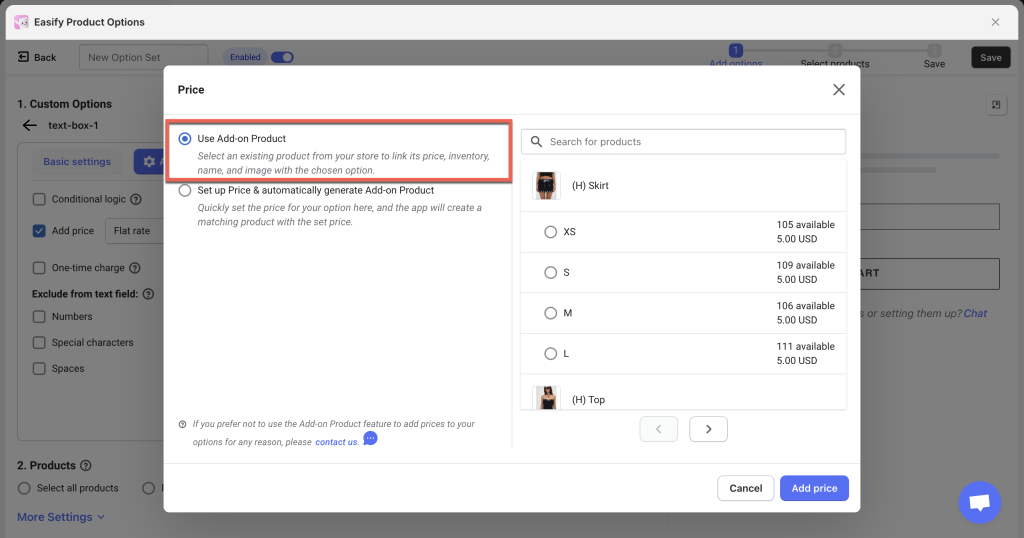
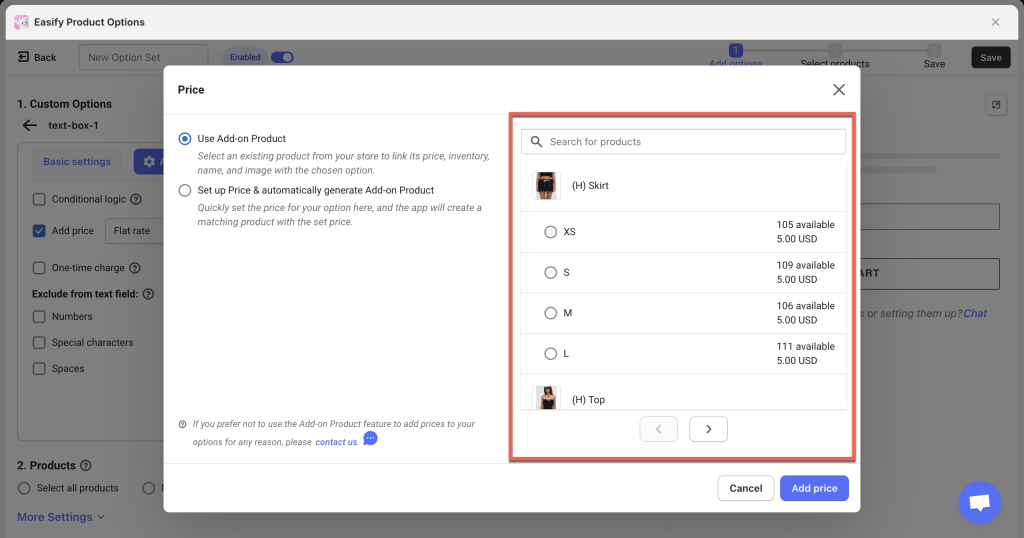
The default option in the popup is to use the add-on product to add a charge to the option.
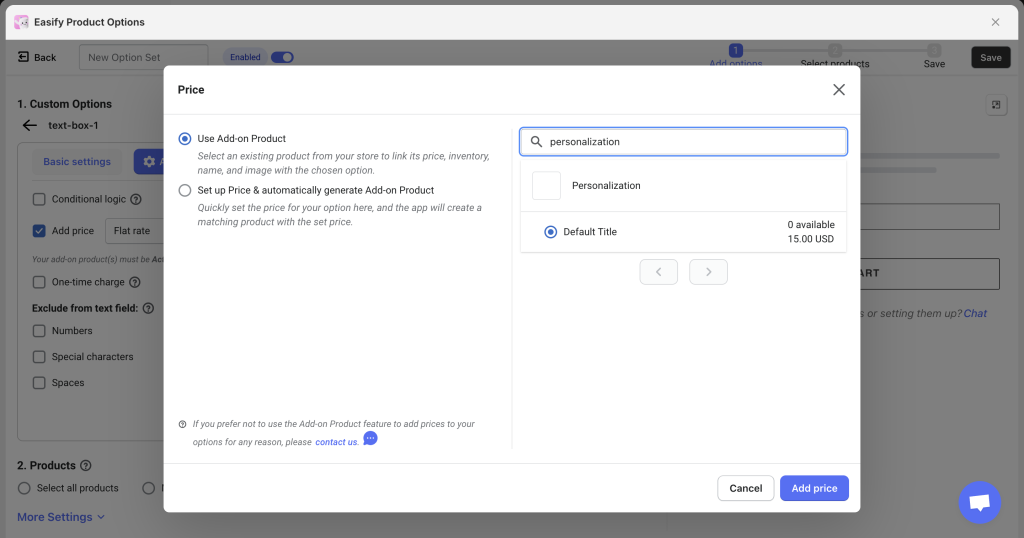
Select the add-on product from the right section of the popup to link it to your custom option. Use the search bar to find your product easily.
Click the Add Price button after selecting the product.
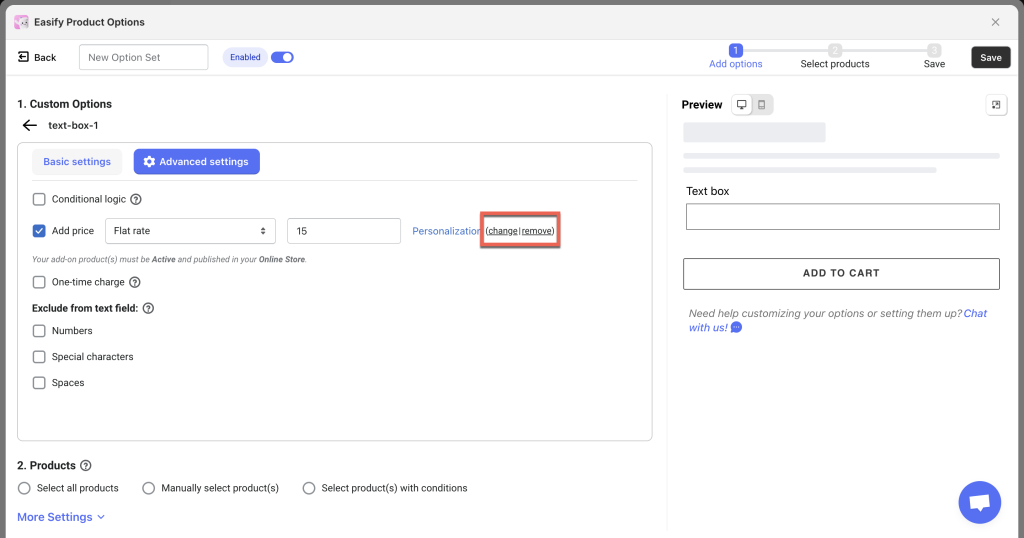
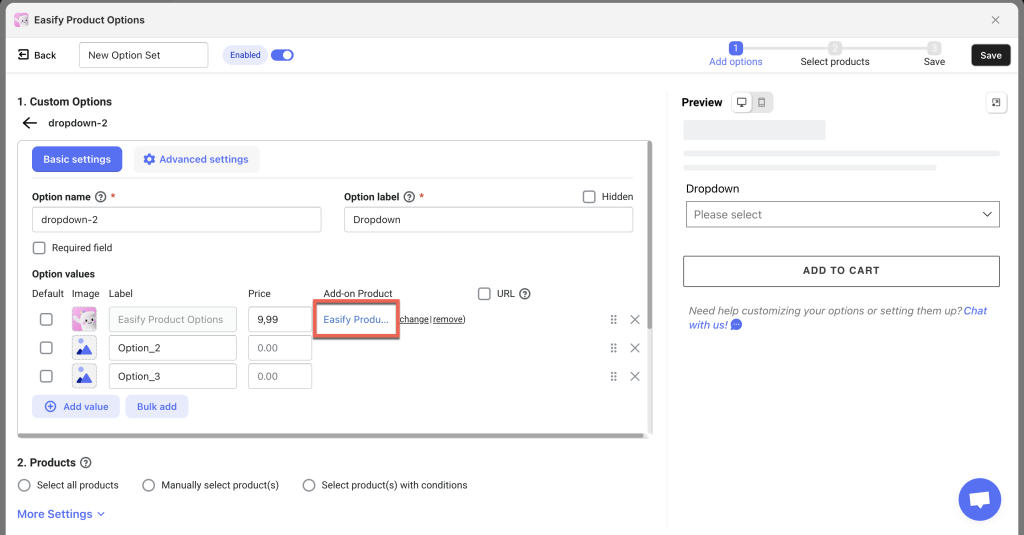
To edit the information of the autogenerated Add-on Product, click on (change | remove) next to the product name.
Continue editing other options within the same set and click Save to finish.
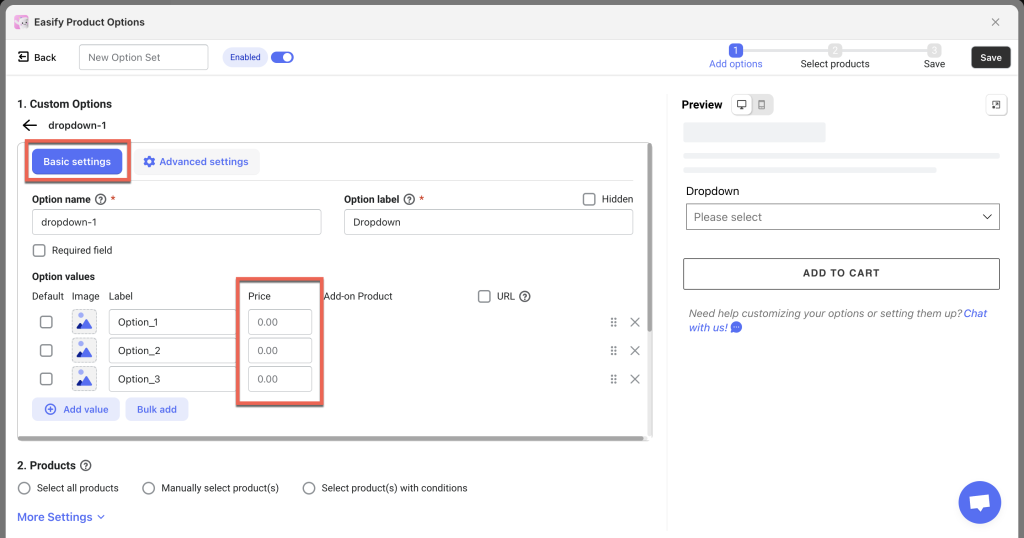
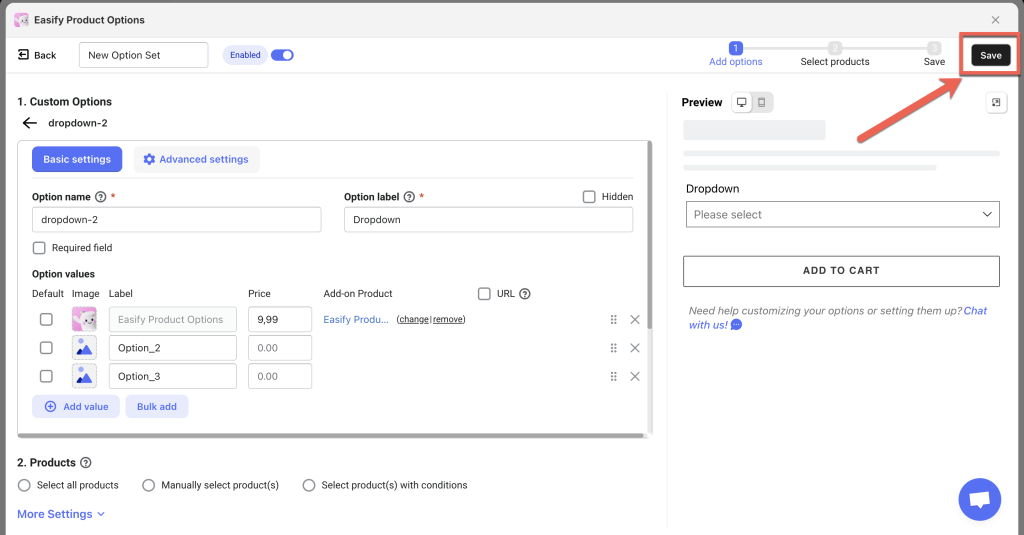
b. For option types with set values (e.g., Dropdown, Color Swatch, Image Swatch, Checkbox, Button, Radio Button, Product List):
In the Basic Settings tab, add all option values.
In the Price column for each option value, click the Price field to open a popup for configuring its price.
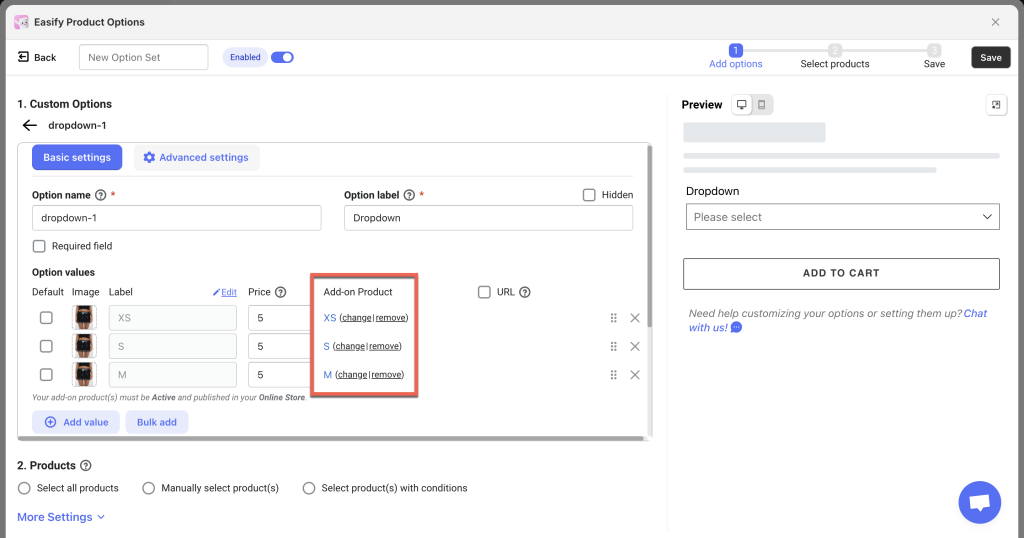
The default option in the popup is to use an add-on product to add a charge to the option.
Select the add-on product from the right section of the popup to link it to your custom option. Use the search bar to find your product easily.
Click the Add Price button after selecting the product.
Continue editing other options within the same set and click Save to finish.
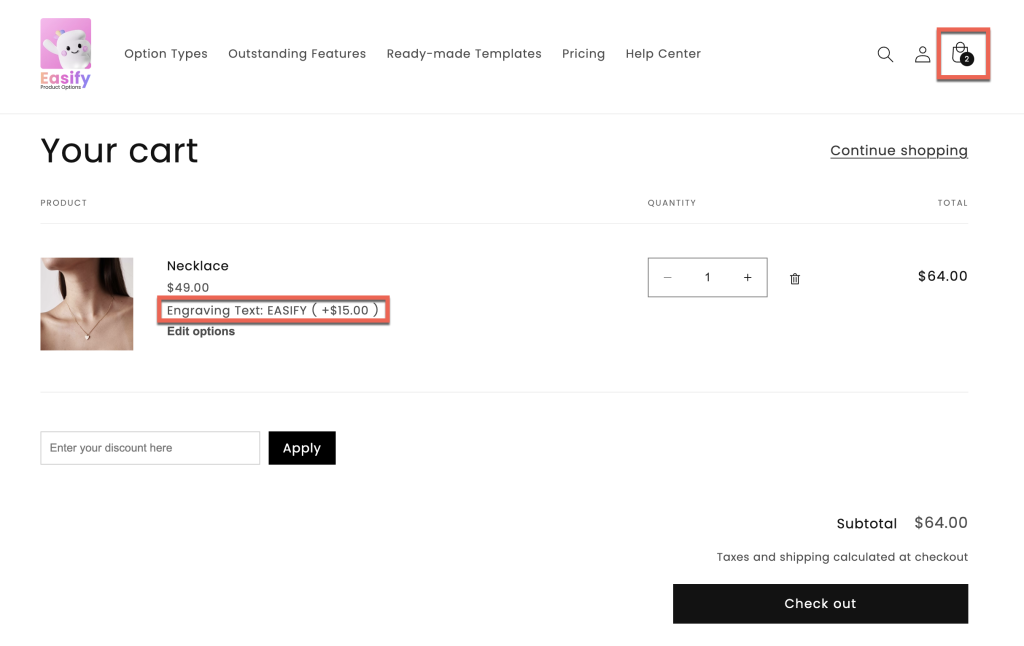
When customers select an option with an extra price, the associated product with that price is also added to the cart.
This means there will be 2 products in the cart and checkout pages (the main product and the add-on product representing the extra price).
Pay attention to this, especially if you want to set up Shopify discounts based on the number of items in the cart.
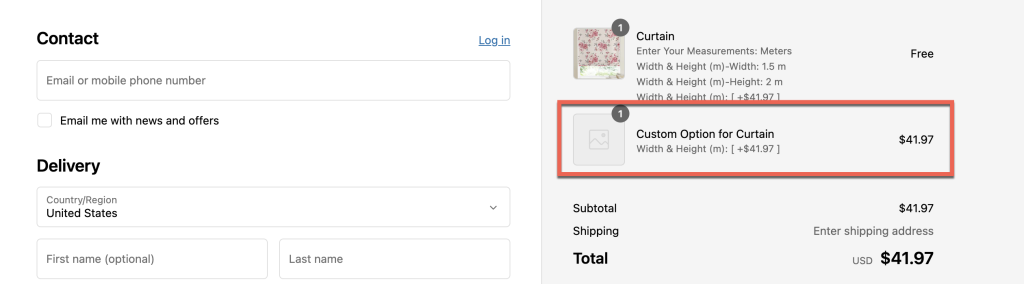
Shopping cart page:
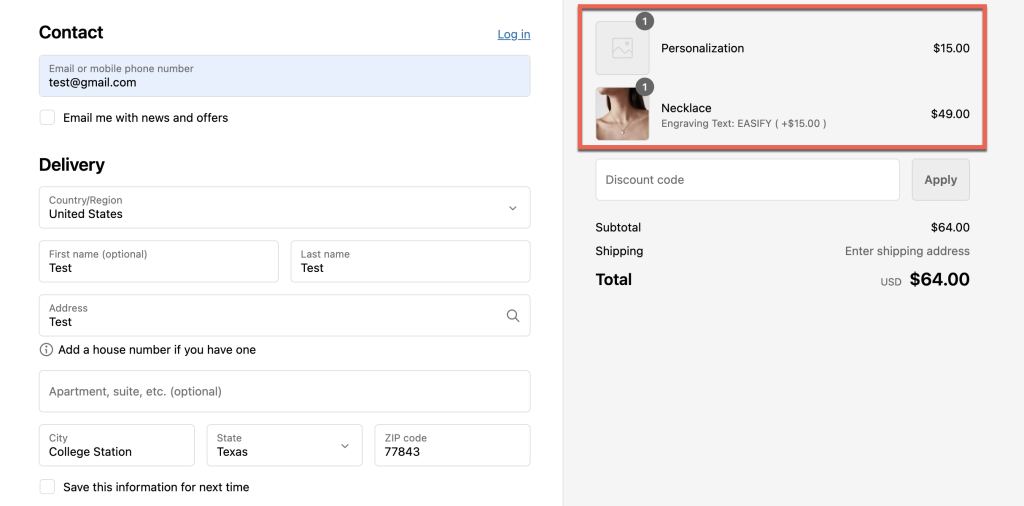
Checkout page:
Please note that the Add-on product’s name, price, and image (if any) will be displayed on the checkout page. Keep this in mind when creating your Add-on products.
In the cart, we merge the main product and custom options (with or without extra prices) into one for a clean cart look. However, on the checkout page, the option with a price (add-on product) will be listed separately.
Currently, there is no way to merge the main product and the custom option with a price (add-on product) on the checkout page due to Shopify restrictions, which do not allow customization of the checkout page.
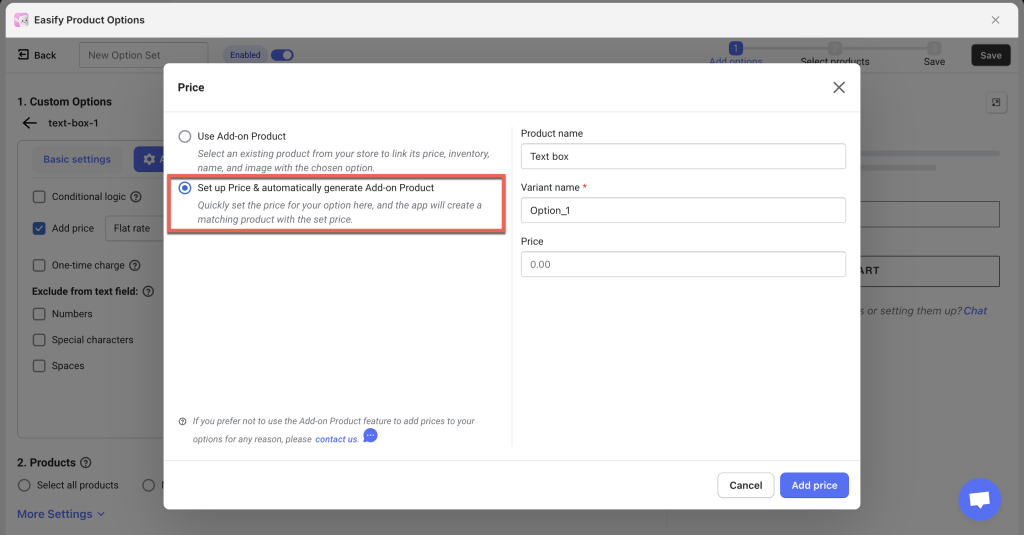
Approach 2: Set up Price & automatically generate Add-on Product #
In this approach, instead of creating Add-on Products before setting up the option set, you’ll set extra prices for custom options or option values directly in the option set.
After saving the option set, the app will automatically generate the associated Add-on Products for any options or option values with a set price.
You can edit the generated Add-on Products if needed.
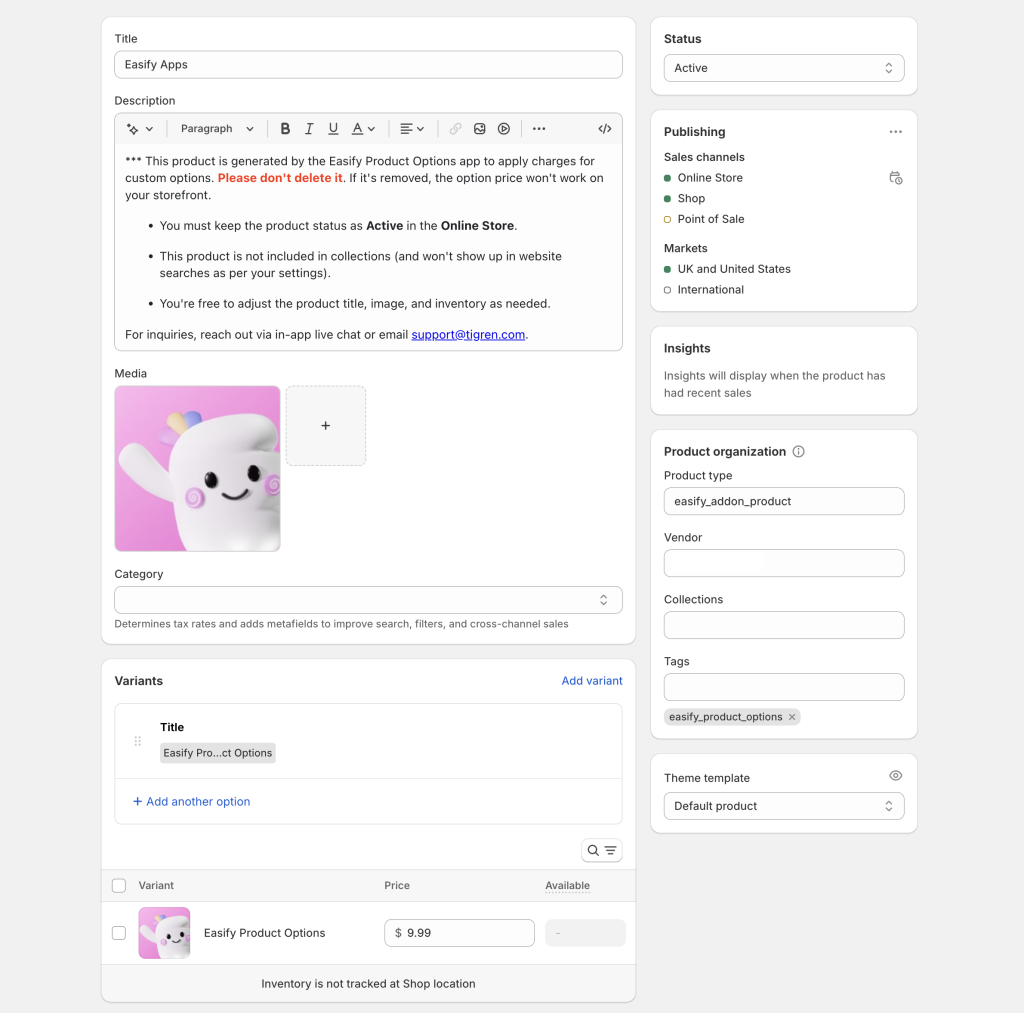
By default, the autogenerated products will have the following characteristics:
Inventory Not Tracked: Autogenerated products do not track inventory by default. To enable inventory tracking, edit the product, check the “Track quantity” option, and set the desired quantity.
Set as Active and published on Online Store: All Add-on Products (for both the 1st and 2nd approaches) must be active and published on the Online Store; otherwise, extra charges won’t function correctly.
Default Description: Each autogenerated product includes a default description with notes about this special product type. Since these products aren’t visible for individual sale, customers won’t see the descriptions. If you want to make the product visible, you’ll need to delete the default description.
Tag of “easify_product_options” and Type of “easify_addon_product”: Autogenerated products will be tagged with “easify_product_options” and categorized under the type “easify_addon_product”. This tag and type make it easy to filter your product list in the Shopify admin, excluding autogenerated products and displaying only your actual products. This way, the autogenerated products won’t mix with your actual products, ensuring efficient product management.
Hidden from Store Search Results: The app uses the seo.hidden metafield to hide autogenerated products from site search and Google results. However, they may still appear in other areas of your store. Check this guide for ways to hide them completely.
Images: For options without images (e.g., Text Box) or options able to configure images that don’t have any set up, the generated products will not have images. For options with option values that include images, the autogenerated products will use these images. Note that the autogenerated product image will be shown on the checkout page. To avoid displaying a blank image, ensure you set up images appropriately.
IMPORTANT
DO NOT DELETE autogenerated Add-on products; it can cause incorrect option price calculations on the storefront. If you accidentally delete the generated products, the app will regenerate them to mitigate issues caused by missing Add-on products.
You can only delete the Add-on products if you no longer want to add charges to your options. To do this, open your option set, remove the Add-on products, then delete the autogenerated Add-on products from your product list.
To begin with, create your option set and select the preferred option type (from the supported types listed above).
a. For option types without set values (e.g., Text Box, Text Area, Number Box, Switch, File Upload, Date Range, Date Picker, Time Picker, Color Picker, Font Picker, Quantity):
Open the Advanced Settings tab.
Check the Add Price checkbox.
Click on the Price field to open a popup for setting extra prices.
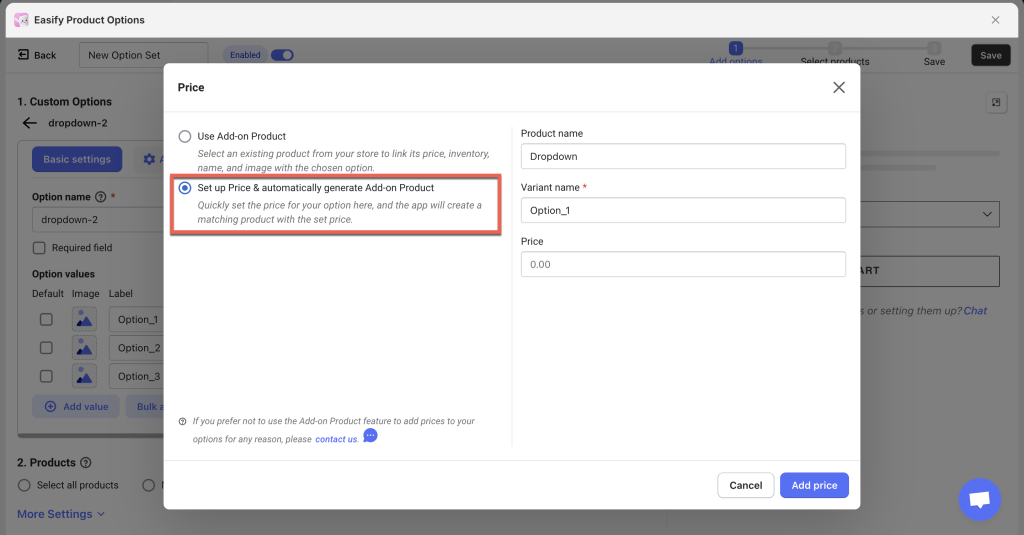
Select the second option, “Set up Price & automatically generate Add-on Product”.
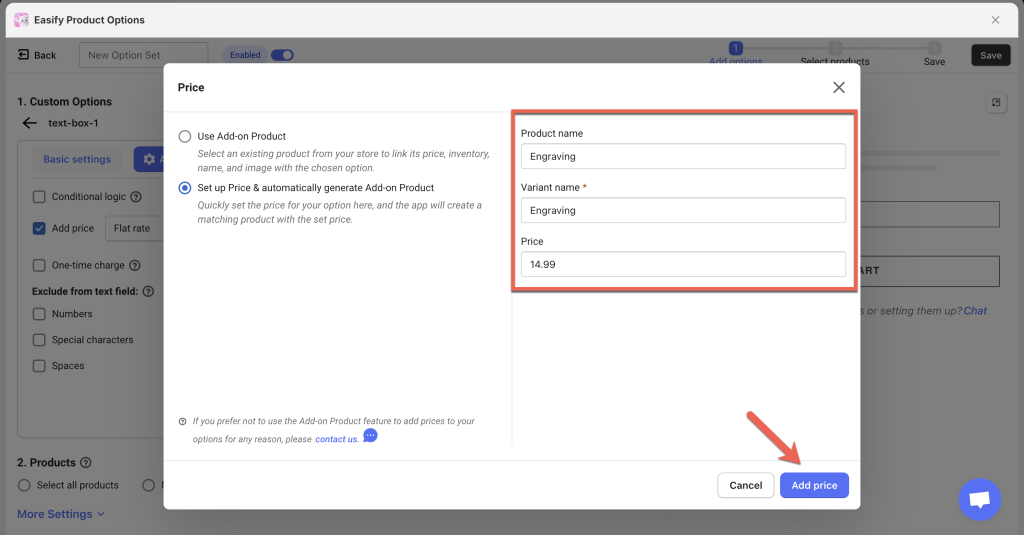
Configure the extra price for the option value and provide the information for the autogenerated product:
Product name: It’s the name of the autogenerated product. By default, it will use the Option name of the custom option as the Product name. You can change it if you prefer. Note that even if you change the Option name later, the generated product will retain its original name.
Variant name: For options without values (e.g., Text Box), the Variant name is not important since it won’t show on the storefront. You can match it to the Product name or leave it as default (Option_1).
Price: This is the price of the custom option and the autogenerated Add-on Product.
After configuring the Add-on Product, click Add price button.
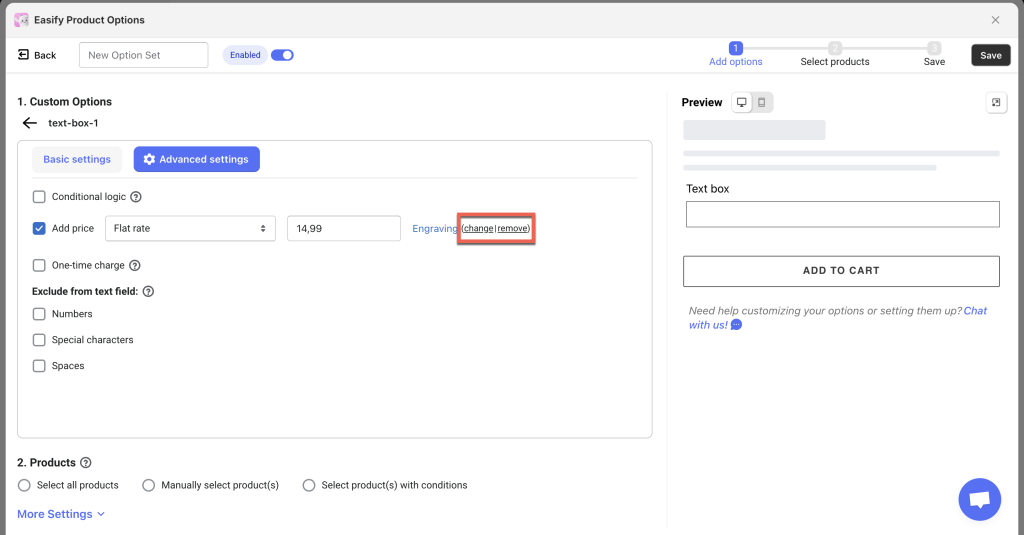
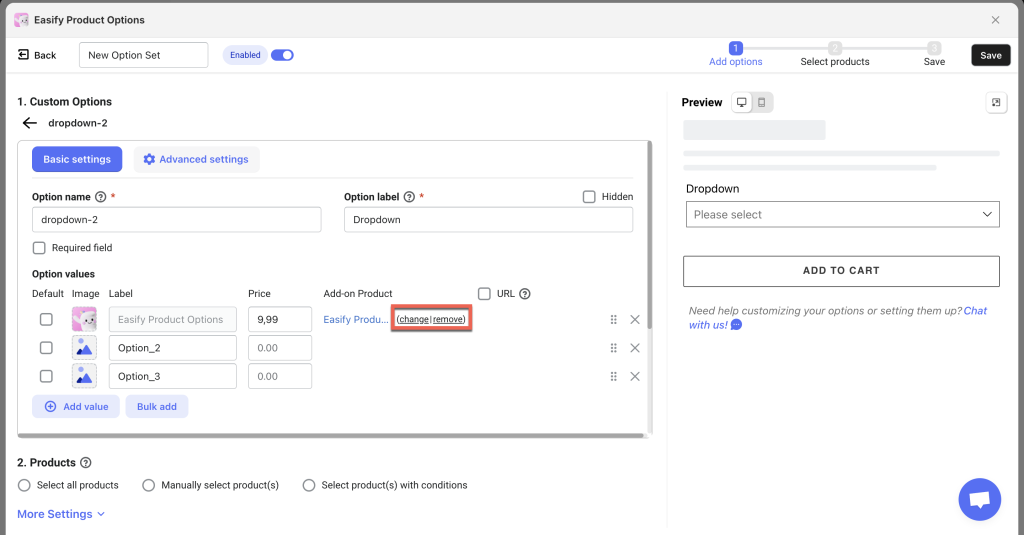
To edit the information of the autogenerated Add-on Product, click on (change | remove) next to the product name.
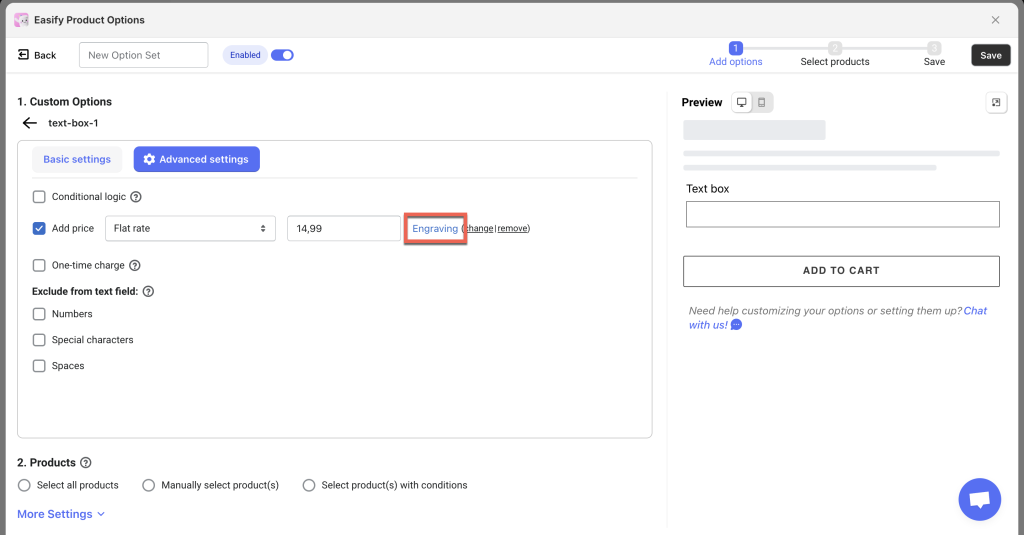
Click the Save button when you finish setting up the option set. Note that the Add-on Products are generated only after the option set is saved. After saving, you can click on the Add-on Product name to go directly to its product page for further editing if needed.
b. For option types with set values (e.g., Dropdown, Color Swatch, Image Swatch, Checkbox, Button, Radio Button, Product List):
In the Basic Settings tab, add all option values.
In the Price column for each option value, click the Price field to open a popup for configuring its price.
Select the second option, “Set up Price & automatically generate Add-on Product”.
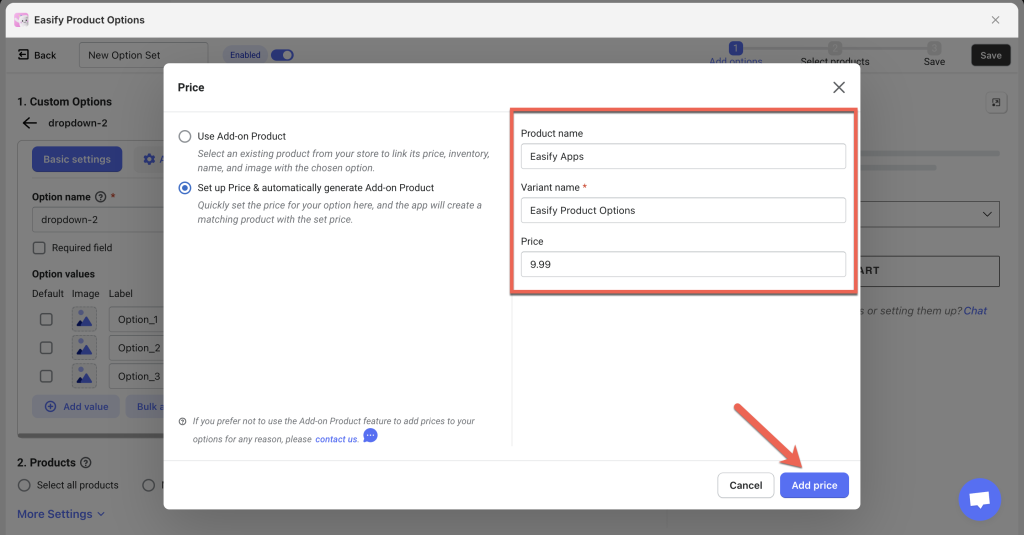
Configure the extra price for the option and provide the information for the autogenerated product:
Product Name: By default, it will use the Option name of the custom option as the product name. You can change it if you prefer. Note that even if you change the Option name later, the generated product will retain its original name.
Variant Name: By default, it will use the Option value label as the variant name. You can change it if you prefer. Note that even if you change the Option value label later, the generated product’s Variant name will retain its original name.
Price: This is the price of the variant of the generated product and the option value.
After configuring the Add-on product, click Add price button.
Upload an image for the option value if desired. This image will be the Variant image of the generated product and will be shown on the checkout page.
If you want to edit the information of the autogenerated Add-on Product, you can still change or remove it by clicking on (change | remove) next to the product name.
Click the Save button when you finish setting up the option set. Note that the Add-on Products are generated only after the option set is saved. After saving, you can click on the Add-on product name to go directly to its product page for further editing if needed.
Notes:
Single Add-on Product Per Custom Option: Each custom option generates one Add-on Product. Each variant of this Add-on Product represents a different option value. This approach prevents the creation of an excessive number of Add-on Products in your store.
Alternative Approach: If you prefer not to use a single Add-on Product for each option value, consider Approach 1. In this approach, you manually create your Add-on Products first and then link them to the option values in the option set.
Shopify Variant Limit: Shopify limits each product to a maximum of 100 variants. If your option has more than 100 option values, additional Add-on Products will be generated to accommodate them.
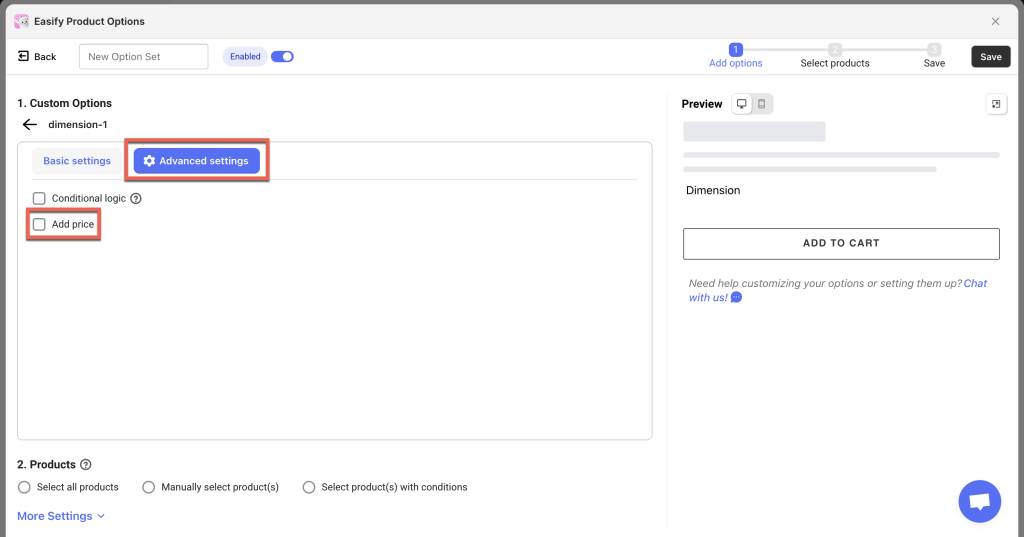
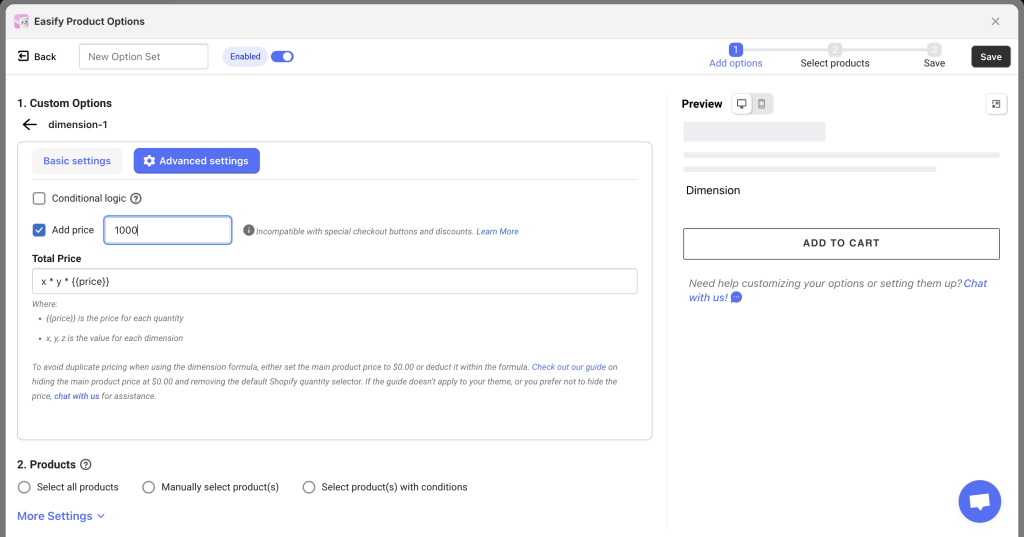
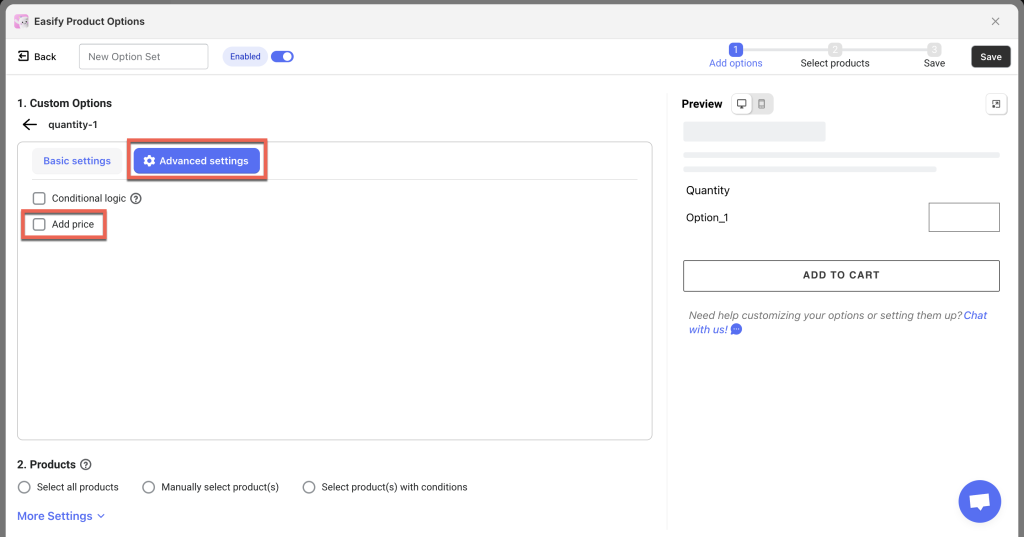
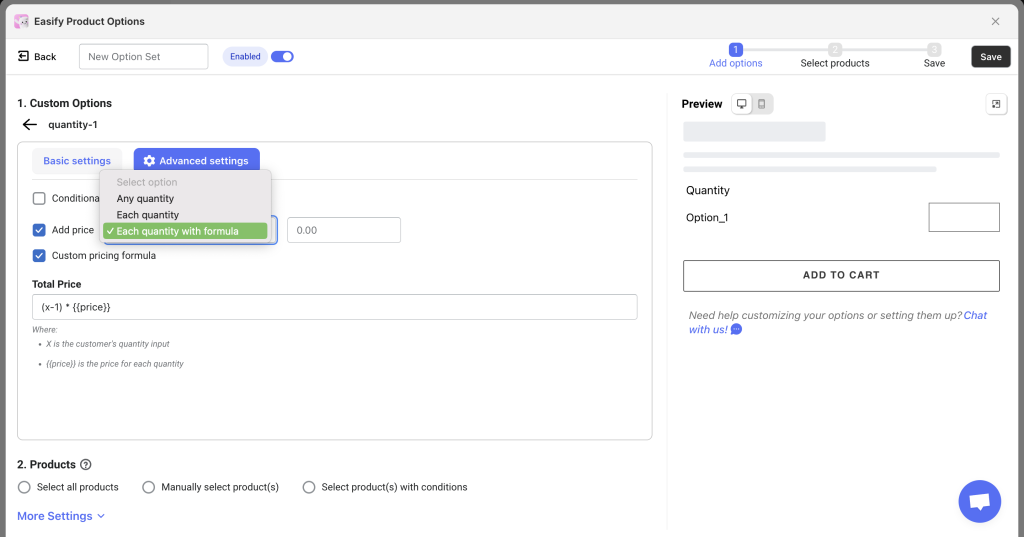
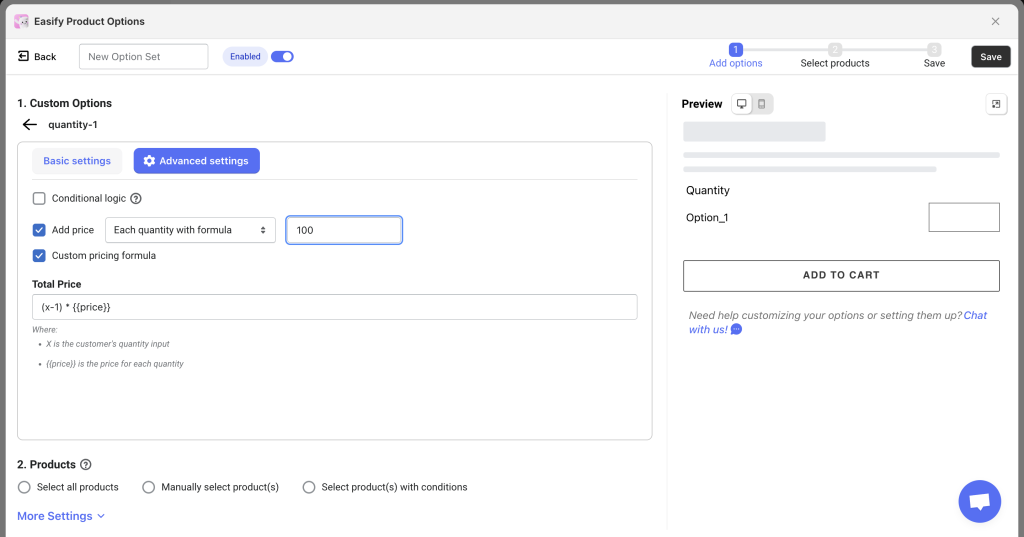
Approach 3: Use Add-on Price Without Generating Add-on Product #
To add charges to custom options that use the Dimension or Quantity (with formula) option types, you can use Add-on Price.
This allows you to set up charges directly in the option set without creating or generating Add-on Products.
IMPORTANT:
Incompatibility with Discounts: Add-on Price cannot be applied with discounts. Discounts will only affect the Main product price, leaving the option price unaffected.
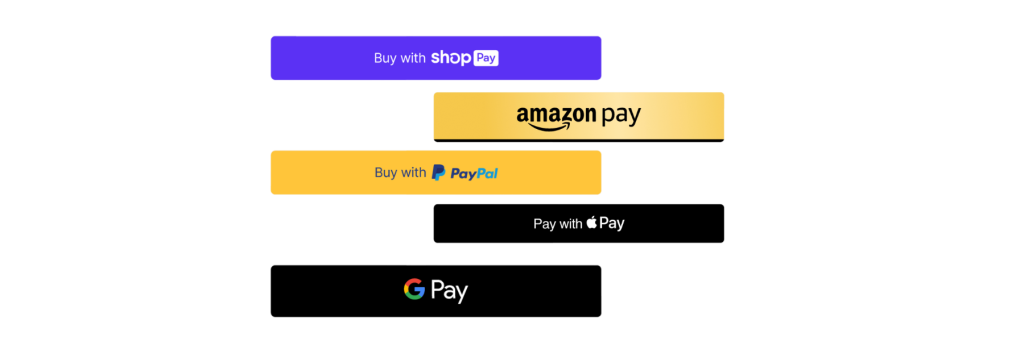
Checkout Button Compatibility: While the Add-on Price feature works with special checkout buttons from some payment gateway providers on Checkout pages, it currently lacks compatibility with those checkout buttons on the Product and Cart pages.
Visual representation on Checkout page: The selected option with Add-on Price will display as a blank image on the checkout page. For example:
If you run into any challenges while adding charges to your custom options, feel free to reach out to us for assistance through our convenient in-app live chat. We’re here to help!