By default, when you add a price to an option value, that price is added on top of the product’s base price as an extra charge. With the Add Discount feature, you can flip this: instead of charging more, you offer a price reduction on specific option values or add-on products.
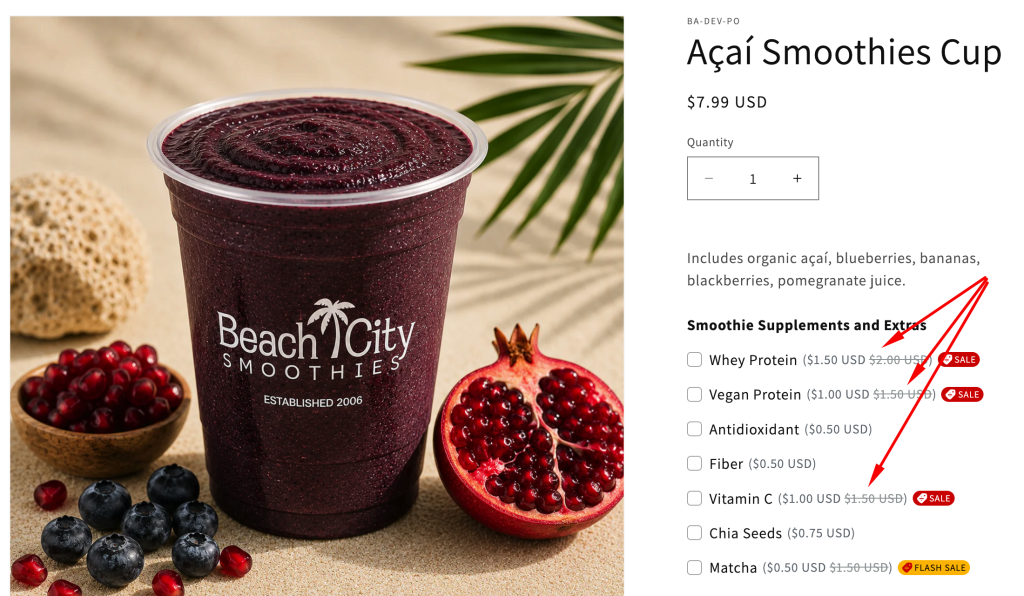
This is useful when you want to:
- Run a limited-time promotion on certain add-ons (e.g. “Engraving is 20% off this weekend”)
- Incentivize customers to pick a particular option or add-on product
When you enable Display discounted price, the original add-on price appears as a strikethrough on the storefront next to the discounted price, so shoppers can clearly see the saving they’re getting.
🔒 This feature is available on the Premium plan.
📌 This feature is available in the latest version of Easify Product Options (from May 2026)
Merchants using earlier versions may not see this feature. To check for updates or request an upgrade, please reach out to us via live chat and we’ll assist you.
Supported Option Types #
The discount feature is available on most option types that support add-on pricing or add-on products, except Range Slider and Dimension:
- Text box, Text area, Number box, Quantity, Font Picker, File Upload
- Dropdown, Checkbox, Color Swatch, Color Picker, Image Swatch, Button, Radio Button, Switch, Product List
- Date Picker, Time Picker, Date Range
How to Add a Discount #
There are two ways to set up a discount depending on the option type.
1 — For Option Types with a Value Table #
Applies to: Dropdown, Checkbox, Color Swatch, Image Swatch, Button, Radio Button, Product List
These option types have an option value table where each value (e.g. a color, a choice, a product) is listed individually.
- Open your option and add related option values
- Enter add-on price or select the add-on product for the options
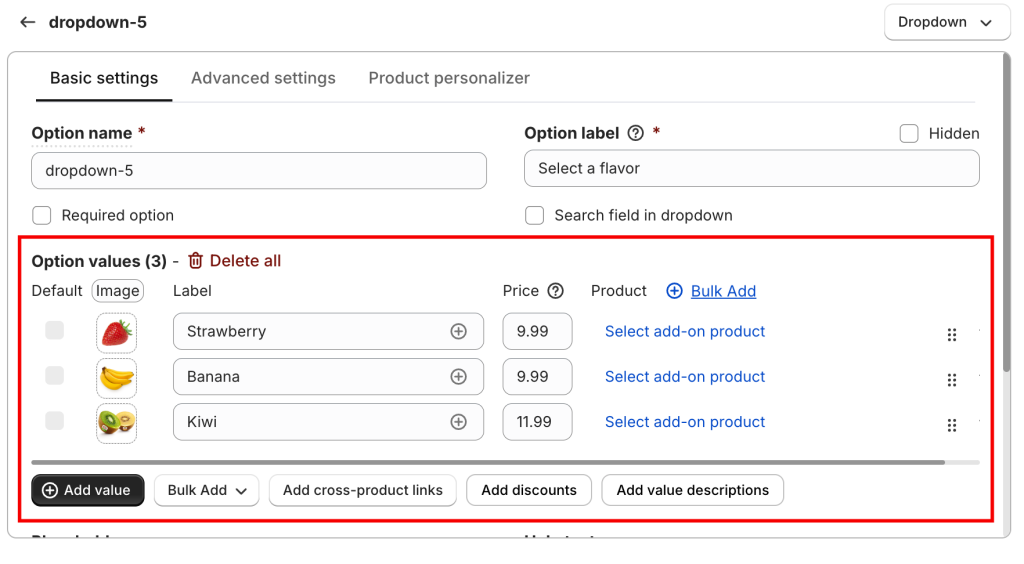
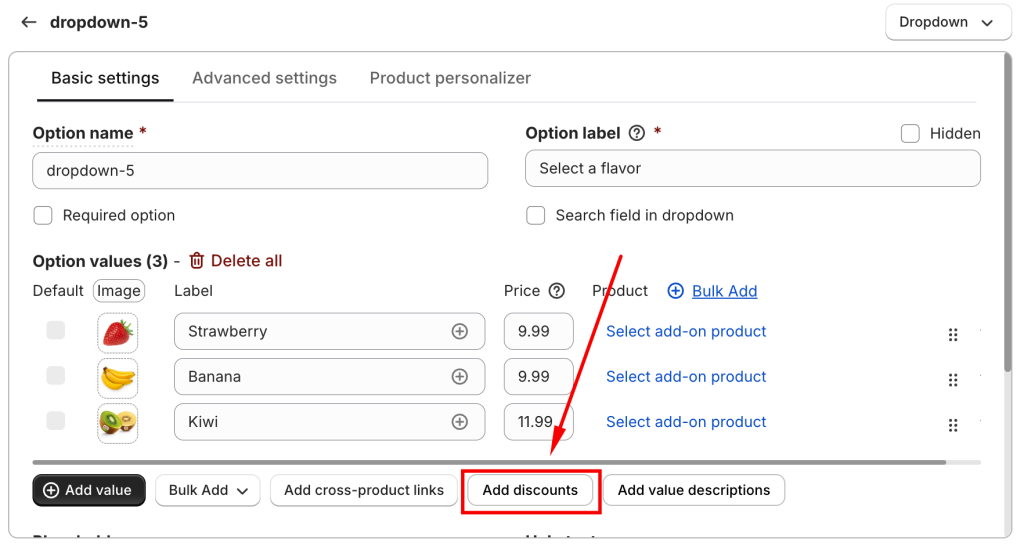
3. Under the value table, click the Add discount button. A popup will appear.
4. In the popup:
- Choose the discount type: Fixed amount or Percentage
- Enter the discount value (e.g. 5 for $5 off, or 10 for 10% off)
- Toggle Display discounted price on if you want the original price shown as strikethrough on the storefront.
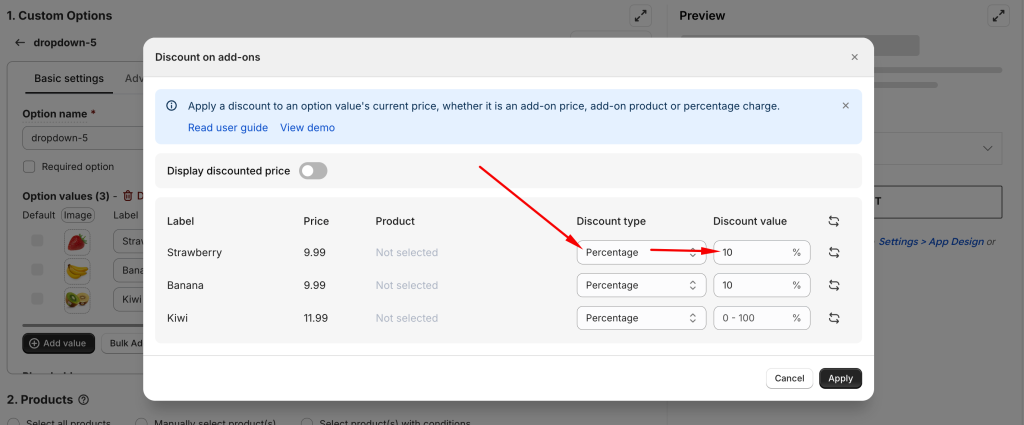
5. Click Apply and Save your Option Set.
2 — Other Supported Option Types #
These option types configure pricing through Advanced Settings.
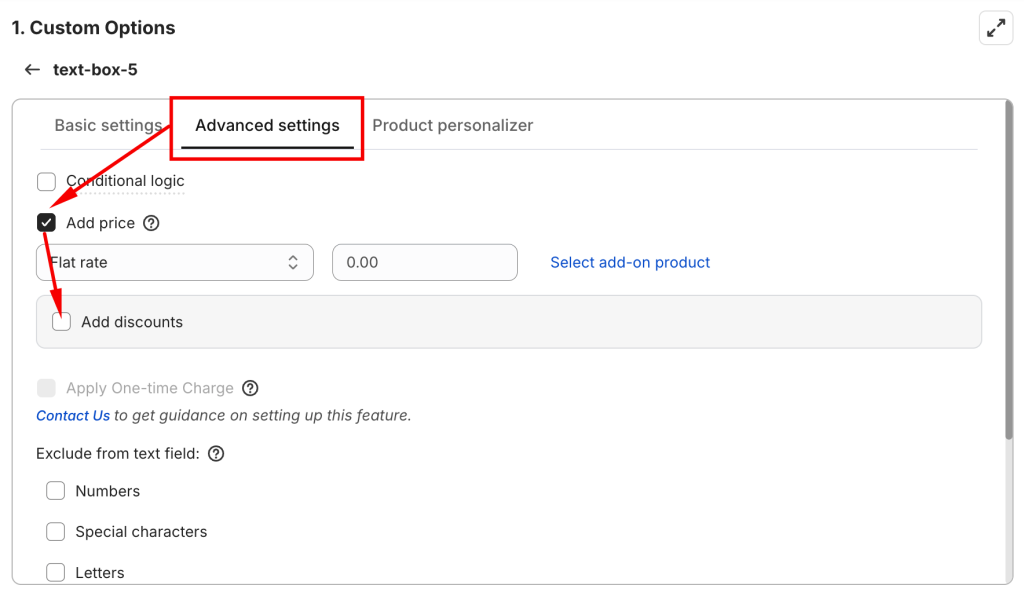
- Open your Option Set and select the option you want to edit, such as Text box.
- Go to the Advanced Settings tab.
- Click Add price to open the pricing configuration.
- Check the Add discount checkbox that appears.
5. Set the discount type (Fixed or Percentage) and enter the amount.
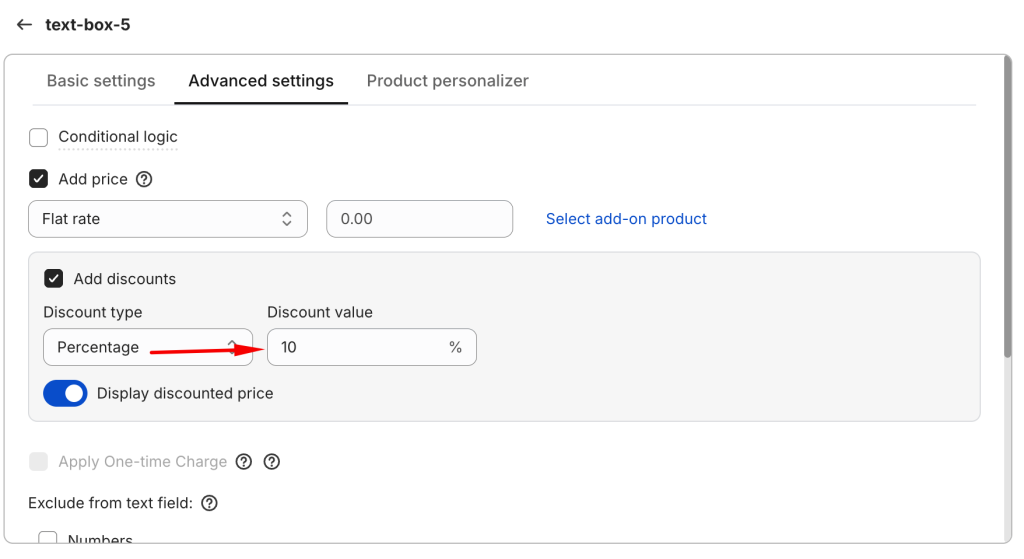
6. Toggle Display discounted price on if needed.
7. Save your Option Set.
Discount Types at a Glance #
| Type | How It Works | Example |
|---|---|---|
| Fixed amount | Subtracts a set dollar amount from the add-on price | Add-on $20 → discount $5 → customer pays $15 |
| Percentage | Subtracts a percentage from the add-on price | Add-on $20 → discount 10% → customer pays $18 |
Display Discounted Price #
When the toggle Display discounted price is enabled for an option, customers will see:
- The original add-on price with a strikethrough
- The discounted price shown next to it
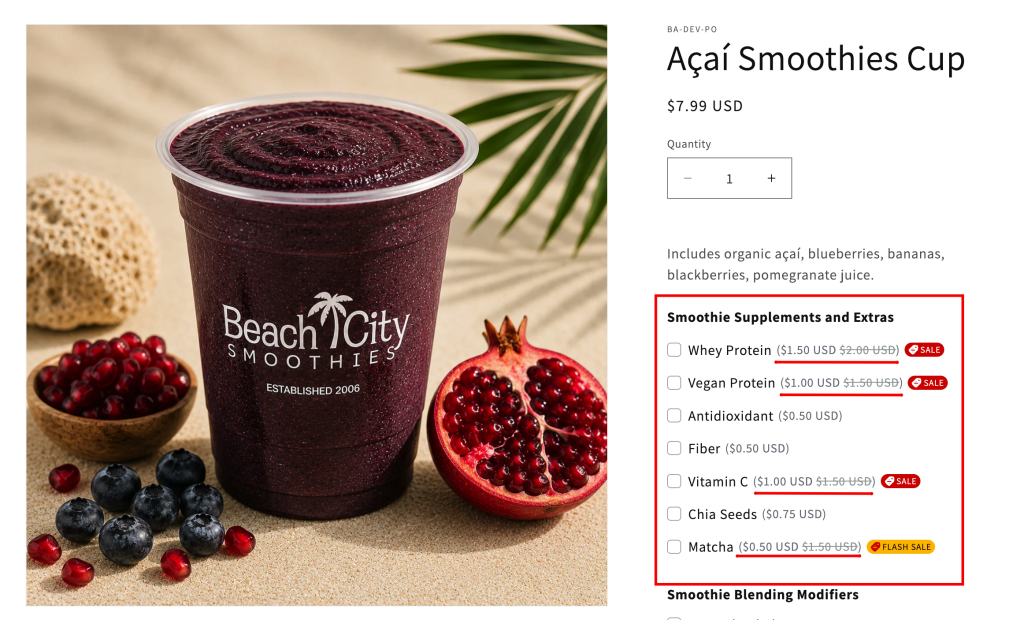
📌 Note: Due to a current technical limitation, the strikethrough price is not yet shown in the in-app canvas preview. To verify how it looks, check the live storefront directly.
Our development team is actively working to bring this display to the in-app preview as well, please kindly bear with us in the meantime.
Important: Cart Price Behavior #
1. If a customer adds a product to their cart while a discount is active, that discounted price is locked in for their cart session — even if you later turn the discount off. This is due to how cart sessions of Shopify work
This means: if you run a time-limited promotion and a customer has already added the item to their cart before the promotion ends, they will still check out at the discounted price when they return.
👉 Plan your promotions accordingly: consider communicating end dates clearly to avoid unexpected discounted checkouts after a campaign closes.
2. Discounts can only be applied when using Cart Transform. This means all add‑on products at checkout must be grouped under a single parent product.
Note: The majority of Easify users are already using Cart Transform, so this setup will apply in most cases.
Best Practices to Add Discounts #
Highlight discounts with badges #
A discount alone won’t catch attention if customers don’t notice it. Pair your discounted option values with a badge — such as “Sale”, “20% Off”, or “Limited Deal” — displayed directly on the option swatch or button.
This draws the eye exactly where you want it and reinforces the value of choosing that option.
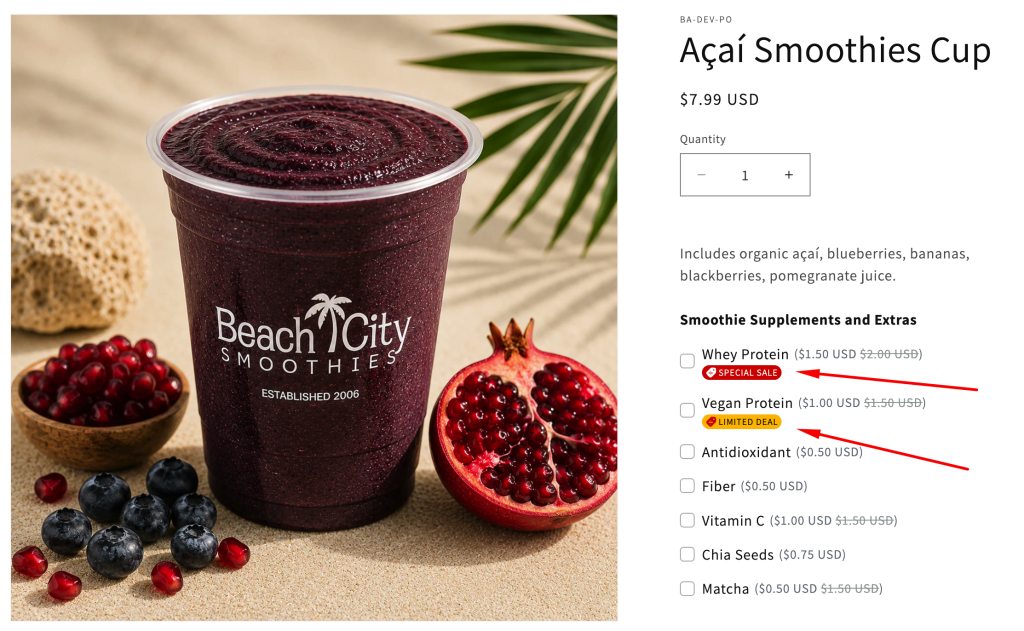
→ Learn how to set this up: Set Up Badges for Option Values
Run flash sales the right way #
Flash sales work best when the urgency is felt across the entire shopping journey. Consider a coordinated approach:
- Homepage: Use a banner or announcement bar to announce the promotion and its end time.
- Product page: Let the discounted add-on price and badge do the work — customers should see the saving the moment they interact with the options.
- Specific time range: Set the discount up before the sale starts, then manually disable it when the window closes.
One thing to plan for: due to how cart sessions work, a customer who adds a discounted product to their cart before the sale ends will still check out at the discounted price even after you’ve turned the discount off. This is expected behavior — but it means your “sale ends at midnight” messaging should account for a natural bleed-over window.
Track what’s working #
After running a discount campaign, review your Average Order Value (AOV) and Add-on Revenue metrics in the dashboard.
A well-placed discount should lift both: if AOV drops without a meaningful increase in add-on attach rate, the discount may be too deep or targeting the wrong option. Treat every campaign as a data point to refine your next one.
Need Assistance? #
If you encounter any issues or need help setting up your badges, our support team is always ready to assist you through the in-app live chat. We’re here to make sure everything works smoothly for you!
