EasifyApps
  • About
  • Apps
    Easify Product Options
    Easify Product Attachments
  • Resources
    Help Center
    Easify Product Options
    Easify Product Attachments
    Video Tutorials
    Easify Product Options
    Easify Product Attachments
  • Partners
  • Blog
  • Contact
All Easify Apps
EasifyApps
  • About
  • Apps
    Easify Product Options
    Easify Product Attachments
  • Resources
    Help Center
    Easify Product Options
    Easify Product Attachments
    Video Tutorials
    Easify Product Options
    Easify Product Attachments
  • Partners
  • Blog
  • Contact

Easify Product Options App

Getting Started
    Key Terminology Simplified
    • Custom options & variants
    • Option set
    • Option set templates
    • Option type (Option input)
    • Your option sets
    • Option label
    • Option name
    • Option value
    • Option group
    • Conditional logic
    • Live preview
    • Help text
    • Placeholder
    • Information (Tooltip)
    • Option widget
    Option Input Types
    • Design Layer
    • Text Box
    • Text Area
    • Number Text Box
    • Color Swatches
    • Image Swatches
    • Radio Buttons
    • Dropdown
    • Checkbox
    • Button(s)
    • Switch/ Toggle
    • Modal (Popup)
    • File Upload
    • Option Group
    • Product List
    • Date Range
    • Date Picker
    • Time Picker
    • Font Picker
    • Color Picker
    • Dimension
    • Quantity
    • Custom HTML
    • Heading
    • Paragraph
    • Spacer
    • Divider
    App Activation
    • Activate the app on your theme
User Guide (PO)
    Set Up Option Sets
    • Create A New Option Set From Scratch
    • Use Ready-made Templates To Create Your Option Set
    Conditional Logic
    • What is Conditional Logic (CL)?
    • Standard Conditional Logic – Among Easify Options
    • Advanced Conditional Logic – Show Easify Options Based On Shopify Variants
    Extra Pricing (Add Charges)
    • Set Up Extra Fees (Version 3 – From July 24, 2025)
    • Set Up Extra Fees (Version 2 – July 18, 2024 – July 23, 2025)
    • Add-on Prices vs. Add-on Products (Version 1 – Before July 18, 2024)
    • Set Up Add-on Prices (Version 1 – Before July 18, 2024)
    • Set Up Add-on Products (Version 1 – Before July 18, 2024)
    • Convert Add-on Prices To Add-on Products (Version 1 – Before July 18, 2024)
    • Hide Specific Products from Shopify Storefront while Keeping Them Buyable
    Option URL
    • What is Option URL?
    • Establish Cross-Product Links
    • Include Option Detail Links For Add-on Products/Custom Options
    Option Design
    • Customize Option Styles
    • Distinct Option Styles for Light & Dark Themes
    • Modern and Classic Option Styles
    App Settings
    • General Settings
    • App Translation
    Tiered Wholesale Pricing
    • What is Tiered Wholesale Pricing?
    • Set Up Tiered Wholesale Pricing
    • Customize Tiered Wholesale Pricing Table
    Option Import/Export
      Option Export
      • Export All Option Sets
      • Export Specific Option Sets
    • Option Import
  • Track Real-time Analytics
  • Set Up One-time Charge
  • Set Up Badges for Option Values
  • Set Up Quantity Selector Per Option Value
  • Add Option Value Descriptions & Tooltips
  • Enable Image Editor for File Upload
  • Show Image/ Color Swatch Slider
  • View & Export Orders With Easify Options
  • Hide Main Product Price & Shopify Quantity Selector
  • Display Option Set In Popup Triggered By Button Click
  • Switch Product Images Upon Option Selection
  • Set Up Option/ Option Set Templates
  • Translate Option Set Into Multiple Languages
  • Separate or Combine Add-ons with Main Product in Cart
  • Reposition Option Set On Product Page
  • Set Up Product Bundles
  • Show Custom Options On Order Confirmation Emails (To Customers)
  • Show Custom Options On New Order Notification Emails (To Staff)
  • Show Custom Options On Packing Slips
Product Personalizer (Live Preview)
  • What Is Product Personalizer – Live Preview?
  • How It Works
  • Ready-to-use Templates with Product Personalizer
  • Upcoming Features
Subscription & Billing
  • Pricing Plans
  • How to upgrade
  • How to cancel subscription
Customization & Support
  • App Maintenance Notification
  • Get support
  • Request a new feature
Frequently Asked Questions
  • Why does the app remain “Inactive” even after activation?
  • What to do if custom options aren’t visible on product pages?
  • Why weren’t custom option prices included in my customer orders?
  • How many custom options can I create per product?
  • Does the app work with Shopify Online Store 2.0?
  • Will the app slow down my website?
  • How can I stay informed about updates for the app?
  • What happens if I uninstall the app, and how does it affect my store?
Integrations
  • Easify Product Options x GemPages Landing Page Builder

Easify Box Builder App

Getting Started
    Get Support
    • Pricing Plans, Trial, and Billing
  • Activate the App
  • Key Terms
Visual Editor
  • Create a New Box with the Visual Editor (Overview)
  • Create a New Box with a Template
  • Create a Box from Scratch (Without a Template)
  • Create Custom Fields/ Options
Box Types
  • Predefined Box Sizes
  • Tiered Quantity Discounts
Advanced Features
  • Connect Subscription Plans to Boxes
  • Display Variants as Individual Products
  • Create Products Linked with Boxes
  • Set Up Add-on Price or Add-on Product for Custom Fields
  • Translate App Default Texts
  • Translate Box-Specific Content
Product List
  • Product List (Overview)
  • Product List: Grid
  • Product List: Tabs
  • Product List: Accordion
  • Product List: Carousel
  • Default Selected Products
More Features
  • Use Cart Transform or List Items Separately at Checkout
  • Show Custom Options On Order Confirmation Emails (To Customers)
  • Show Custom Options On New Order Notification Emails (To Staff)
Help & Support
  • Get Support
  • Frequently Asked Questions – Most Common Questions
  • FAQs – Theme Settings: Product Cards
  • FAQs – Theme Settings: Step bar, Quick Summary, Quick View
  • FAQs – Theme Settings: Quantity selector, Box Review Page

Easify Inventory Sync App

  • Welcome to Easify Inventory Sync
Multi-store Sync
    Getting Started
    • Overview and Key Terminology
    Sync Setup & Management
    • How to Connect Source and Destination Stores
    • Understand Connection & Sync Statuses
    • How to Track Sync Activity
    • Disconnect or Delete Connection
    Data Sync Types
    • Product Sync
    • Inventory and Order Sync
    • Page, Blog and Blog post Sync
    Subscription & Billing
    • Pricing Plans
Single-store Sync
    Getting Started
    • Quick Start Guide
    • Frequently Asked Questions
    • Roadmap Spotlight – A Sneak Peek Into The Future
    • Get Support
    Inventory Groups
    • Create Inventory Groups Automatically by SKUs
    • Create Inventory Groups Manually
    • Events Triggering Syncs among Products in Inventory Groups
    • When do Inventory groups Fail to sync?
    • How to Set Up Common Cases
    Bundle Groups
    • Create A New Bundle Group
    • How Master product inventory is Calculated from Component product inventory (Modified Quantity)
    • Events Triggering Syncs among Products in Bundle Groups
    • When do Bundle groups Fail to sync?
    • How to Set Up Common Cases
    Inventory Thresholds
    • What is Inventory Threshold?
    • Set Up Universal Inventory Threshold
    • Create A New Inventory Threshold
    Advanced Features
    • Bulk Edit Inventory Groups
    • Import/ Export Inventory Groups
    • Import/ Export Bundle Groups
    • Export Product Variant & Location IDs
    • Bulk Duplicate Products
    Subscription & Billing
    • Pricing Plans (& FAQs)
    • How to Change Plans
    Common Scenarios & Setup Guides
    • Roast Coffee
    • Loose Leaf Tea
    • Stationery Set
    • Retail & Wholesale Items
    • Blank & Personalized Tees
    • Unisex Tees
    • Baby Gift Hamper
    • Flowers
    • Chocolate Cookies
    • 3-Pack T-Shirts (mixed sizes & colors)
    • Batteries
    • Beverage (Inventory by Cans)
    • Beverage (Inventory by Packs)
    • Multivitamins (from Single Pack)
    • Multivitamins (from Double Pack)
    • Incense Sticks (Inventory by Packs)
    • Incense Sticks (Inventory by Sticks)
    • Candle Trio Set
    • Perfume Set
    • Pick n Mix Sweets
    • Top & Skirt Set (Same Size)
    • Top & Skirt Set (Mixed Sizes)
    • 2-Pack Tops (1 Color)
    • 2-Pack Tops (1 Color) – Only in Packs
    • 2-Pack Tops (Multicolor – Fixed)
    • 2-Pack Tops (Multicolor – Optional)
    • Custom Print Shirts
    • Shoes & Free Socks

Easify Product Attachments App

App Activation
  • Activate the app on your theme
User Guide
  • Upload Product Attachments
  • Upload Attachment Icons
  • Add Attachments To Templates
  • Import Bulk Product Attachments
  • Export Product Attachments
  • Add Attachments To Collapsible Rows On Product Pages
Customization & Support
  • Get support
  • Roadmap Spotlight – A Sneak Peek Into The Future
  • Frequently Asked Questions
  • Feature Requests

Recommended Shopify Apps

  • Page builder
  • Marketing
  • Affiliate programs
  • Image gallery
  • Pricing quotes
  • Invoices and receipts
  • Others

Announcements

  • 🎉 Easify Lucky Draw 2026: Terms and Conditions
  • Become a VIP Founder of Easify Box Builder – Limited to the First 100 Users Only!
  • Limited Support During Lunar New Year (Jan 25th- Feb 3rd, 2025) – Your Patience Is Our Greatest Gift!
  • Go Beyond Options: Easify Product Options Premium Is Here!
  • Limited Support During Our Summer Holiday (September 27th-29th, 2025) – Your Patience Is Our Greatest Gift!
  • Easify Box Builder: New Plans, Your Box Sales Get a Power-Up

Product List: Accordion

Table of Contents
  • 1. Common Use Cases
  • 2. How To Add Accordion Element
  • 2. General Settings
  • 3. Styling Settings
  • 4. Accordion Row
    • General Settings for Accordion Row
    • Styling Settings for Accordion Row
    • Product List in Accordion Row
  • 💬 Need Help?

The Accordion Element enables you to present content in collapsible sections. This helps streamline your pages, improve the user experience, and can lead to higher conversion rates.

👉 Instead of overwhelming customers with long lists, Accordion breaks content into digestible chunks that shoppers can open only when they need them.

1. Common Use Cases #

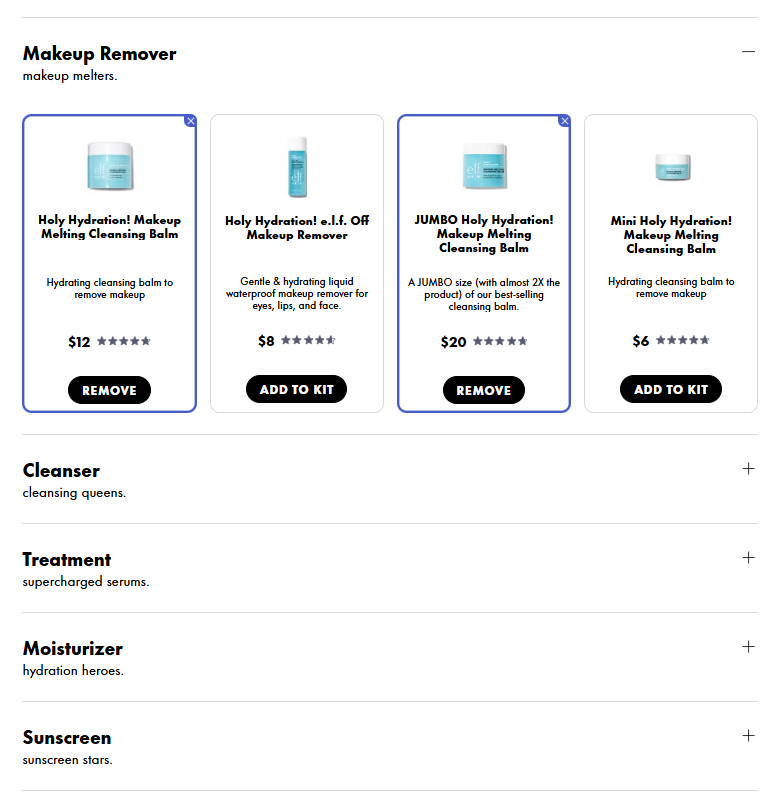
  • Skincare bundle: Organize products by routine steps, using accordion (e.g., Makeup Remover, Cleanser, Treatment, Serum, Moisturizer)
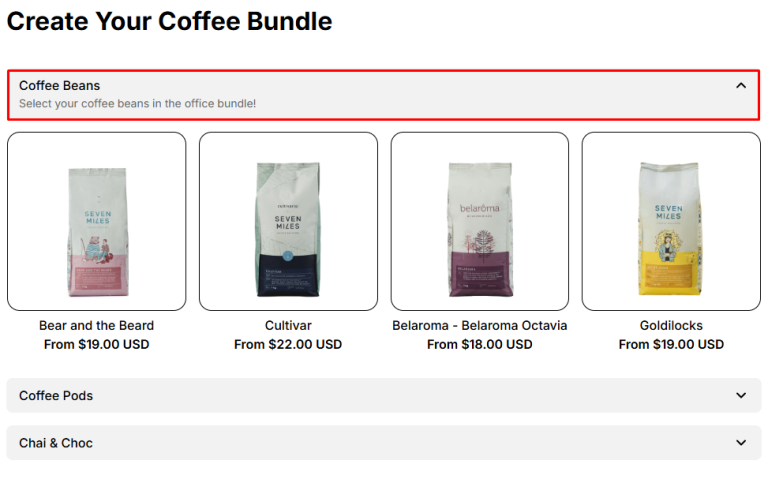
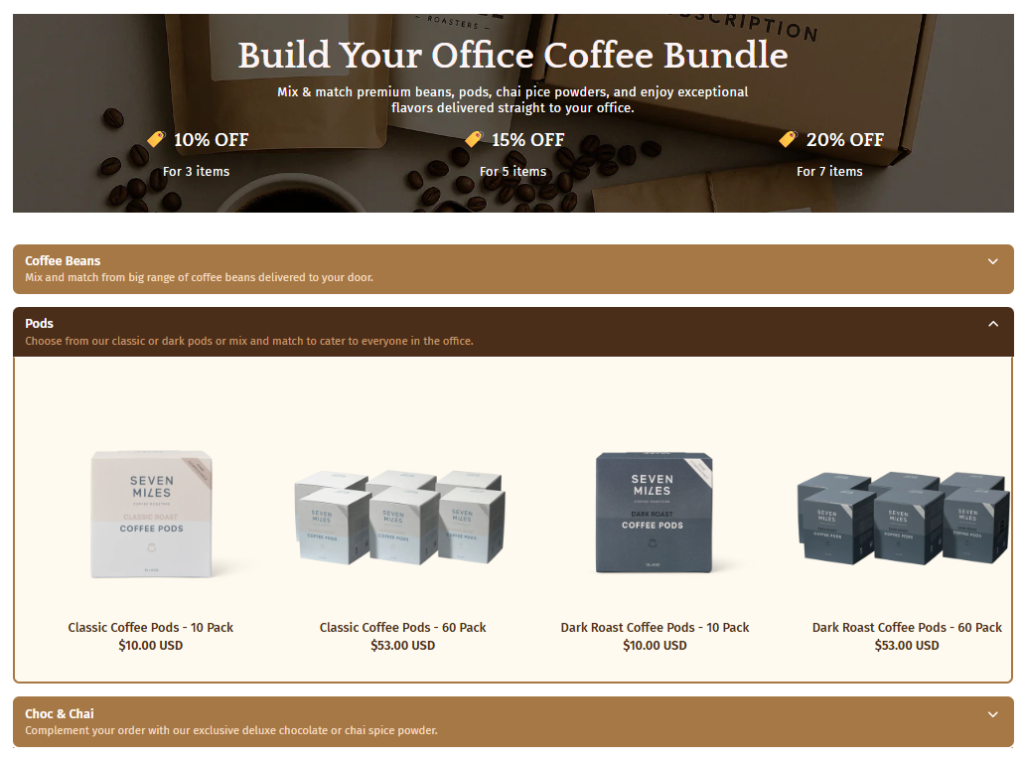
  • Coffee bundle: Coffee merchants can use Product List: Accordion to organize products by type (Coffee beans, Coffee pods, Specialty blends)

2. How To Add Accordion Element #

  • Step 1: Click the “Add section” button
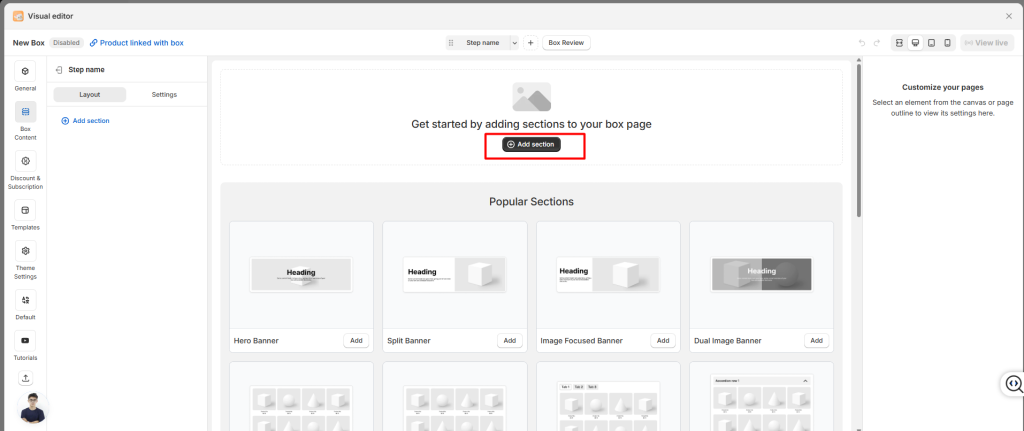
  • Step 2: Choose the Accordion element or Product List: Accordion section
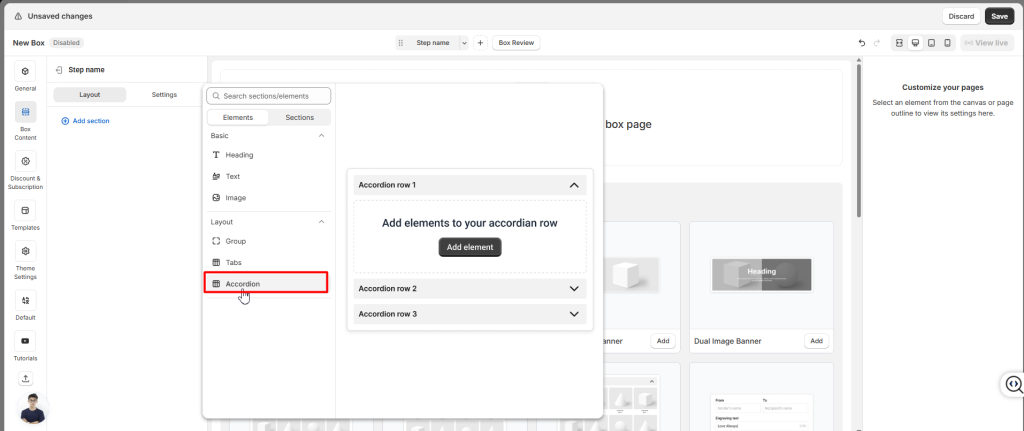
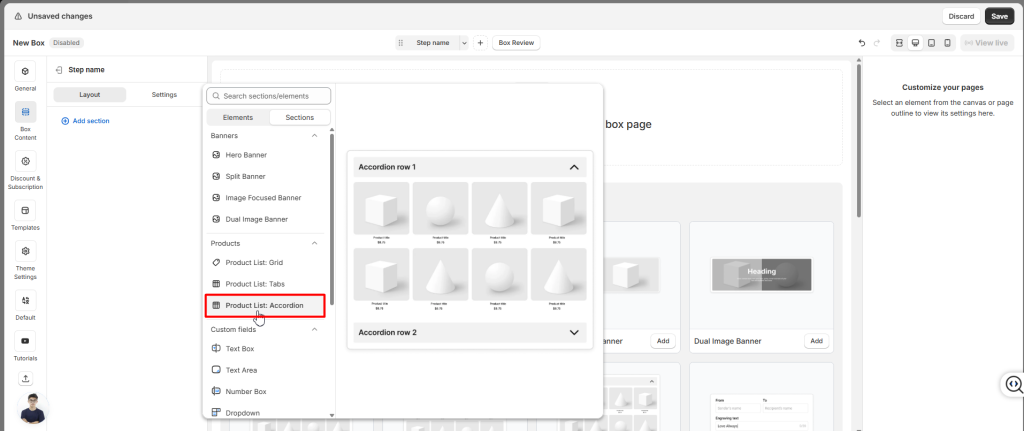
  • Step 3: Add content inside each accordion (e.g., product lists, images, text).

You can configure the Accordion Element’s settings and appearance using the options in General and Styling.

2. General Settings #

In the General tab, you’ll find options that control how the accordion behaves:

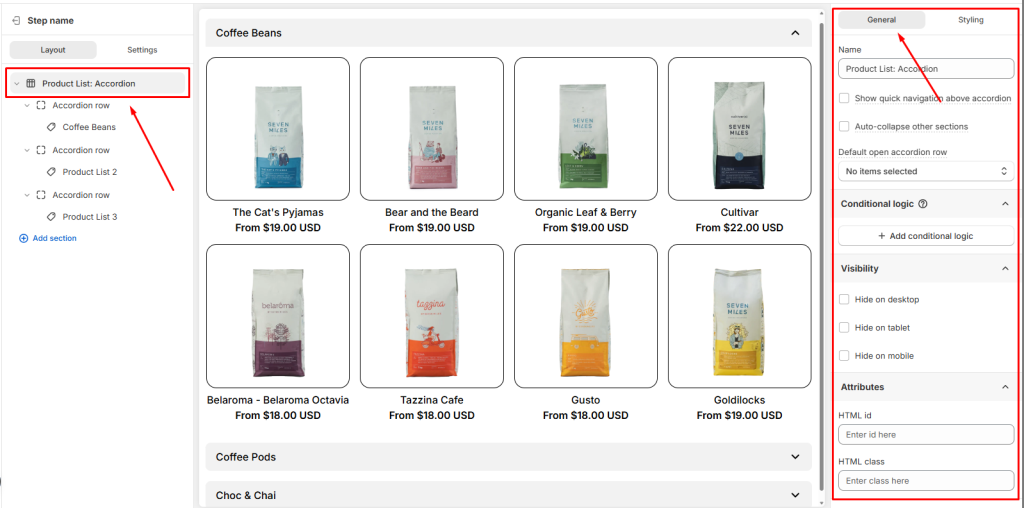
  • Show quick navigation above accordion: Show a row of buttons above the accordion. When customers click a button, the page automatically scrolls to that section below.
  • Auto-collapse other sections: Automatically collapse other accordion sections when one is expanded, keeping only one section open at a time.
  • Default open accordion row: Pick which section should be open by default when the page loads
  • Conditional Logic: Add rules to show or hide the Accordion based on customer choices. 
  • Visibility: You can hide Accordion on Desktop, Tablet, or Mobile
  • Attributes: Add custom identifiers for advanced styling or tracking

3. Styling Settings #

Want to make your accordion match your store’s look? Head to the Styling tab.

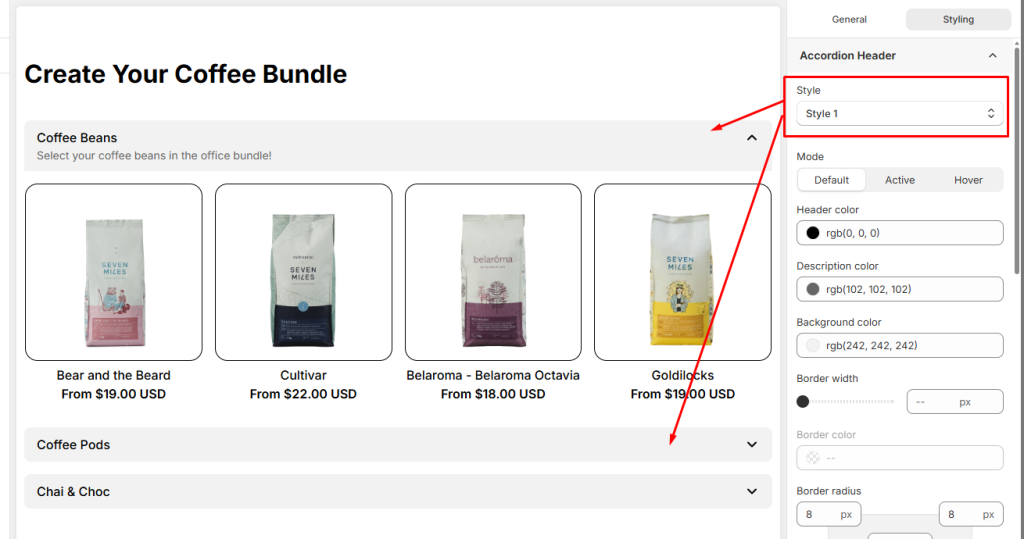
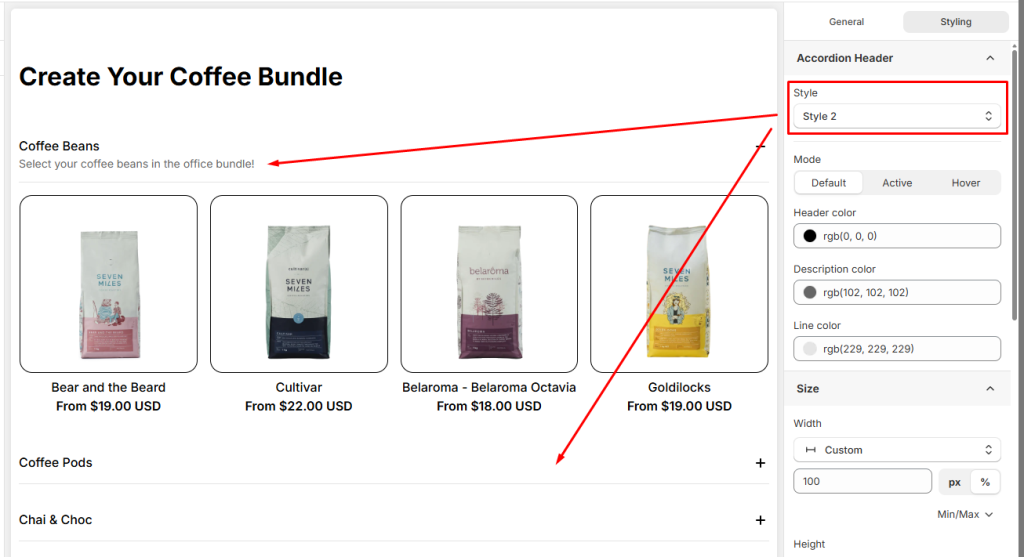
For Accordion Header Styling, customize the appearance of your accordion headers by styling their two different states.

  • Style 1
  • Style 2
  • Advanced Design Controls: You can further customize the design using a wide range of options for Size, Spacing, Background, Border, Effects, or custom CSS to ensure the Accordion element fits your page’s design perfectly.
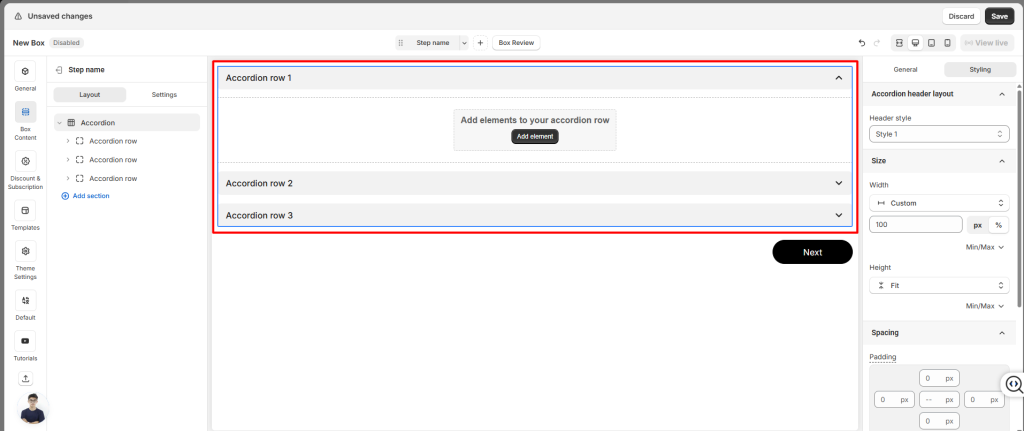
4. Accordion Row #

When you use the Accordion layout, the Product List is divided into multiple Accordion Row. Each row is essentially a smaller section inside the overall Product List. This means every row has its own settings and can be customized independently.

To edit one, select the row from Box Content.

General Settings for Accordion Row #

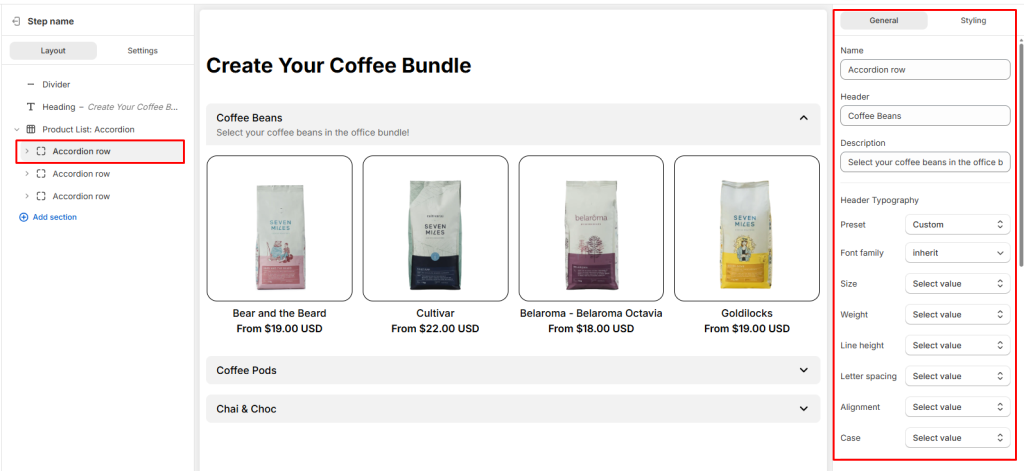
  • Name: The internal ID of the row
  • Header text: The label shown to customers on your storefront.
  • Description: The main content that appears directly below the header.
  • Header Typography: Where you can customize the header text styles.
  • Description Typography: Where you can customize the description text styles.
  • Conditional Logic: Add rules to show or hide the Accordion row based on customer choices. 
  • Visibility: You can hide Accordion row Desktop, Tablet, or Mobile
  • Attributes: Add custom identifiers for advanced styling or tracking

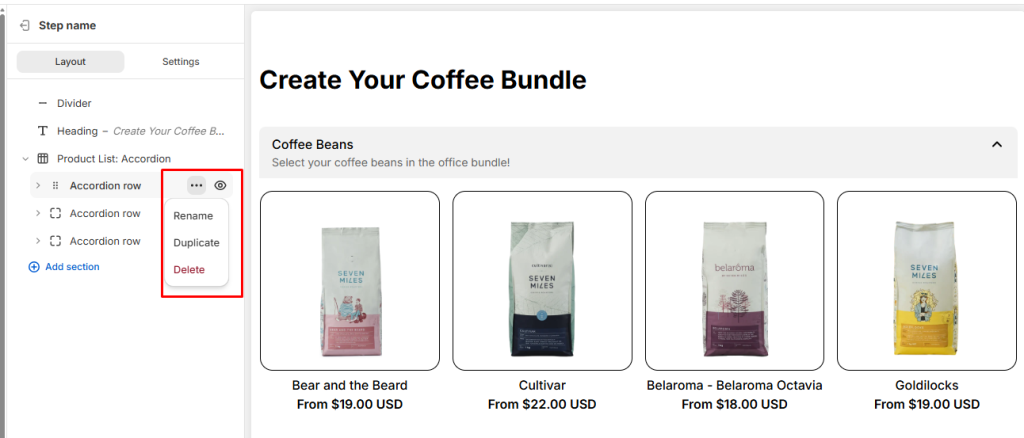
You can also manage rows easily: add new rows, rename, duplicate, delete, or hide them using the buttons next to each row.

Styling Settings for Accordion Row #

Each Accordion Row can also be styled individually, so you can adjust layout, spacing, borders, or apply custom CSS to match your storefront design.

  • Layout: When you add multiple elements inside a Accordion Row (for example: a heading, description, and product list), the Layout settings let you control how those elements are arranged. You can adjust direction (vertical or horizontal), alignment, position, and gap to create a clean and organized design.
  • Size: Define the width and height of the tab content
  • Spacing: Adjust padding (inside spacing) and margin (outside spacing) to create balanced layouts.
  • Color: Set the content color to match your storefront design.
  • Background Color: Choose the background color for the tab content.
  • Border: Customize the border style and border radius
  • Effects: Apply opacity (transparency) and shadow.
  • Custom CSS: Insert your own CSS rules for advanced styling and precise design control.

Product List in Accordion Row #

When you add a Product List inside a Accordion Row, it’s important to understand that at its core, this is still a Product List: Grid. The Accordion layout simply organizes multiple product lists into separate sections, but each tab’s product list is powered by the same structure and settings.

👉 Learn more about Product List: Grid

💬 Need Help? #

If you run into any issues or have questions, feel free to reach out via our in-app 24/7 live chat. We’re always here to help!

Table of Contents
  • 1. Common Use Cases
  • 2. How To Add Accordion Element
  • 2. General Settings
  • 3. Styling Settings
  • 4. Accordion Row
    • General Settings for Accordion Row
    • Styling Settings for Accordion Row
    • Product List in Accordion Row
  • 💬 Need Help?
Essentials Logo

Make the Complex Simple for Shopify Stores

Our AppsHelp CenterPartner ProgramPrivacy PolicyTerms of ServiceBlogContact Us

Copyright © 2025 Easify. All rights reserved.

Close
Search

Hit enter to search or ESC to close

cookie By using this website, you agree to our cookie policy. Close