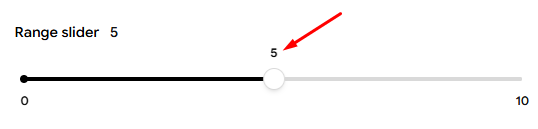
A range slider allows customers to easily select a value within a defined range instead of typing or scrolling through long lists in your product page. This makes it a fast, interactive, and intuitive way to choose product options on both desktop and mobile.
This option type is available on the Pro & Premium plan.
It’s important to note that this option type pertains to the quantity of the specific option chosen, distinct from the main product quantity. If you opt to utilize the Range slider option type to replace the default Shopify quantity selector, you will have to hide the quantity selector in your product template.
Common Use Cases #
The Range Slider is ideal for products or services that are sold or priced based on measurement units rather than fixed quantities.
📌Products sold by measurement: Items priced by weight, length, width, or volume (lbs, kg, meters, liters, ounces, etc.).
Example 1: Selling fabric in ½ yard increments.

Example 2: Selling fresh beef by kg.
- If customers buy less than 2kg, price per unit is $5
- If customers buy from 2kg, price per unit is $4.5

Option Settings #
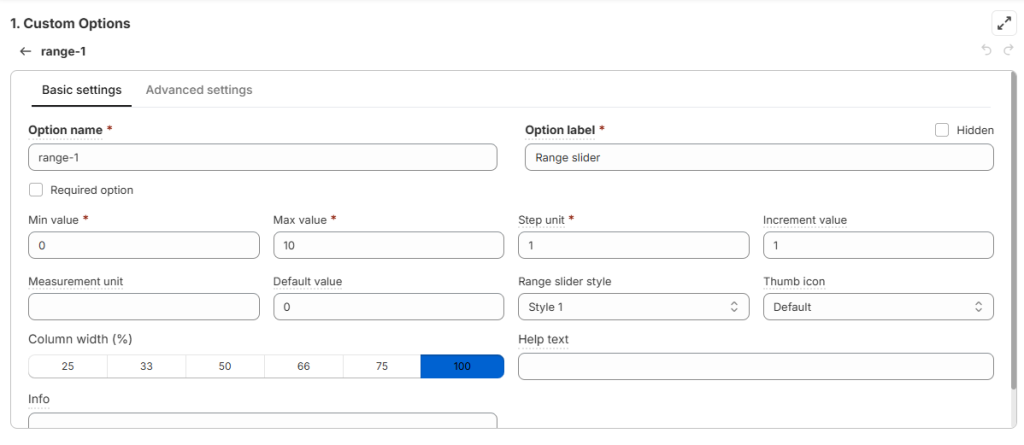
Basic Settings #
These are the everyday controls that shape how your slider works. You’ll decide the minimum and maximum values, the step size, and what unit of measurement to show… all the general settings here.
| Settings | What it means | Example |
| Option name | Give your Range slider option a unique internal ID, which will also be visible to your customers. | – |
| Option label | Add a label that is visible to your customers such as “Range slider”. Option labels can be the same or different for various options in the option set. | – |
| Min value & Max value | Sets the lowest and highest numbers customers can pick from the range slider | Min = 1, Max = 100 → customers can only choose between 1 and 100. |
| Step unit | Controls how the slider moves visually. It decides the smallest jump the slider can show. | Step = 0.5 → slider moves from 0.5, 1.0, 1.5, 2.0… |
| Increment value | Controls what customers can actually buy. It sets the purchase unit. | Increment = 2 → customers can only buy 2, 4, 6, etc. |
| Measurement unit | Shows the unit next to the number. | “kg”, “m”, “oz”, “lbs” |
| Default value | The starting number when the product page loads. | Default = 10 → slider stays at 10 when the page loads. |
| Range slider style | Lets you pick the look of the slider. | – |
| Thumb icon | The “handle” customers drag on the slider. You can choose the Default or Custom (upload PNG, SVG, JPG/JPEG) thumb. | – |
| Column width | Controls how wide the option appears on your product page. | – |
| Help text | Extra info shown below the slider. | – |
| Info | A small tooltip that appears when customers hover over the option label. | – |
Advanced Settings #
This section gives you extra tools to make the range slider more flexible and tailored to your store. If you want to go beyond the basics and really customize how the slider looks and behaves, this is where you’ll find those options
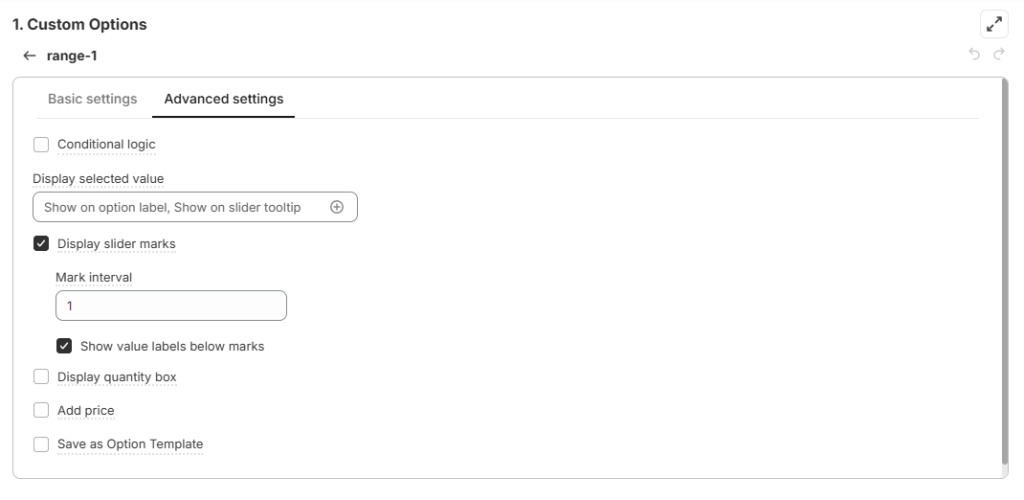
- Conditional logic: Determine the visibility of the Range slider, ensuring it appears only when specific custom options or Shopify variants are selected. To set up the condition logic for your Range slider, follow this guide.
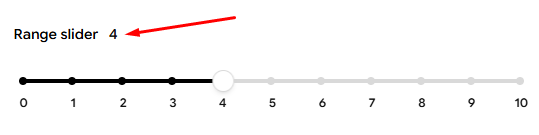
- Display selected value: When customers move the slider, you can choose where their chosen number appears.
Show on option label: The selected value appears right next to the option label
Show on slider tooltip: The selected value appears in a small popup above the slider thumb while the customer is sliding.
Show on slider track: The selected value appears directly on the track itself. Even when customers is not sliding the thumb the track, this selected is also shown.
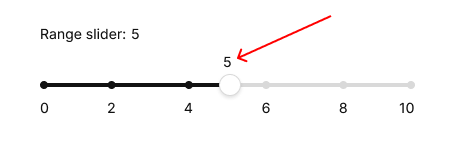
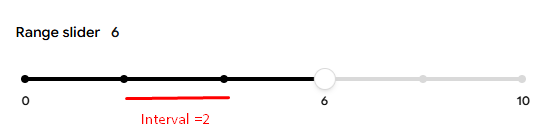
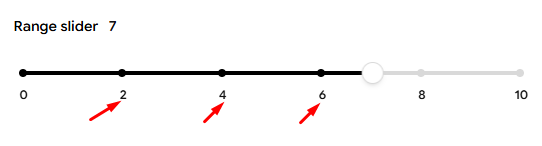
- Display slider marks: Control small “ticks” appear along the slider bar, showing fixed points within the range that customers can use as visual guides.
Mark interval: Decides how often marks appear on the slider.
Show value labels below marks: Shows the actual numbers under each mark.
- Display quantity box: A small input box appears next to the slider, allowing customers to type in the exact number they want instead of dragging the slider.

Add price for Range slider #
The Add Price setting controls how extra costs are calculated when customers move the range slider. The rage slider automatically updates the product’s cost based on the quantity selected, using either single‑rate pricing (same price per unit) or tiered pricing (different prices depending on quantity ranges).
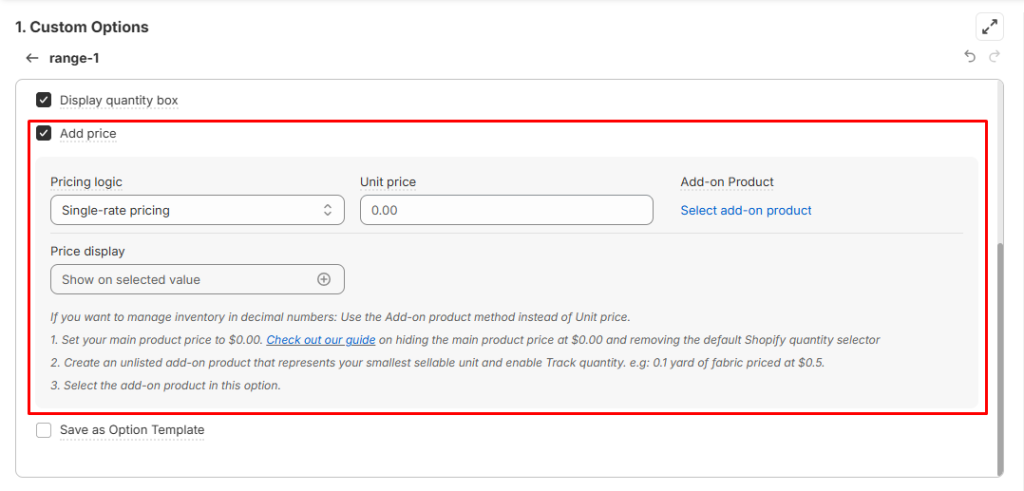
1. Pricing Logic #
Easify gives you two simple pricing options that cover most selling situations.
| Pricing logic | What it means | Example |
| Single‑rate Pricing | The unit price stays the same no matter how much the customer buys. | Price per 1 yard of fabric = $10. Customer selects 2 yards → Addon price is $20 |
| Tiered Pricing | The unit price changes depending on how much the customer buys. | Tier setup: 1–5 yards = $10 each, 6–10 yards = $8 each. Customer selects 8 yards → Addon price is $64. |
2. Pricing Formula #
The pricing formula for the range slider works a bit differently from other option types.
Because the slider uses a step unit (like 0.1m, 0.5 yard, or 1kg), the customer’s selection first needs to be converted into the number of steps. Then the app multiplies those steps by the unit price to get the total.
Total price of option = Unit price × (Selected quantity ÷ Step Unit)
What this means:
- Unit price = the price you set for one unit (like $10 per 1 yard).
- Selected quantity = how much the customer chooses on the slider.
- Step unit = the smallest unit the slider moves (like 1 yard or 0.1 meter).
❔Example 1: For merchant selling whole units
- Unit price = $10 per yard
- Step unit = 1 yard
- Customer selects 2 yards
- Price calculation: $10 × (2 ÷ 1) = $20
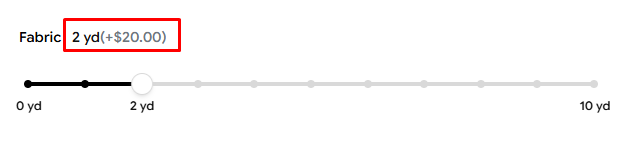
👉 The customer pays $20 because each yard costs $10, and they bought 2 yards
❔Example 2: For merchant selling decimal units
- Unit price = $10 per half yard
- Step unit = 0.5 yard (you allow customers to buy half yards))
- Customer selects 1.5 yards
- Price calculation: $10 × (1.5 ÷ 0.5) = $30
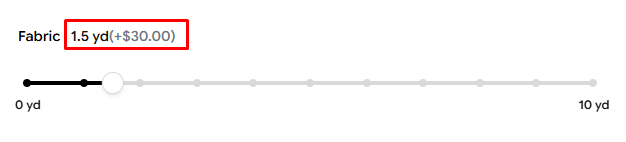
👉 The customer pays $30 because 1.5 yards equals 3 half‑yard, and each half yard costs $10.
3. Addon price VS Addon products #
Addon price #
The Add‑on Price option simply adds the cost directly into the slider. It does not connect to any real product in Shopify, so inventory is not tracked.
You can just input in the Unit price field here to enable it.

Use this when you don’t need to manage stock levels and only care about the price added in cart.
Works smoothly with both whole units (like 1kg, 2kg) and decimal units (like 0.5 yard, 1.2 meters).
Addon products #
The Add‑on Product option connects the slider to a real Shopify product. The slider’s unit price is taken directly from that product, and Shopify automatically deducts inventory when customers buy.

Use this when you need to manage stock levels.
Special Case – Tracking inventory with decimals #
If you want to manage inventory in decimal numbers: Use the Add-on product method instead of Unit price.
This setup requires creating both a Virtual Product and an Add‑on Product.
Step 1. Create a Virtual Product
- In Shopify Admin, create a new product with its price set to $0.00.
- Check out our guide on hiding the main product price at $0.00 and removing the default Shopify quantity selector.
- This product acts as a “cover” on your storefront — it’s what customers see, but it doesn’t manage price or inventory.
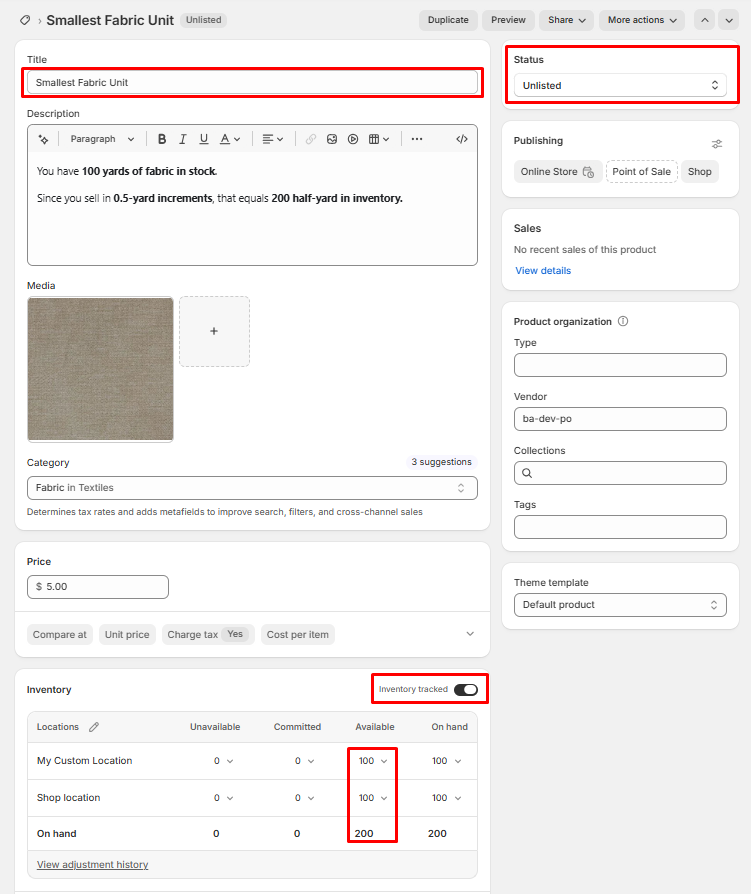
Step 2. Create the Add-on Product
- Create an unlisted product that represents your smallest unit (e.g., 0.5 yard, 0.1 meter).
- Enable Track quantity for this product and enter the available inventory for it.
- The range slider converts the customer’s decimal selection into multiples of this smallest unit, deducts inventory, and calculates the correct price
Example: You have 100 yards of fabric in stock. Since you sell in 0.5‑yard increments, that equals 200 half‑yard in Shopify inventory.
Step 3. Assign the Virtual products in your Option set.
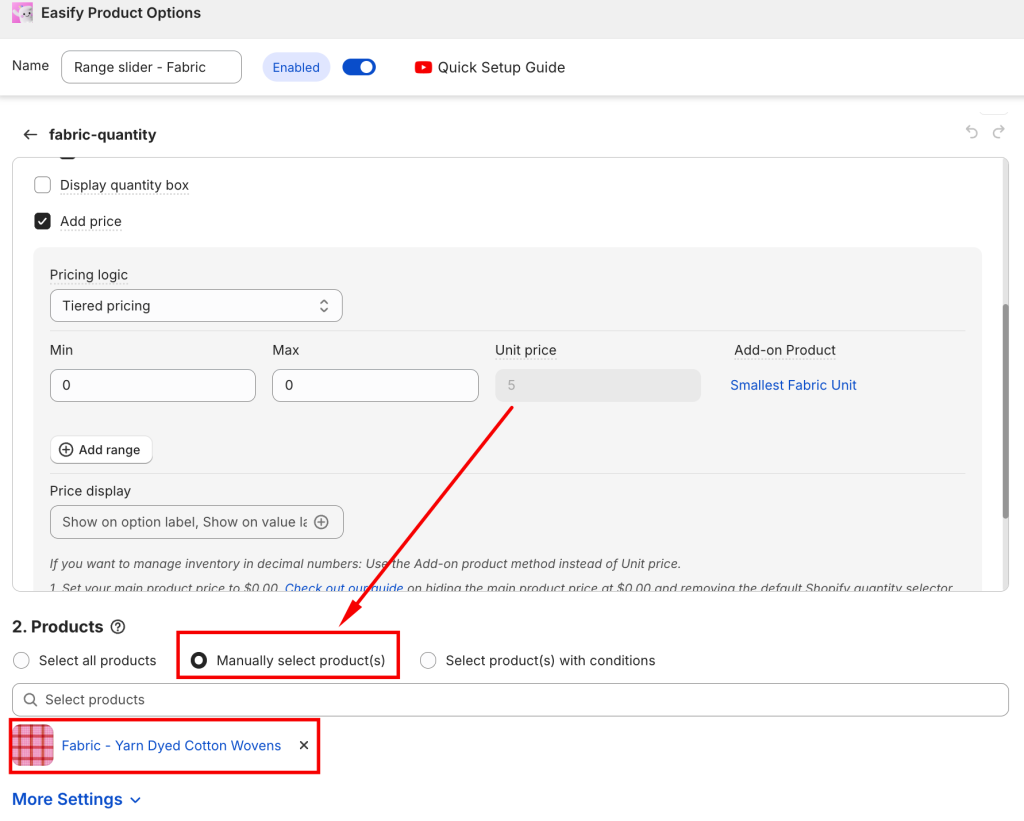
Step 4. Assign the Add-on Product
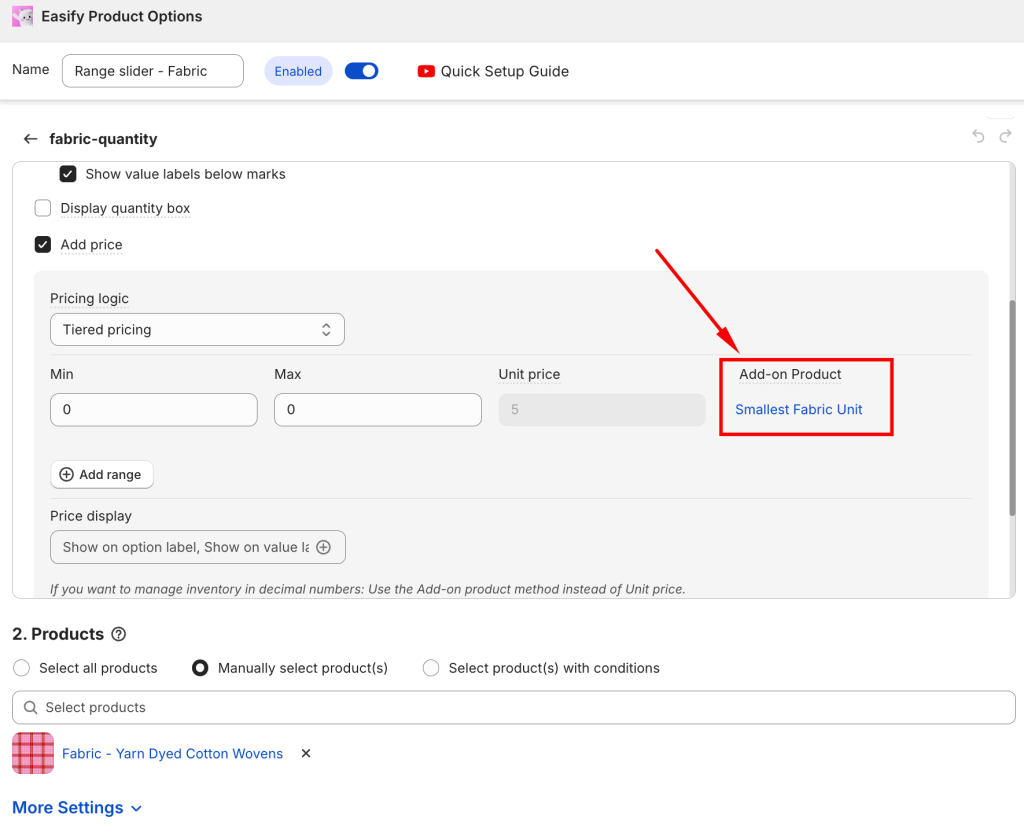
Step 5. Test your option
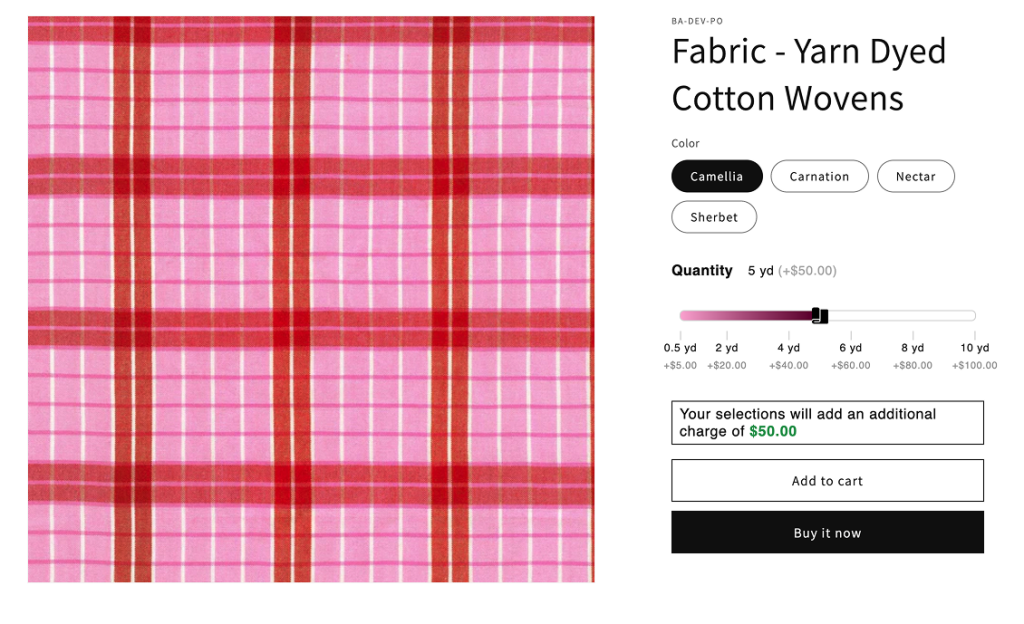
Let’s say a customer buys 5.5 yards of fabric using the range slider.
- You’ve set up your Virtual Product (price $0.00, no inventory) as the storefront cover.
- You’ve created an Add‑on Product for the smallest unit: Fabric (0.5 yard) priced at $5 per half yard, with inventory set to 200 (because 100 yards = 200 half‑yards).
In Shopify Admin:
- The slider selection of 5.5 yards will be converted into 11 half‑yard units of the Add‑on Product.
- The order shows the Virtual Product as the item purchased.
- Behind the scenes, Easify deducts 11 units from the Fabric (0.5 yard) Add‑on Product’s inventory.
- The total price is calculated as 11 × $5 = $55.
Need Assistance? #
If you run into any challenges while configuring your custom options, feel free to reach out to us for assistance through our convenient in-app live chat, by submitting your request via our contact form, or by sending an email to support@tigren.com. We’re here to help!