Easify Product Options allows you to add unlimited custom product options to your Shopify store, providing flexible choices such as swatches, text fields, and personalized uploads. By integrating with EComposer Landing Page Builder, a powerful drag-and-drop tool for creating stunning layouts without coding, you can easily place these custom options into any high-converting page design.
This combination pairs Easify’s functional variety with EComposer’s design flexibility to create a professional and seamless shopping journey. This guide will show you how to set up this integration and display your custom options perfectly, so let’s dive in!
Requirements #
Before you begin, ensure you have both the Easify Product Options and EComposer Landing Page Builder apps installed and activated in your Shopify theme.
You will need to configure your option sets in Easify Product Options and create your product pages or landing pages in EComposer. Once you have set them up separately, follow this guide to quickly add the Easify options widget to your EComposer product templates.
How to add Easify Product Options to Ecomposer Templates #
Step 1: Create Your Product Page Templates with Ecomposer #
Start by setting up your product page template within EComposer. You can choose from various layouts to match your brand’s style. For detailed instructions on building and customizing your product pages with EComposer, click here.
Once your layout is ready, you can move on to adding the Easify options widget.
Tip: You can place the Easify widget in your design now and set up your custom options later in the Easify app, or vice versa – whichever fits your workflow best.
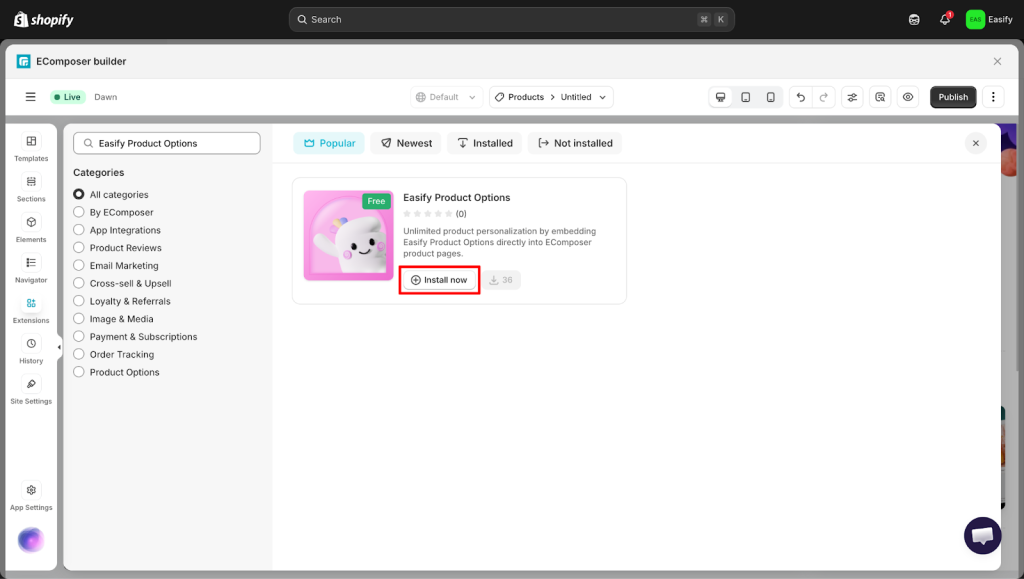
Step 2: Locate the Easify Product Options Widget in EComposer #
To add Easify Product Options to your design, you first need to find it in the EComposer extension library. From the left sidebar of the editor, navigate to the Extensions tab and click on the Add Extension button.
A popup will appear, where you can search for Easify Product Options. Once you find it, simply click the Install Now button to add the widget to your available elements.
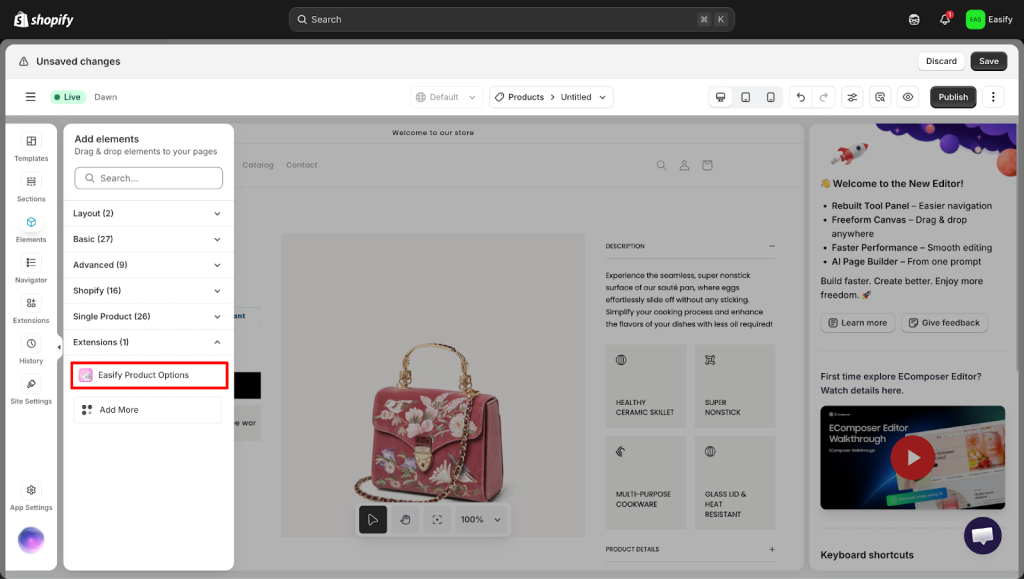
Step 3: Drag and Drop the Easify Widget onto Your Product Page #
Now that you have installed the extension, you can place it exactly where you want it to appear. Go to the Elements tab on the left sidebar, select Extensions, and simply drag the Easify Product Options widget into your layout.
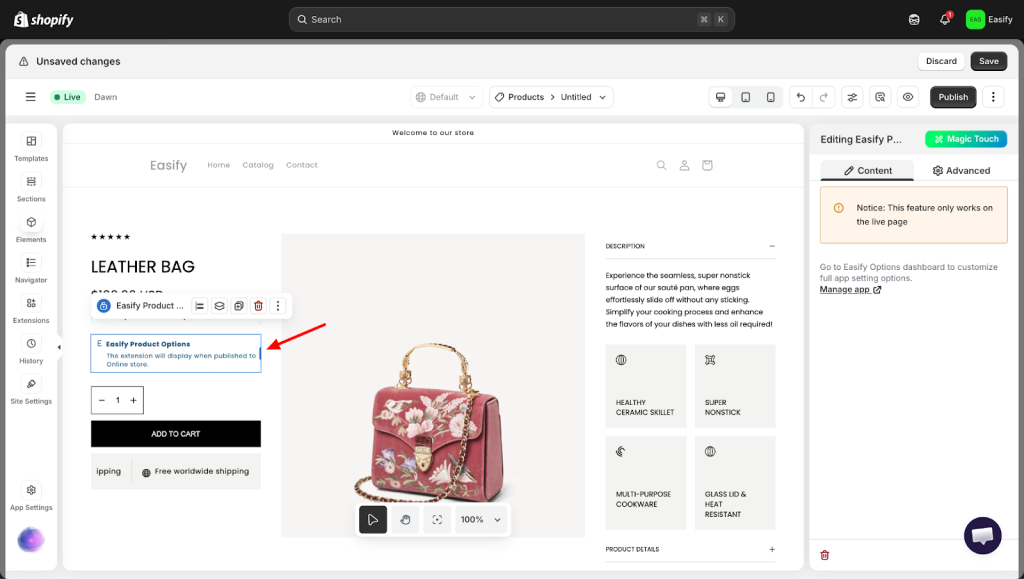
Most merchants prefer these common placements:
- Under the product price
- Below the default Shopify variants
- Under the Quantity Selector.
Step 4: Final Check #
The most important final check is to confirm that your layout includes a functional Add to Cart button. For the Easify options to appear and function correctly on your page, an Add to Cart element must be present in the design.
If you are using a EComposer template that lacks this button, or if it has been removed, your custom options will not load. Please make sure to drag an Add to Cart element into your layout. This is typically positioned right below your custom options to ensure everything displays and works perfectly.
Once you have confirmed the button is in place, click Save and Publish to see your live results.
Important Notes #
- Easify Product Options extension only works on the live page. You may not see the functional options directly inside the EComposer editor preview.
- Use the EComposer editor to adjust your page layout. To manage or change the actual product options and rules, use the Easify Product Options app.
- If you use different templates for different products, you will need to add the Easify widget to each one individually.
Need Assistance? #
If you run into any challenges while following this guide, please feel free to reach out to us for assistance through our convenient in-app live chat.
Our dedicated support team is available 24/7 to help you troubleshoot any issues or answer any questions you may have. We want to ensure your setup process is as smooth as possible, so please do not hesitate to contact us at any time.