EasifyApps
  • About
  • Apps
    Easify Product Options
    Easify Product Attachments
  • Resources
    Help Center
    Easify Product Options
    Easify Box Builder
    Easify Inventory Sync
    Easify Product Attachments
    Video Tutorials
    Easify Product Options
    Easify Product Attachments
  • Partners
  • Blog
  • Contact
All Easify Apps
EasifyApps
  • About
  • Apps
    Easify Product Options
    Easify Product Attachments
  • Resources
    Help Center
    Easify Product Options
    Easify Box Builder
    Easify Inventory Sync
    Easify Product Attachments
    Video Tutorials
    Easify Product Options
    Easify Product Attachments
  • Partners
  • Blog
  • Contact

Easify Product Options App

Getting Started
    Key Terminology Simplified
    • Custom options & variants
    • Option set
    • Option set templates
    • Option type (Option input)
    • Your option sets
    • Option label
    • Option name
    • Option value
    • Option group
    • Conditional logic
    • Live preview
    • Help text
    • Placeholder
    • Information (Tooltip)
    • Option widget
    Option Input Types
    • Design Layer
    • Text Box
    • Text Area
    • Number Text Box
    • Color Swatches
    • Image Swatches
    • Radio Buttons
    • Dropdown
    • Checkbox
    • Button(s)
    • Switch/ Toggle
    • Modal (Popup)
    • File Upload
    • Option Group
    • Product List
    • Date Range
    • Date Picker
    • Time Picker
    • Font Picker
    • Color Picker
    • Dimension
    • Quantity
    • Custom HTML
    • Heading
    • Paragraph
    • Spacer
    • Divider
    App Activation
    • Activate the app on your theme
User Guide (PO)
    Set Up Option Sets
    • Create A New Option Set From Scratch
    • Use Ready-made Templates To Create Your Option Set
    Conditional Logic
    • What is Conditional Logic (CL)?
    • Standard Conditional Logic – Among Easify Options
    • Advanced Conditional Logic – Show Easify Options Based On Shopify Variants
    Extra Pricing (Add Charges)
    • Set Up Extra Fees (Version 3 – From July 24, 2025)
    • Set Up Extra Fees (Version 2 – July 18, 2024 – July 23, 2025)
    • Add-on Prices vs. Add-on Products (Version 1 – Before July 18, 2024)
    • Set Up Add-on Prices (Version 1 – Before July 18, 2024)
    • Set Up Add-on Products (Version 1 – Before July 18, 2024)
    • Convert Add-on Prices To Add-on Products (Version 1 – Before July 18, 2024)
    • Hide Specific Products from Shopify Storefront while Keeping Them Buyable
    Option URL
    • What is Option URL?
    • Establish Cross-Product Links
    • Include Option Detail Links For Add-on Products/Custom Options
    Option Design
    • Customize Option Styles
    • Distinct Option Styles for Light & Dark Themes
    • Modern and Classic Option Styles
    App Settings
    • General Settings
    • App Translation
    Tiered Wholesale Pricing
    • What is Tiered Wholesale Pricing?
    • Set Up Tiered Wholesale Pricing
    • Customize Tiered Wholesale Pricing Table
    Option Import/Export
      Option Export
      • Export All Option Sets
      • Export Specific Option Sets
    • Option Import
  • Track Real-time Analytics
  • Set Up One-time Charge
  • Set Up Badges for Option Values
  • Set Up Quantity Selector Per Option Value
  • Add Option Value Descriptions & Tooltips
  • Enable Image Editor for File Upload
  • Show Image/ Color Swatch Slider
  • View & Export Orders With Easify Options
  • Hide Main Product Price & Shopify Quantity Selector
  • Display Option Set In Popup Triggered By Button Click
  • Switch Product Images Upon Option Selection
  • Set Up Option/ Option Set Templates
  • Translate Option Set Into Multiple Languages
  • Separate or Combine Add-ons with Main Product in Cart
  • Reposition Option Set On Product Page
  • Set Up Product Bundles
  • Show Custom Options On Order Confirmation Emails (To Customers)
  • Show Custom Options On New Order Notification Emails (To Staff)
  • Show Custom Options On Packing Slips
Product Personalizer (Live Preview)
  • What Is Product Personalizer – Live Preview?
  • How It Works
  • Ready-to-use Templates with Product Personalizer
  • Upcoming Features
Subscription & Billing
  • Pricing Plans
  • How to upgrade
  • How to cancel subscription
Customization & Support
  • App Maintenance Notification
  • Get support
  • Request a new feature
Frequently Asked Questions
  • Why does the app remain “Inactive” even after activation?
  • What to do if custom options aren’t visible on product pages?
  • Why weren’t custom option prices included in my customer orders?
  • How many custom options can I create per product?
  • Does the app work with Shopify Online Store 2.0?
  • Will the app slow down my website?
  • How can I stay informed about updates for the app?
  • What happens if I uninstall the app, and how does it affect my store?
Integrations
  • Easify Product Options x GemPages Landing Page Builder

Easify Box Builder App

Getting Started
  • Pricing Plans, Trial, and Billing
  • Activate the App
  • Key Terms
Visual Editor
  • Create a New Box with the Visual Editor (Overview)
  • Create a New Box with a Template
  • Create a Box from Scratch (Without a Template)
  • Create Custom Fields/ Options
Box Types
  • Predefined Box Sizes
  • Regular Box
  • Tiered Quantity Discounts
  • Fixed Box Price
Product List
  • Product List (Overview)
  • Product List: Grid
  • Product List: Tabs
  • Product List: Accordion
  • Product List: Carousel
  • Default Selected Products
  • Hover to Show Second Image in Product List
Conditional Logic
  • Conditional Logic: Overview and Use Cases
  • Setting Up Conditional Logic
  • Conditional Logic Best Practices
Sales Boosters
  • Sales Boosters: The End of “I’ll Buy It Later”
  • Low Stock Counter
  • Sales Notifications
  • Countdown Timer
Advanced Features
  • Connect Subscription Plans to Boxes
  • Display Variants as Individual Products
  • Create Products Linked with Boxes
  • Set Up Add-on Price or Add-on Product for Custom Fields
  • Translate App Default Texts
  • Translate Box-Specific Content
Help & Support
  • Get Support
  • Frequently Asked Questions – Most Common Questions
  • FAQs – Theme Settings: Product Cards
  • FAQs – Theme Settings: Step bar, Quick Summary, Quick View
  • FAQs – Theme Settings: Quantity selector, Box Review Page
More Features
  • Use Cart Transform or List Items Separately at Checkout
  • Show Custom Options On Order Confirmation Emails (To Customers)
  • Show Custom Options On New Order Notification Emails (To Staff)

Easify Inventory Sync App

  • Welcome to Easify Inventory Sync
Multi-store Sync
    Getting Started
    • Overview and Key Terminology
    Sync Setup & Management
    • How to Connect Source and Destination Stores
    • Understand Connection & Sync Statuses
    • How to Track Sync Activity
    • Disconnect or Delete Connection
    Data Sync Types
    • Product Sync
    • Inventory and Order Sync
    • Page, Blog and Blog post Sync
    Subscription & Billing
    • Pricing Plans
Single-store Sync
    Getting Started
    • Quick Start Guide
    • Frequently Asked Questions
    • Roadmap Spotlight – A Sneak Peek Into The Future
    • Get Support
    Inventory Groups
    • Create Inventory Groups Automatically by SKUs
    • Create Inventory Groups Manually
    • Events Triggering Syncs among Products in Inventory Groups
    • When do Inventory groups Fail to sync?
    • How to Set Up Common Cases
    Bundle Groups
    • Create A New Bundle Group
    • How Master product inventory is Calculated from Component product inventory (Modified Quantity)
    • Events Triggering Syncs among Products in Bundle Groups
    • When do Bundle groups Fail to sync?
    • How to Set Up Common Cases
    Inventory Thresholds
    • What is Inventory Threshold?
    • Set Up Universal Inventory Threshold
    • Create A New Inventory Threshold
    Advanced Features
    • Bulk Edit Inventory Groups
    • Import/ Export Inventory Groups
    • Import/ Export Bundle Groups
    • Export Product Variant & Location IDs
    • Bulk Duplicate Products
    Subscription & Billing
    • Pricing Plans (& FAQs)
    • How to Change Plans
    Common Scenarios & Setup Guides
    • Roast Coffee
    • Loose Leaf Tea
    • Stationery Set
    • Retail & Wholesale Items
    • Blank & Personalized Tees
    • Unisex Tees
    • Baby Gift Hamper
    • Flowers
    • Chocolate Cookies
    • 3-Pack T-Shirts (mixed sizes & colors)
    • Batteries
    • Beverage (Inventory by Cans)
    • Beverage (Inventory by Packs)
    • Multivitamins (from Single Pack)
    • Multivitamins (from Double Pack)
    • Incense Sticks (Inventory by Packs)
    • Incense Sticks (Inventory by Sticks)
    • Candle Trio Set
    • Perfume Set
    • Pick n Mix Sweets
    • Top & Skirt Set (Same Size)
    • Top & Skirt Set (Mixed Sizes)
    • 2-Pack Tops (1 Color)
    • 2-Pack Tops (1 Color) – Only in Packs
    • 2-Pack Tops (Multicolor – Fixed)
    • 2-Pack Tops (Multicolor – Optional)
    • Custom Print Shirts
    • Shoes & Free Socks

Easify Product Attachments App

App Activation
  • Activate the app on your theme
User Guide
  • Upload Product Attachments
  • Upload Attachment Icons
  • Add Attachments To Templates
  • Import Bulk Product Attachments
  • Export Product Attachments
  • Add Attachments To Collapsible Rows On Product Pages
Customization & Support
  • Get support
  • Roadmap Spotlight – A Sneak Peek Into The Future
  • Frequently Asked Questions
  • Feature Requests

Recommended Shopify Apps

  • Page builder
  • Marketing
  • Affiliate programs
  • Image gallery
  • Pricing quotes
  • Invoices and receipts
  • Others

Announcements

  • 🎊 Easify Lucky Draw 2026: Winners Announcement!
  • 🎉 Easify Lucky Draw 2026: Terms and Conditions
  • Become a VIP Founder of Easify Box Builder – Limited to the First 100 Users Only!
  • Limited Support During Lunar New Year (Jan 25th- Feb 3rd, 2025) – Your Patience Is Our Greatest Gift!
  • Go Beyond Options: Easify Product Options Premium Is Here!
  • Limited Support During Our Summer Holiday (September 27th-29th, 2025) – Your Patience Is Our Greatest Gift!
  • Easify Box Builder: New Plans, Your Box Sales Get a Power-Up

Tiered Quantity Discounts

Table of Contents
  • Common Use Cases
  • How to Create a Tiered Quantity Discounts Box
    • Step 1. Create a New Tiered Quantity Discounts Box
    • Step 2. Configure Tiered Discounts
    • Step 3. Customize content in the Visual Editor
    • Step 4. Refine the design
    • Step 5. Finalize and publish
  • Advanced Tips to Maximize Profits with Tiered Quantity Discounts
    • Highlight the Middle Tier
    • Keep Tiers Simple (3 is Optimal)
    • Show Per‑Unit Savings Clearly
  • 💬 Need Help?

Tiered Quantity Discounts let you reward customers for buying more. Instead of offering one fixed deal, you create multiple tiers: the more items they add, the bigger the savings. This model is perfect for nudging customers toward larger baskets while keeping pricing flexible.

💡 Think of it as “buy more, save more.” Customers feel in control, and you increase average order value.

Common Use Cases #

There are two styles of Tiered Quantity Discounts Box setups:

One-page box: Customers build their box on a single page — quick and straightforward.

Multi‑page box: Customers move through multiple steps — perfect for larger or more complex bundles.

Here are some other demo templates you can explore for inspiration:

One-page Templates

  • Dinnerware
  • Makeup Kit
  • Bedding Set
  • Meal Kit

Multi-page Templates

  • Dinnerware
  • Makeup Kit
  • Bedding Set

How to Create a Tiered Quantity Discounts Box #

Step 1. Create a New Tiered Quantity Discounts Box #

From the Easify Box Builder app admin, go to Box Management → Click the Create box button. Then:

  • Enter your box name.
  • Select box type: Tiered Quantity Discounts
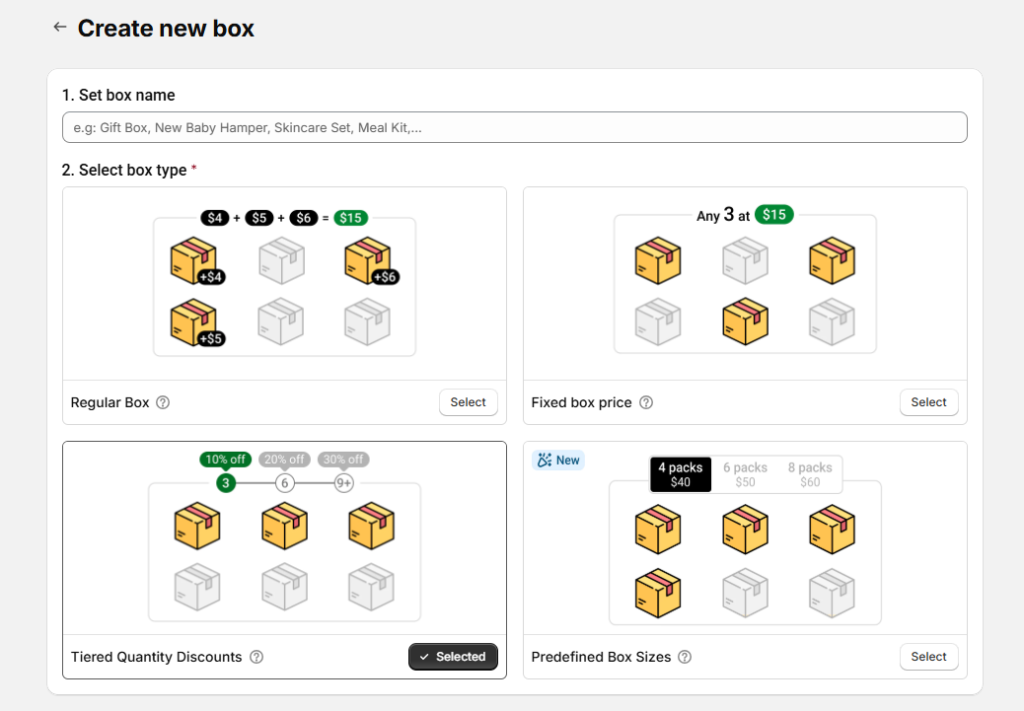
  • Template: Choose a starting point. We recommend using a template.
    • Using a Template: Easify offers nearly 30 templates, with 8 specifically designed for Fixed Box Price. This gives you a ready-made structure to customize, saving you time.
    • Starting from Scratch: Select this if you prefer to build the box entirely yourself.

After making your selections, click Start building to open the Visual Editor.

Step 2. Configure Tiered Discounts #

In the Visual Editor, open the Discounts tab.

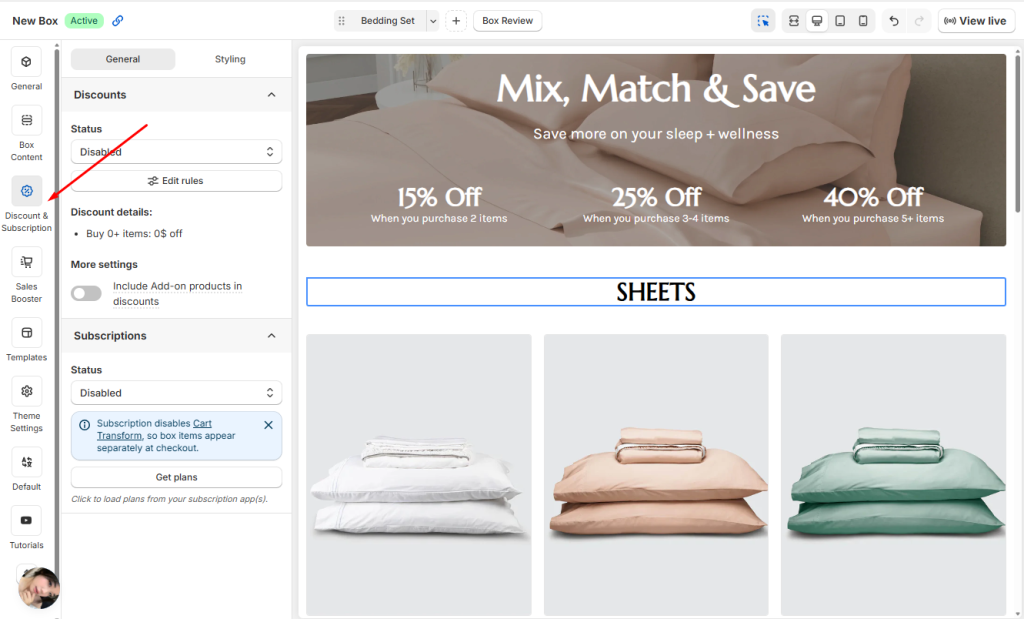
You can change the Status of the Discount from Disabled to Enabled. You can enable it right away or wait until after you’ve configured all your rules.

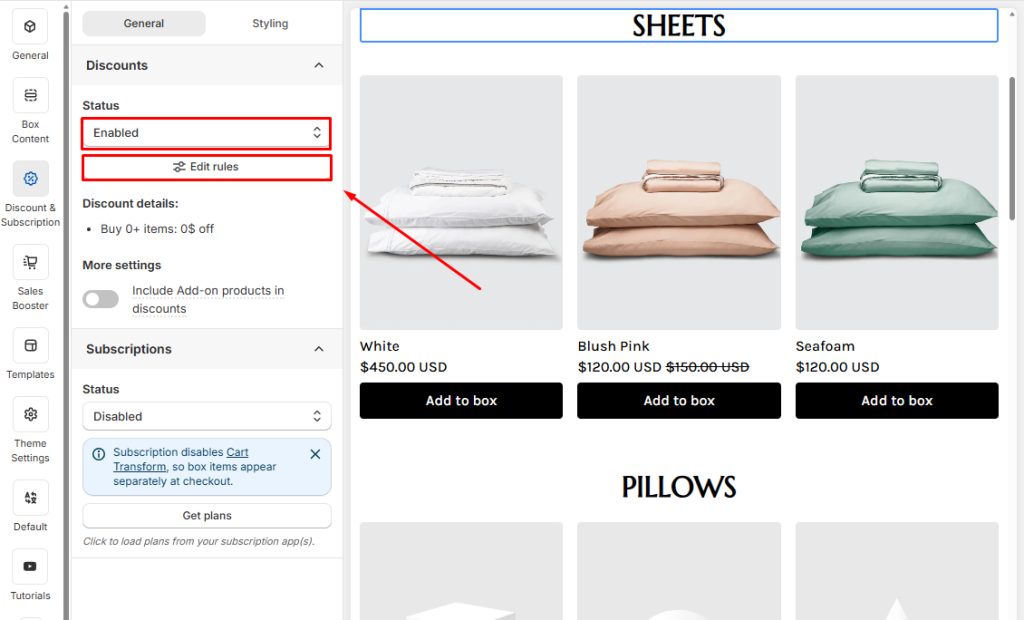
Click Edit Rules to open the discount popup.

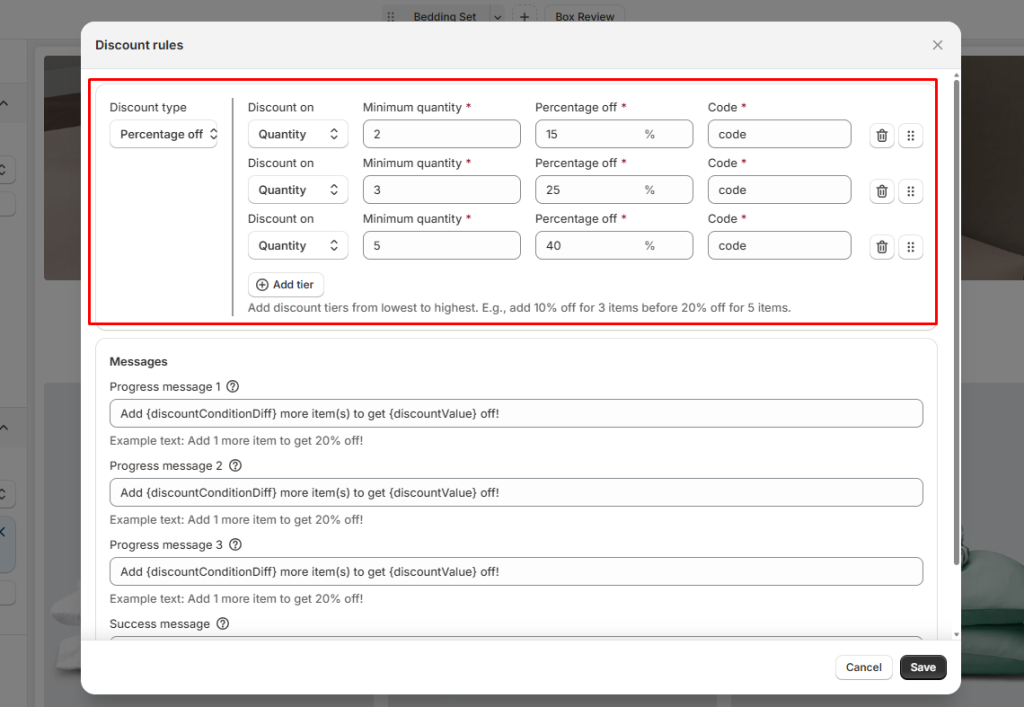
  • If you want to create multiple tiers (e.g., Buy 2 get 15% off, Buy 3 get 25% off, Buy 5 get 40% off), click Add Tier.
  • You can stack as many tiers as you need to guide customers toward larger purchases.
  • After adding your tiers, you’ll configure the details for each one individually.

Next, we’ll walk through what each field in a discount tier means so you can set them up correctly.

FieldsDescription
Discount typeThis determines how the discount is applied.
– Amount off: A flat reduction (e.g., Buy 2 get $20 off).
– Percentage off: A percentage reduction (e.g., Buy 2 get 20% off).
Discount onThis defines what triggers the discount:
– Quantity: Based on the number of products purchased in box (e.g., Buy 2 get 20% off)
– Amount: Based on the total spend in box (e.g., Spend $100 get 20% off)
Minimum quantity
/ Minimum amount
This sets the threshold customers must reach before the discount applies.
– If you selected Discount on Quantity, enter the minimum number of items.
– If you selected Discount on Amount, enter the minimum spend.
Fixed amount offAppears only if you chose Amount off
– Enter the exact discount value (e.g., $20).
– Best for promotions like “Buy 5, Save $20.”
Percentage offAppears only if you chose Percentage off
– Enter the discount percentage (e.g., 20%).
– Best for promotions like “Buy 3, Save 25%.”
CodeThis option is for merchants using the old discount flow that created separate discount codes for each box.
⚠️ This flow will be sunset soon — we don’t recommend using it for new setups.

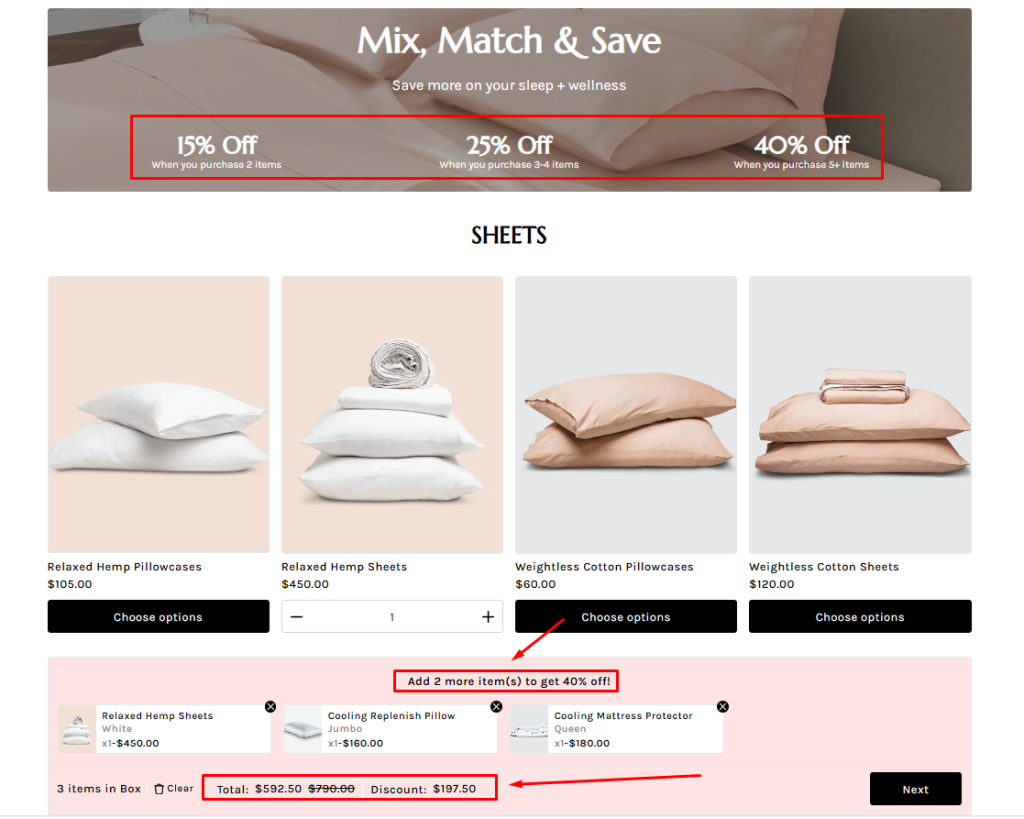
For example, you can set up tiered discounts for a Bedding Bundle like this:

  • Buy 2 get 15% off
  • Buy 3 get 25% off
  • Buy 5 get 40%

Message

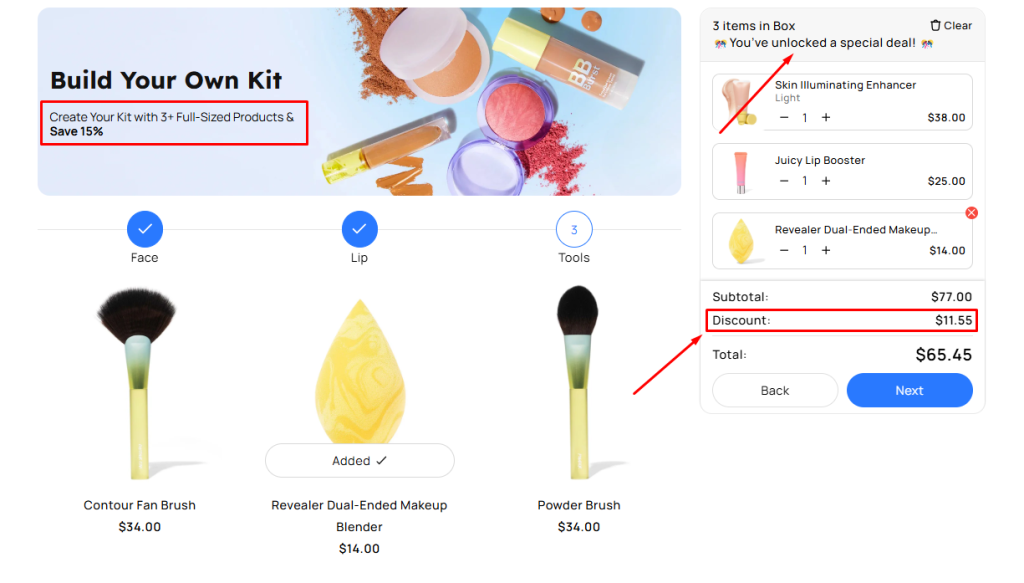
  • Progress Message: A motivational message that appears when customers need more items to qualify for the offer (e.g., “Add 3 more product(s) to unlock the deal!”).
  • Success Message: The confirmation text shown when the customer has selected the required quantity (e.g., “🎉 Fantastic! You’ve unlocked the special offer! Enjoy your savings!”).

Subscription

If you’re using a subscription app, you can combine it with Tiered Quantity Discounts Box to keep your pricing simple and consistent.

👉 Want to dive deeper? Check out our comprehensive guide to Subscriptions for step‑by‑step instructions and best practices.

Before moving on to the next step, don’t forget to click Save!

Step 3. Customize content in the Visual Editor #

From the left menu, go to Box Content to edit your page.

Add sections and elements (e.g., banners) and assign products to the box.

You can switch between Desktop, Tablet, and Mobile views and customize what appears in each. (This is not just a responsive preview — you decide the actual layout for each device)

Step 4. Refine the design #

From the left menu, go to Theme Settings to adjust page style.

Customize layout width, typography, product cards, step bar, colors, and more to match your store branding.

Step 5. Finalize and publish #

In the General tab, enable the box page.

Save and publish to your storefront.

Define the box page URL.

Add a box image (displayed on the box review page, cart, and checkout).

Advanced Tips to Maximize Profits with Tiered Quantity Discounts #

Highlight the Middle Tier #

Why: In tiered pricing, customers often avoid extremes (“too small” or “too expensive”) and settle on the middle option — a behavior known as the center‑stage effect. Positioning the mid‑tier as the “sweet spot” can drive the majority of sales.

Example: A bedding store offers:

  • Buy 2 → 15% off
  • Buy 3 → 25% off
  • Buy 5 → 40% off

👉 Most customers choose the 3‑item tier because it feels balanced in both price and value.

Keep Tiers Simple (3 is Optimal) #

Why: Too many pricing tiers can overwhelm customers and make decision‑making harder. Research shows that offering around three clear options strikes the right balance — enough variety to feel flexible, but not so many that shoppers get confused or abandon the purchase.

Example: 5‑Tier Setup (Too Complex)

  • Buy 2 → 10% off
  • Buy 3 → 15% off
  • Buy 4 → 20% off
  • Buy 5 → 25% off
  • Buy 6 → 30% off

👉 While it offers more options, customers may feel confused or indecisive. Too many tiers can cause decision fatigue, leading to slower checkout or even cart abandonment. Instead of encouraging upgrades, it risks overwhelming shoppers.

Show Per‑Unit Savings Clearly #

Why: Shoppers are highly sensitive to “price per unit.” When you make the math obvious, customers feel smarter buying more. Larger tiers become irresistible when savings reach 15–25% compared to the smallest tier.

Example:

  • Buy 2 pillows → $10 each
  • Buy 3 items → $8 each (20% savings)
  • Buy 5 items → $7 each (30% savings)

👉 Add detailed descriptions like “30% off = $7 each items” directly under the tier to make the value crystal clear.

💬 Need Help? #

Questions? Stuck somewhere?

We’re always here to help! Just reach out via our in-app live chat for 24/7 support.

Table of Contents
  • Common Use Cases
  • How to Create a Tiered Quantity Discounts Box
    • Step 1. Create a New Tiered Quantity Discounts Box
    • Step 2. Configure Tiered Discounts
    • Step 3. Customize content in the Visual Editor
    • Step 4. Refine the design
    • Step 5. Finalize and publish
  • Advanced Tips to Maximize Profits with Tiered Quantity Discounts
    • Highlight the Middle Tier
    • Keep Tiers Simple (3 is Optimal)
    • Show Per‑Unit Savings Clearly
  • 💬 Need Help?
Essentials Logo

Make the Complex Simple for Shopify Stores

Our AppsHelp CenterPartner ProgramPrivacy PolicyTerms of ServiceBlogContact Us

Copyright © 2025 Easify. All rights reserved.

Close
Search

Hit enter to search or ESC to close

cookie By using this website, you agree to our cookie policy. Close