EasifyApps
  • About
  • Apps
    Easify Product Options
    Easify Product Attachments
  • Resources
    Help Center
    Easify Product Options
    Easify Product Attachments
    Video Tutorials
    Easify Product Options
    Easify Product Attachments
  • Partners
  • Blog
  • Contact
All Easify Apps
EasifyApps
  • About
  • Apps
    Easify Product Options
    Easify Product Attachments
  • Resources
    Help Center
    Easify Product Options
    Easify Product Attachments
    Video Tutorials
    Easify Product Options
    Easify Product Attachments
  • Partners
  • Blog
  • Contact

Easify Product Options App

Getting Started
    Key Terminology Simplified
    • Custom options & variants
    • Option set
    • Option set templates
    • Option type (Option input)
    • Your option sets
    • Option label
    • Option name
    • Option value
    • Option group
    • Conditional logic
    • Live preview
    • Help text
    • Placeholder
    • Information (Tooltip)
    • Option widget
    Option Input Types
    • Design Layer
    • Text Box
    • Text Area
    • Number Text Box
    • Color Swatches
    • Image Swatches
    • Radio Buttons
    • Dropdown
    • Checkbox
    • Button(s)
    • Switch/ Toggle
    • Modal (Popup)
    • File Upload
    • Option Group
    • Product List
    • Date Range
    • Date Picker
    • Time Picker
    • Font Picker
    • Color Picker
    • Dimension
    • Quantity
    • Custom HTML
    • Heading
    • Paragraph
    • Spacer
    • Divider
    App Activation
    • Activate the app on your theme
User Guide (PO)
    Set Up Option Sets
    • Create A New Option Set From Scratch
    • Use Ready-made Templates To Create Your Option Set
    Conditional Logic
    • What is Conditional Logic (CL)?
    • Standard Conditional Logic – Among Easify Options
    • Advanced Conditional Logic – Show Easify Options Based On Shopify Variants
    Extra Pricing (Add Charges)
    • Set Up Extra Fees (Version 3 – From July 24, 2025)
    • Set Up Extra Fees (Version 2 – July 18, 2024 – July 23, 2025)
    • Add-on Prices vs. Add-on Products (Version 1 – Before July 18, 2024)
    • Set Up Add-on Prices (Version 1 – Before July 18, 2024)
    • Set Up Add-on Products (Version 1 – Before July 18, 2024)
    • Convert Add-on Prices To Add-on Products (Version 1 – Before July 18, 2024)
    • Hide Specific Products from Shopify Storefront while Keeping Them Buyable
    Option URL
    • What is Option URL?
    • Establish Cross-Product Links
    • Include Option Detail Links For Add-on Products/Custom Options
    Option Design
    • Customize Option Styles
    • Distinct Option Styles for Light & Dark Themes
    • Modern and Classic Option Styles
    App Settings
    • General Settings
    • App Translation
    Tiered Wholesale Pricing
    • What is Tiered Wholesale Pricing?
    • Set Up Tiered Wholesale Pricing
    • Customize Tiered Wholesale Pricing Table
    Option Import/Export
      Option Export
      • Export All Option Sets
      • Export Specific Option Sets
    • Option Import
  • Track Real-time Analytics
  • Set Up One-time Charge
  • Set Up Badges for Option Values
  • Set Up Quantity Selector Per Option Value
  • Add Option Value Descriptions & Tooltips
  • Enable Image Editor for File Upload
  • Show Image/ Color Swatch Slider
  • View & Export Orders With Easify Options
  • Hide Main Product Price & Shopify Quantity Selector
  • Display Option Set In Popup Triggered By Button Click
  • Switch Product Images Upon Option Selection
  • Set Up Option/ Option Set Templates
  • Translate Option Set Into Multiple Languages
  • Separate or Combine Add-ons with Main Product in Cart
  • Reposition Option Set On Product Page
  • Set Up Product Bundles
  • Show Custom Options On Order Confirmation Emails (To Customers)
  • Show Custom Options On New Order Notification Emails (To Staff)
  • Show Custom Options On Packing Slips
Product Personalizer (Live Preview)
  • What Is Product Personalizer – Live Preview?
  • How It Works
  • Ready-to-use Templates with Product Personalizer
  • Upcoming Features
Subscription & Billing
  • Pricing Plans
  • How to upgrade
  • How to cancel subscription
Customization & Support
  • App Maintenance Notification
  • Get support
  • Request a new feature
Frequently Asked Questions
  • Why does the app remain “Inactive” even after activation?
  • What to do if custom options aren’t visible on product pages?
  • Why weren’t custom option prices included in my customer orders?
  • How many custom options can I create per product?
  • Does the app work with Shopify Online Store 2.0?
  • Will the app slow down my website?
  • How can I stay informed about updates for the app?
  • What happens if I uninstall the app, and how does it affect my store?
Integrations
  • Easify Product Options x GemPages Landing Page Builder

Easify Box Builder App

Getting Started
  • Pricing Plans, Trial, and Billing
  • Activate the App
  • Key Terms
Visual Editor
  • Create a New Box with the Visual Editor (Overview)
  • Create a New Box with a Template
  • Create a Box from Scratch (Without a Template)
  • Create Custom Fields/ Options
Box Types
  • Predefined Box Sizes
  • Fixed Box Price
  • Tiered Quantity Discounts
Product List
  • Product List (Overview)
  • Product List: Grid
  • Product List: Tabs
  • Product List: Accordion
  • Product List: Carousel
  • Default Selected Products
  • Hover to Show Second Image in Product List
Sales Boosters
  • Sales Boosters: The End of “I’ll Buy It Later”
  • Low Stock Counter
  • Sales Notifications
  • Countdown Timer
Advanced Features
  • Connect Subscription Plans to Boxes
  • Display Variants as Individual Products
  • Create Products Linked with Boxes
  • Set Up Add-on Price or Add-on Product for Custom Fields
  • Translate App Default Texts
  • Translate Box-Specific Content
More Features
  • Use Cart Transform or List Items Separately at Checkout
  • Show Custom Options On Order Confirmation Emails (To Customers)
  • Show Custom Options On New Order Notification Emails (To Staff)
Help & Support
  • Get Support
  • Frequently Asked Questions – Most Common Questions
  • FAQs – Theme Settings: Product Cards
  • FAQs – Theme Settings: Step bar, Quick Summary, Quick View
  • FAQs – Theme Settings: Quantity selector, Box Review Page

Easify Inventory Sync App

  • Welcome to Easify Inventory Sync
Multi-store Sync
    Getting Started
    • Overview and Key Terminology
    Sync Setup & Management
    • How to Connect Source and Destination Stores
    • Understand Connection & Sync Statuses
    • How to Track Sync Activity
    • Disconnect or Delete Connection
    Data Sync Types
    • Product Sync
    • Inventory and Order Sync
    • Page, Blog and Blog post Sync
    Subscription & Billing
    • Pricing Plans
Single-store Sync
    Getting Started
    • Quick Start Guide
    • Frequently Asked Questions
    • Roadmap Spotlight – A Sneak Peek Into The Future
    • Get Support
    Inventory Groups
    • Create Inventory Groups Automatically by SKUs
    • Create Inventory Groups Manually
    • Events Triggering Syncs among Products in Inventory Groups
    • When do Inventory groups Fail to sync?
    • How to Set Up Common Cases
    Bundle Groups
    • Create A New Bundle Group
    • How Master product inventory is Calculated from Component product inventory (Modified Quantity)
    • Events Triggering Syncs among Products in Bundle Groups
    • When do Bundle groups Fail to sync?
    • How to Set Up Common Cases
    Inventory Thresholds
    • What is Inventory Threshold?
    • Set Up Universal Inventory Threshold
    • Create A New Inventory Threshold
    Advanced Features
    • Bulk Edit Inventory Groups
    • Import/ Export Inventory Groups
    • Import/ Export Bundle Groups
    • Export Product Variant & Location IDs
    • Bulk Duplicate Products
    Subscription & Billing
    • Pricing Plans (& FAQs)
    • How to Change Plans
    Common Scenarios & Setup Guides
    • Roast Coffee
    • Loose Leaf Tea
    • Stationery Set
    • Retail & Wholesale Items
    • Blank & Personalized Tees
    • Unisex Tees
    • Baby Gift Hamper
    • Flowers
    • Chocolate Cookies
    • 3-Pack T-Shirts (mixed sizes & colors)
    • Batteries
    • Beverage (Inventory by Cans)
    • Beverage (Inventory by Packs)
    • Multivitamins (from Single Pack)
    • Multivitamins (from Double Pack)
    • Incense Sticks (Inventory by Packs)
    • Incense Sticks (Inventory by Sticks)
    • Candle Trio Set
    • Perfume Set
    • Pick n Mix Sweets
    • Top & Skirt Set (Same Size)
    • Top & Skirt Set (Mixed Sizes)
    • 2-Pack Tops (1 Color)
    • 2-Pack Tops (1 Color) – Only in Packs
    • 2-Pack Tops (Multicolor – Fixed)
    • 2-Pack Tops (Multicolor – Optional)
    • Custom Print Shirts
    • Shoes & Free Socks

Easify Product Attachments App

App Activation
  • Activate the app on your theme
User Guide
  • Upload Product Attachments
  • Upload Attachment Icons
  • Add Attachments To Templates
  • Import Bulk Product Attachments
  • Export Product Attachments
  • Add Attachments To Collapsible Rows On Product Pages
Customization & Support
  • Get support
  • Roadmap Spotlight – A Sneak Peek Into The Future
  • Frequently Asked Questions
  • Feature Requests

Recommended Shopify Apps

  • Page builder
  • Marketing
  • Affiliate programs
  • Image gallery
  • Pricing quotes
  • Invoices and receipts
  • Others

Announcements

  • 🎊 Easify Lucky Draw 2026: Winners Announcement!
  • 🎉 Easify Lucky Draw 2026: Terms and Conditions
  • Become a VIP Founder of Easify Box Builder – Limited to the First 100 Users Only!
  • Limited Support During Lunar New Year (Jan 25th- Feb 3rd, 2025) – Your Patience Is Our Greatest Gift!
  • Go Beyond Options: Easify Product Options Premium Is Here!
  • Limited Support During Our Summer Holiday (September 27th-29th, 2025) – Your Patience Is Our Greatest Gift!
  • Easify Box Builder: New Plans, Your Box Sales Get a Power-Up

Sales Notifications

Table of Contents
  • What are Sales Notifications?
  • The Psychology Behind Sales Notifications
    • 1. Eliminate the "Trust Gap"
    • 2. Generate Positive "FOMO" (Fear Of Missing Out)
  • How to Set It Up in Easify Box Builder
    • Step 1: Activate the Booster
    • Step 2: Configure the "Logic" (General tab)
    • Step 3: Style the Notification Popup (Styling tab)
    • Step 4: Save & Launch
  • Pro-Tips: How to Build Authentic Trust

Imagine a shopper walking down a quiet street looking for a place to eat. They see 2 restaurants: one is completely empty with a lone waiter staring at the door; the other is bustling, with a warm glow and the hum of conversation. Almost every time, they choose the busy one.

In e-commerce, this is the “Empty Restaurant Syndrome.” Because online shopping is a solitary experience, customers often feel a subconscious hesitation – a “lonely” uncertainty about whether your store is reliable. Sales Notifications are the digital equivalent of a bustling dining room. They act as a real-time social validation system, proving that your brand is alive, active, and trusted by others right now.

What are Sales Notifications? #

Sales Notifications are small, non-intrusive “pop-ups” that appear strategically as a customer navigates your box builder.

They provide verified proof of recent activity by displaying data from your actual orders.

Unlike generic marketing banners, these notifications offer a heartbeat for your store, signaling that your brand is alive, active, and trusted by others.

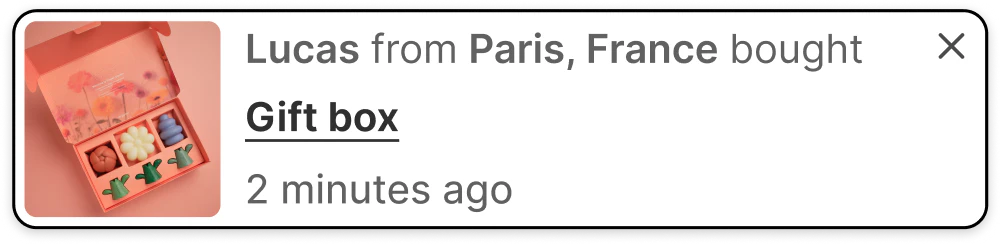
  • The Social Proof Slide-In: A subtle notification that says, “Someone in New York just completed a Gourmet Gift Box!”.
  • The Freshness Indicator: A timestamped nudge that reads, “A Custom Spa Bundle was purchased 15 minutes ago.”.

This tool isn’t about interrupting the customer’s journey; it’s about validating it. It tells the shopper, “You’re in the right place, and you’re making a choice that many others have made before you.”

The Psychology Behind Sales Notifications #

Sales Notifications do more than just show off your volume; they handle the deep-seated psychological barriers that lead to cart abandonment.

1. Eliminate the “Trust Gap” #

When a shopper sees a notification of a recent purchase, their brain checks off a major box: Credibility. It proves that your payment gateway works, your products are in demand, and real people are spending real money with you. This “herd mentality” reduces the perceived risk of the transaction, especially for first-time visitors.

2. Generate Positive “FOMO” (Fear Of Missing Out) #

Social proof creates a sense of “trending” momentum. When a customer sees that boxes are being completed every few minutes, they realize that your inventory is moving. This creates a natural and soft urgency, turning a static shopping page into a high-energy “Buy” zone.

How to Set It Up in Easify Box Builder #

You can transform your store from a quiet catalog into a busy marketplace in four logical steps:

Step 1: Activate the Booster #

Navigate to the Sales Boosters tab in your left-hand menu, expand the Sales Notifications section, and change the status to “Enabled”.

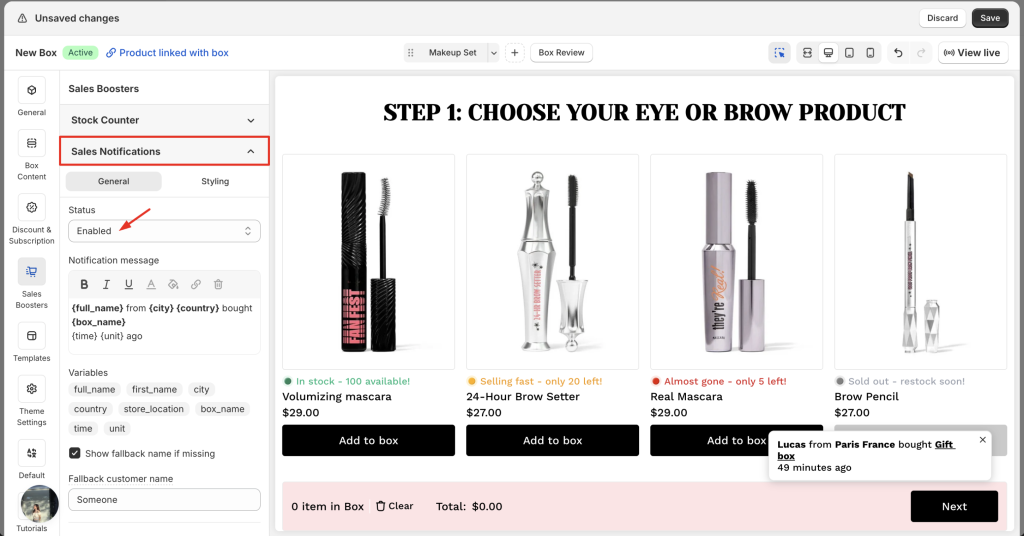
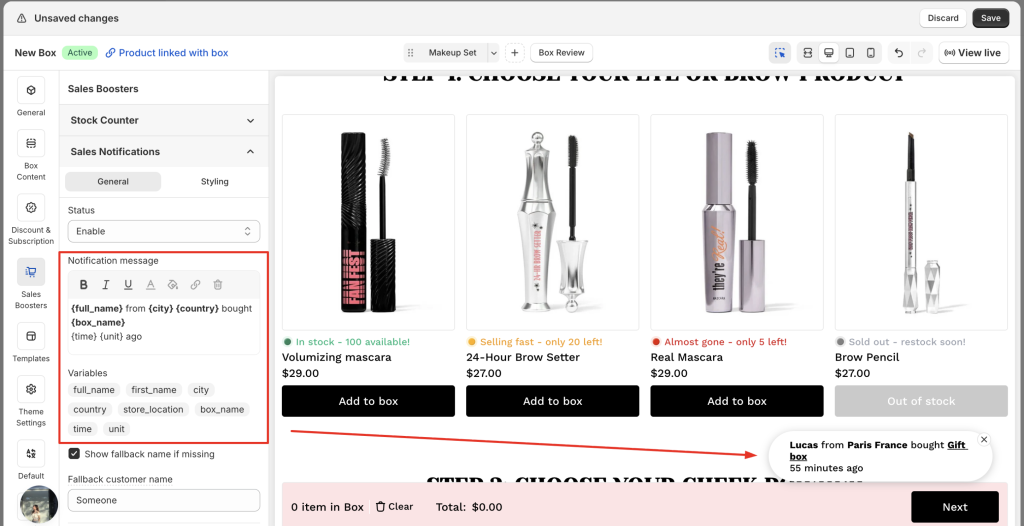
Step 2: Configure the “Logic” (General tab) #

This is where you decide how your notifications will behave and where they pull their data from.

  • Notification message: Craft your story using our dynamic tags. You can use the default: "{full_name} from {city}, {country} bought {box_name} {time} {unit} ago", or click the available variables below the message field to add or remove details.
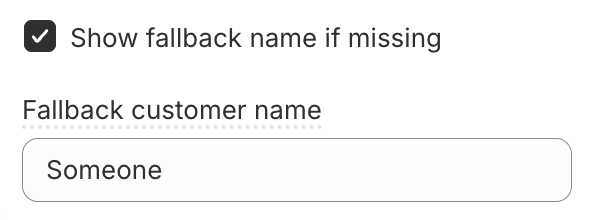
  • Show fallback name if missing: If an order is missing a buyer name (e.g., a guest checkout), enable this to show a friendly alternative like “A fellow curator” or “A happy shopper” instead of a blank space.
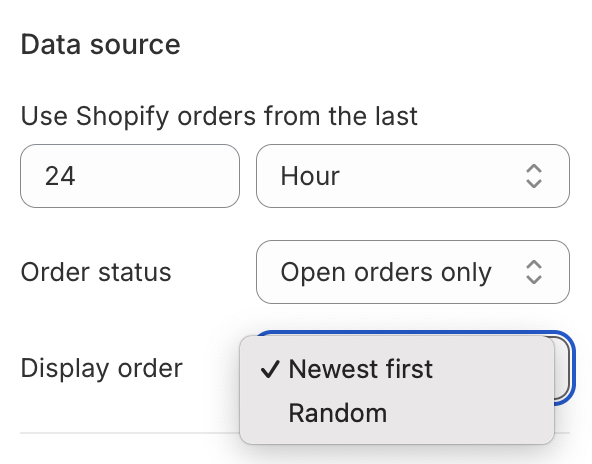
  • Data source: Define your proof. Choose to pull Shopify orders from the last few hours, days, or even months. You can also filter by Order Status (All vs. Open only) and set the Display Order to show your newest sales first or shuffle them at random.
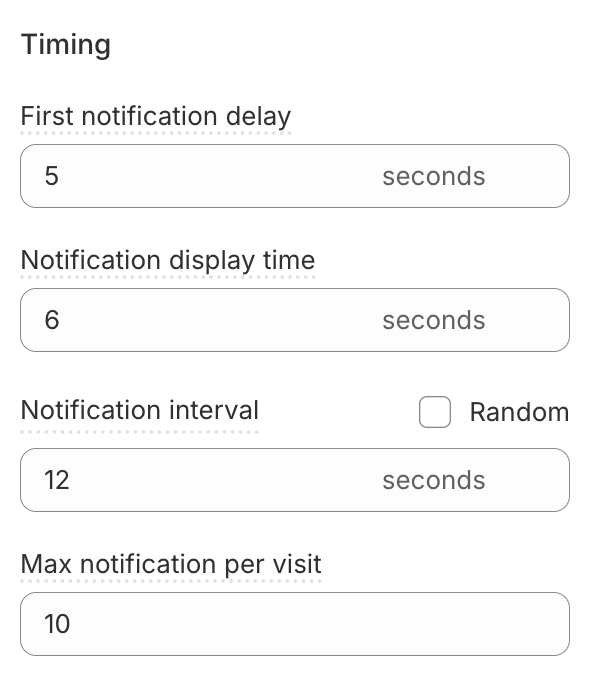
  • Timing: 
    • First notification delay (second): How long to wait after a page loads before the first notification appears.
    • Notification display time (second): How many seconds the popup stays visible.
    • Notification interval (second): The gap between notifications. You can set a Specific time or a Random range to make the activity feel more natural.
    • Max notification per visit: Limit the total number of popups to keep the experience helpful, not overwhelming.
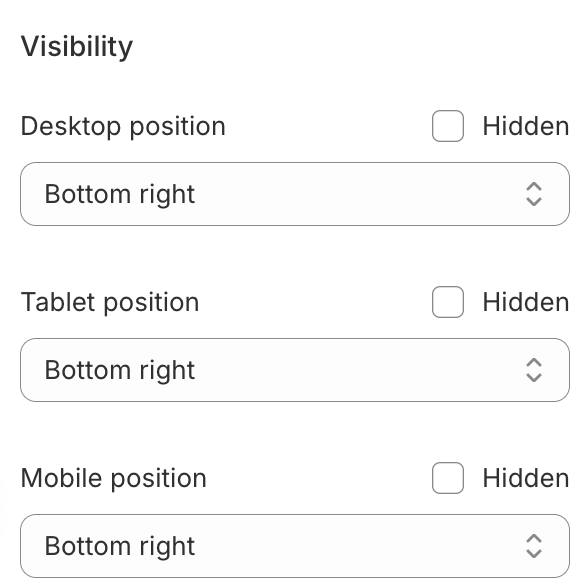
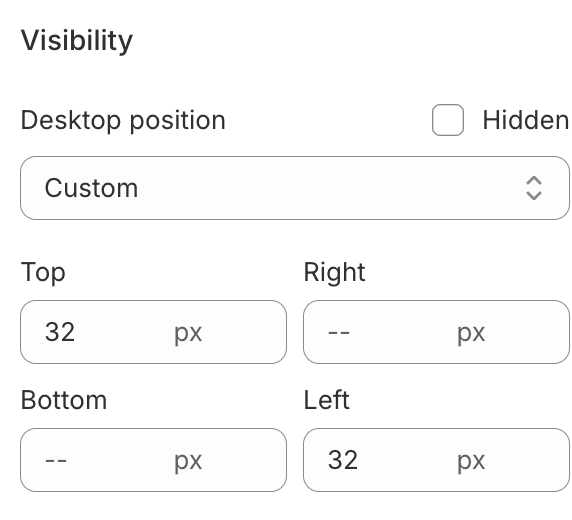
  • Visibility: Choose exactly where the notifications appear on Desktop, Tablet, and Mobile, or hide them on specific devices to keep your mobile layout clean.

Step 3: Style the Notification Popup (Styling tab) #

Make sure your notifications feel like a native, premium part of your box design.

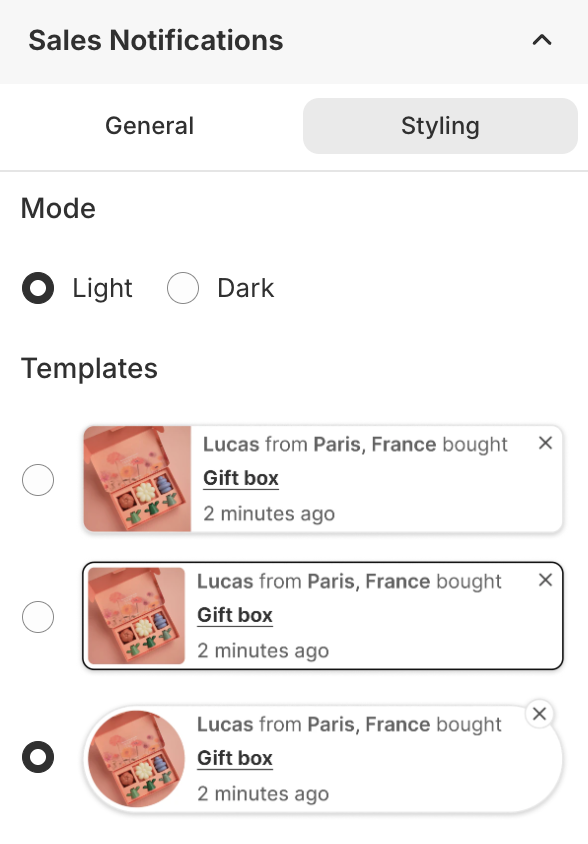
  • Mode: Select between Light or Dark modes to instantly align with your site’s theme. 
  • Template: Select one of our 3 layouts and customize it further.
  • Visual Details: Fine-tune the Background, Border, Size, and Padding to perfectly match your brand’s UI.
  • More settings:
    • Hide close button: Removes the “X” button from the corner of the popup.
    • Hide box image: Removes the product thumbnail, focusing the notification entirely on the text and purchase data.
    • Hide notifications on Box Review Page: Disables notifications when the customer is on the final review step of their box-building process.

Step 4: Save & Launch #

Once you have aligned the logic and the look with your brand identity, click Save. Your box-building page will immediately begin broadcasting live social proof. 

Pro-Tips: How to Build Authentic Trust #

To ensure your Sales Notifications drive sales instead of annoyance, follow these strategic guidelines:

  • The “Local Hero” Strategy: If you have a strong regional following, use city-level data. Seeing that someone “just down the road” bought a box is 5x more powerful than a generic global notification.
  • The Sweet Spot of Frequency: Less is often more. If notifications are popping up every 2 seconds, they feel fake. Set your “Time Between Notifications” to a natural pace (e.g., every 30–60 seconds) to simulate a real, busy store.
  • Match Your Brand Persona: If you are a high-end luxury brand, use elegant, minimal text like “A Bespoke Collection was recently curated.” If you are a fun, energetic brand, use “Boom! Another box headed to Seattle!”.
  • Be Transparent and Real: Sophisticated shoppers can tell when a notification is “simulated”. Only use real order data. If you are just starting out and don’t have many orders yet, it is better to set a longer delay between popups rather than making up fake ones. Trust is easy to lose and hard to gain.

Ready to bring your store to life? Turn on your Sales Notifications today and let your happy customers help you sell more boxes.

What’s Next? You’ve sparked interest with stock levels and built trust with social proof. Now, learn how to drive the final checkout. Explore our guide on Countdown Timers →

Table of Contents
  • What are Sales Notifications?
  • The Psychology Behind Sales Notifications
    • 1. Eliminate the "Trust Gap"
    • 2. Generate Positive "FOMO" (Fear Of Missing Out)
  • How to Set It Up in Easify Box Builder
    • Step 1: Activate the Booster
    • Step 2: Configure the "Logic" (General tab)
    • Step 3: Style the Notification Popup (Styling tab)
    • Step 4: Save & Launch
  • Pro-Tips: How to Build Authentic Trust
Essentials Logo

Make the Complex Simple for Shopify Stores

Our AppsHelp CenterPartner ProgramPrivacy PolicyTerms of ServiceBlogContact Us

Copyright © 2025 Easify. All rights reserved.

Close
Search

Hit enter to search or ESC to close

cookie By using this website, you agree to our cookie policy. Close