EasifyApps
  • About
  • Apps
    Easify Product Options
    Easify Product Attachments
  • Resources
    Help Center
    Easify Product Options
    Easify Box Builder
    Easify Inventory Sync
    Easify Product Attachments
    Video Tutorials
    Easify Product Options
    Easify Product Attachments
  • Partners
  • Blog
  • Contact
All Easify Apps
EasifyApps
  • About
  • Apps
    Easify Product Options
    Easify Product Attachments
  • Resources
    Help Center
    Easify Product Options
    Easify Box Builder
    Easify Inventory Sync
    Easify Product Attachments
    Video Tutorials
    Easify Product Options
    Easify Product Attachments
  • Partners
  • Blog
  • Contact

Easify Product Options App

Getting Started
    Key Terminology Simplified
    • Custom options & variants
    • Option set
    • Option set templates
    • Option type (Option input)
    • Your option sets
    • Option label
    • Option name
    • Option value
    • Option group
    • Conditional logic
    • Live preview
    • Help text
    • Placeholder
    • Information (Tooltip)
    • Option widget
    Option Input Types
    • Design Layer
    • Text Box
    • Text Area
    • Number Text Box
    • Color Swatches
    • Image Swatches
    • Radio Buttons
    • Dropdown
    • Checkbox
    • Button(s)
    • Switch/ Toggle
    • Modal (Popup)
    • File Upload
    • Option Group
    • Product List
    • Date Range
    • Date Picker
    • Time Picker
    • Font Picker
    • Color Picker
    • Dimension
    • Quantity
    • Custom HTML
    • Heading
    • Paragraph
    • Spacer
    • Divider
    App Activation
    • Activate the app on your theme
User Guide (PO)
    Set Up Option Sets
    • Create A New Option Set From Scratch
    • Use Ready-made Templates To Create Your Option Set
    Conditional Logic
    • What is Conditional Logic (CL)?
    • Standard Conditional Logic – Among Easify Options
    • Advanced Conditional Logic – Show Easify Options Based On Shopify Variants
    Extra Pricing (Add Charges)
    • Set Up Extra Fees (Version 3 – From July 24, 2025)
    • Set Up Extra Fees (Version 2 – July 18, 2024 – July 23, 2025)
    • Add-on Prices vs. Add-on Products (Version 1 – Before July 18, 2024)
    • Set Up Add-on Prices (Version 1 – Before July 18, 2024)
    • Set Up Add-on Products (Version 1 – Before July 18, 2024)
    • Convert Add-on Prices To Add-on Products (Version 1 – Before July 18, 2024)
    • Hide Specific Products from Shopify Storefront while Keeping Them Buyable
    Option URL
    • What is Option URL?
    • Establish Cross-Product Links
    • Include Option Detail Links For Add-on Products/Custom Options
    Option Design
    • Customize Option Styles
    • Distinct Option Styles for Light & Dark Themes
    • Modern and Classic Option Styles
    App Settings
    • General Settings
    • App Translation
    Tiered Wholesale Pricing
    • What is Tiered Wholesale Pricing?
    • Set Up Tiered Wholesale Pricing
    • Customize Tiered Wholesale Pricing Table
    Option Import/Export
      Option Export
      • Export All Option Sets
      • Export Specific Option Sets
    • Option Import
  • Track Real-time Analytics
  • Set Up One-time Charge
  • Set Up Badges for Option Values
  • Set Up Quantity Selector Per Option Value
  • Add Option Value Descriptions & Tooltips
  • Enable Image Editor for File Upload
  • Show Image/ Color Swatch Slider
  • View & Export Orders With Easify Options
  • Hide Main Product Price & Shopify Quantity Selector
  • Display Option Set In Popup Triggered By Button Click
  • Switch Product Images Upon Option Selection
  • Set Up Option/ Option Set Templates
  • Translate Option Set Into Multiple Languages
  • Separate or Combine Add-ons with Main Product in Cart
  • Reposition Option Set On Product Page
  • Set Up Product Bundles
  • Show Custom Options On Order Confirmation Emails (To Customers)
  • Show Custom Options On New Order Notification Emails (To Staff)
  • Show Custom Options On Packing Slips
Product Personalizer (Live Preview)
  • What Is Product Personalizer – Live Preview?
  • How It Works
  • Ready-to-use Templates with Product Personalizer
  • Upcoming Features
Subscription & Billing
  • Pricing Plans
  • How to upgrade
  • How to cancel subscription
Customization & Support
  • App Maintenance Notification
  • Get support
  • Request a new feature
Frequently Asked Questions
  • Why does the app remain “Inactive” even after activation?
  • What to do if custom options aren’t visible on product pages?
  • Why weren’t custom option prices included in my customer orders?
  • How many custom options can I create per product?
  • Does the app work with Shopify Online Store 2.0?
  • Will the app slow down my website?
  • How can I stay informed about updates for the app?
  • What happens if I uninstall the app, and how does it affect my store?
Integrations
  • Easify Product Options x GemPages Landing Page Builder

Easify Box Builder App

Getting Started
  • Pricing Plans, Trial, and Billing
  • Activate the App
  • Key Terms
Visual Editor
  • Create a New Box with the Visual Editor (Overview)
  • Create a New Box with a Template
  • Create a Box from Scratch (Without a Template)
  • Create Custom Fields/ Options
Box Types
  • Predefined Box Sizes
  • Regular Box
  • Tiered Quantity Discounts
  • Fixed Box Price
Product List
  • Product List (Overview)
  • Product List: Grid
  • Product List: Tabs
  • Product List: Accordion
  • Product List: Carousel
  • Default Selected Products
  • Hover to Show Second Image in Product List
Conditional Logic
  • Conditional Logic: Overview and Use Cases
  • Setting Up Conditional Logic
  • Conditional Logic Best Practices
Sales Boosters
  • Sales Boosters: The End of “I’ll Buy It Later”
  • Low Stock Counter
  • Sales Notifications
  • Countdown Timer
Subscription App Integration
  • Why Add Subscription to Your Boxes
  • Connect Subscription Plans to Your Boxes
  • Subscription App Compatibility
Advanced Features
  • Display Variants as Individual Products
  • Create Products Linked with Boxes
  • Set Up Add-on Price or Add-on Product for Custom Fields
  • Translate App Default Texts
  • Translate Box-Specific Content
More Features
  • Use Cart Transform or List Items Separately at Checkout
  • Show Custom Options On Order Confirmation Emails (To Customers)
  • Show Custom Options On New Order Notification Emails (To Staff)
Help & Support
  • Get Support
  • Frequently Asked Questions – Most Common Questions
  • FAQs – Theme Settings: Product Cards
  • FAQs – Theme Settings: Step bar, Quick Summary, Quick View
  • FAQs – Theme Settings: Quantity selector, Box Review Page

Easify Inventory Sync App

  • Welcome to Easify Inventory Sync
Multi-store Sync
    Getting Started
    • Overview and Key Terminology
    Sync Setup & Management
    • How to Connect Source and Destination Stores
    • Understand Connection & Sync Statuses
    • How to Track Sync Activity
    • Disconnect or Delete Connection
    Data Sync Types
    • Product Sync
    • Inventory and Order Sync
    • Page, Blog and Blog post Sync
    Subscription & Billing
    • Pricing Plans
Single-store Sync
    Getting Started
    • Quick Start Guide
    • Frequently Asked Questions
    • Roadmap Spotlight – A Sneak Peek Into The Future
    • Get Support
    Inventory Groups
    • Create Inventory Groups Automatically by SKUs
    • Create Inventory Groups Manually
    • Events Triggering Syncs among Products in Inventory Groups
    • When do Inventory groups Fail to sync?
    • How to Set Up Common Cases
    Bundle Groups
    • Create A New Bundle Group
    • How Master product inventory is Calculated from Component product inventory (Modified Quantity)
    • Events Triggering Syncs among Products in Bundle Groups
    • When do Bundle groups Fail to sync?
    • How to Set Up Common Cases
    Inventory Thresholds
    • What is Inventory Threshold?
    • Set Up Universal Inventory Threshold
    • Create A New Inventory Threshold
    Advanced Features
    • Bulk Edit Inventory Groups
    • Import/ Export Inventory Groups
    • Import/ Export Bundle Groups
    • Export Product Variant & Location IDs
    • Bulk Duplicate Products
    Subscription & Billing
    • Pricing Plans (& FAQs)
    • How to Change Plans
    Common Scenarios & Setup Guides
    • Roast Coffee
    • Loose Leaf Tea
    • Stationery Set
    • Retail & Wholesale Items
    • Blank & Personalized Tees
    • Unisex Tees
    • Baby Gift Hamper
    • Flowers
    • Chocolate Cookies
    • 3-Pack T-Shirts (mixed sizes & colors)
    • Batteries
    • Beverage (Inventory by Cans)
    • Beverage (Inventory by Packs)
    • Multivitamins (from Single Pack)
    • Multivitamins (from Double Pack)
    • Incense Sticks (Inventory by Packs)
    • Incense Sticks (Inventory by Sticks)
    • Candle Trio Set
    • Perfume Set
    • Pick n Mix Sweets
    • Top & Skirt Set (Same Size)
    • Top & Skirt Set (Mixed Sizes)
    • 2-Pack Tops (1 Color)
    • 2-Pack Tops (1 Color) – Only in Packs
    • 2-Pack Tops (Multicolor – Fixed)
    • 2-Pack Tops (Multicolor – Optional)
    • Custom Print Shirts
    • Shoes & Free Socks

Easify Product Attachments App

App Activation
  • Activate the app on your theme
User Guide
  • Upload Product Attachments
  • Upload Attachment Icons
  • Add Attachments To Templates
  • Import Bulk Product Attachments
  • Export Product Attachments
  • Add Attachments To Collapsible Rows On Product Pages
Customization & Support
  • Get support
  • Roadmap Spotlight – A Sneak Peek Into The Future
  • Frequently Asked Questions
  • Feature Requests

Recommended Shopify Apps

  • Page builder
  • Marketing
  • Affiliate programs
  • Image gallery
  • Pricing quotes
  • Invoices and receipts
  • Others

Announcements

  • 🎊 Easify Lucky Draw 2026: Winners Announcement!
  • 🎉 Easify Lucky Draw 2026: Terms and Conditions
  • Become a VIP Founder of Easify Box Builder – Limited to the First 100 Users Only!
  • Limited Support During Lunar New Year (Jan 25th- Feb 3rd, 2025) – Your Patience Is Our Greatest Gift!
  • Go Beyond Options: Easify Product Options Premium Is Here!
  • Limited Support During Our Summer Holiday (September 27th-29th, 2025) – Your Patience Is Our Greatest Gift!
  • Easify Box Builder: New Plans, Your Box Sales Get a Power-Up

Connect Subscription Plans to Your Boxes

Table of Contents
  • Step 1: Create a Subscription Plan in Your Subscription App
  • Step 2: Create Your Box with Easify Box Builder
  • Step 3: Set Up Subscription for Your Box
    • 1. Enable and Link Your Subscription Plan
    • 2. (Optional) Customizing Subscription Display
    • 3. Managing Your Subscription Updates
  • Storefront Behavior
  • Need Assistance?

Here’s how to link a subscription plan from your chosen subscription app to a box you’ve created in Easify Box Builder.

Overall flow:

  1. Create your box in Easify Box Builder.
  2. Create a subscription plan (with selling frequencies) in your subscription app.
  3. Link that subscription plan to your box in Easify Box Builder.

Step 1: Create a Subscription Plan in Your Subscription App #

Easify Box Builder supports many subscription apps (listed at the end of this guide). In this example, we’ll use Appstle℠ Subscriptions App as an example, but you can follow similar steps in other subscription apps.

To create a new subscription plan:

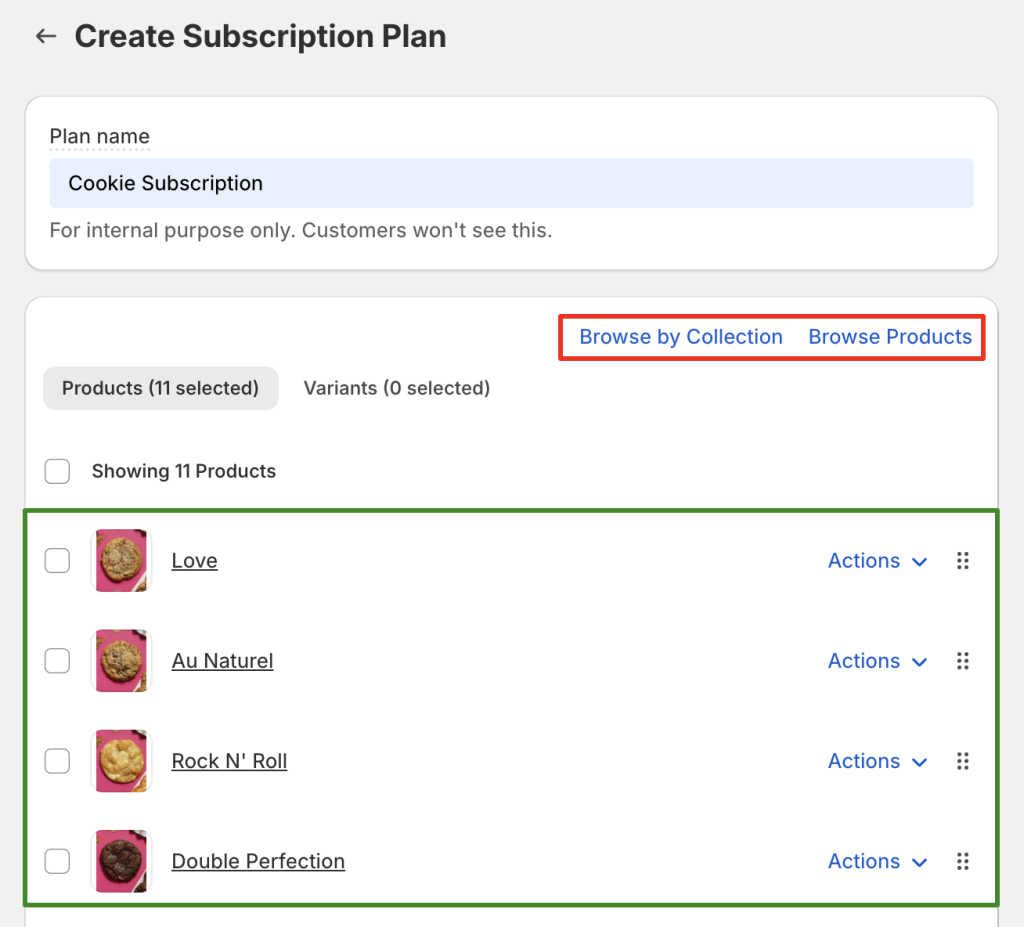
  • Select Products: Choose all products included in your box and add them to the plan.
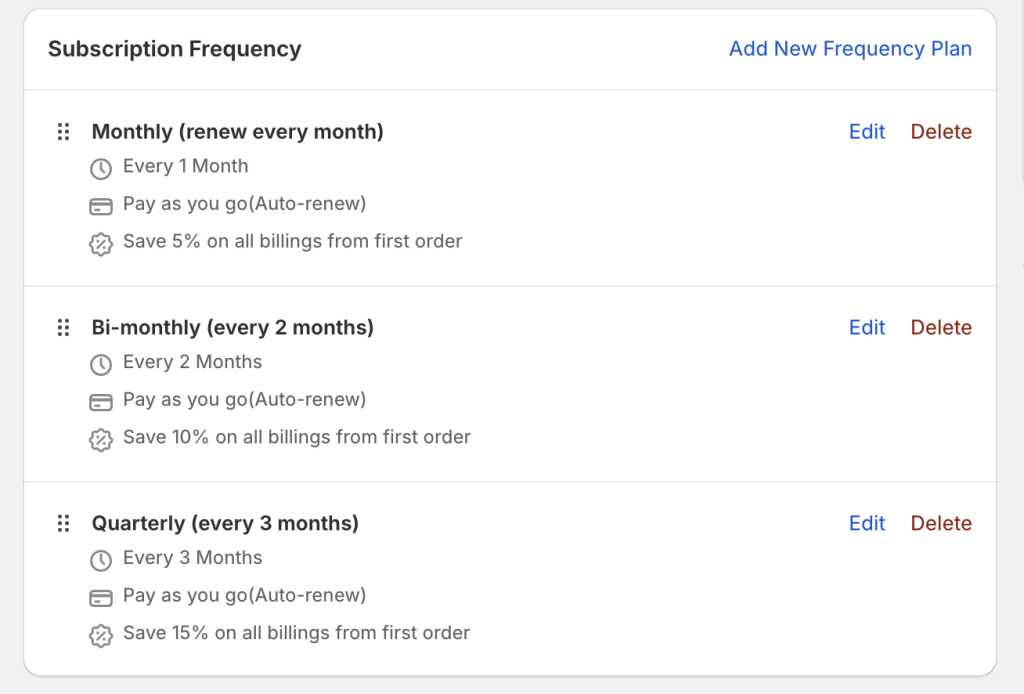
  • Set Subscription Frequency: Choose how often customers receive their box (e.g., weekly, monthly, quarterly).
  • Save your plan and ensure it’s active.

Step 2: Create Your Box with Easify Box Builder #

Create your box in Easify Box Builder as usual — any box type works:

  • Regular Box
  • Tiered Quantity Discount Box
  • Fixed-Price Box
  • Predefined Box Sizes

You don’t need to worry about subscriptions at this stage. Once your box is set up, continue to the next step to add your subscription plan.

Step 3: Set Up Subscription for Your Box #

1. Enable and Link Your Subscription Plan #

  • From the Visual Editor’s vertical menu, go to Discount & Subscription.
  • Open the Subscriptions section and change the Status to Enabled.
  • Click Get plans to load all subscription plans created in your subscription app(s).
  • Select the plan you want (e.g., Cookies Subscription).
  • Easify Box Builder will automatically show all Selling frequencies linked to that plan — both in the setup panel and the visual preview.

Notes:

The location of the subscription plan selector depends on your Quick Summary position:

  • Sidebar: The subscription section appears inside the Quick Summary.
  • Footer: The subscription section appears above the product list, separate from the Quick Summary.

2. (Optional) Customizing Subscription Display #

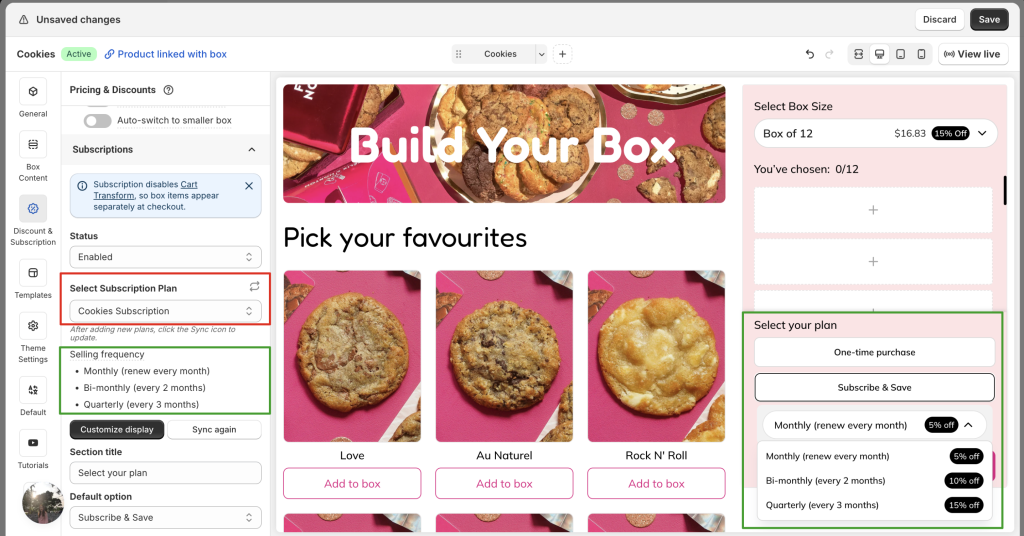
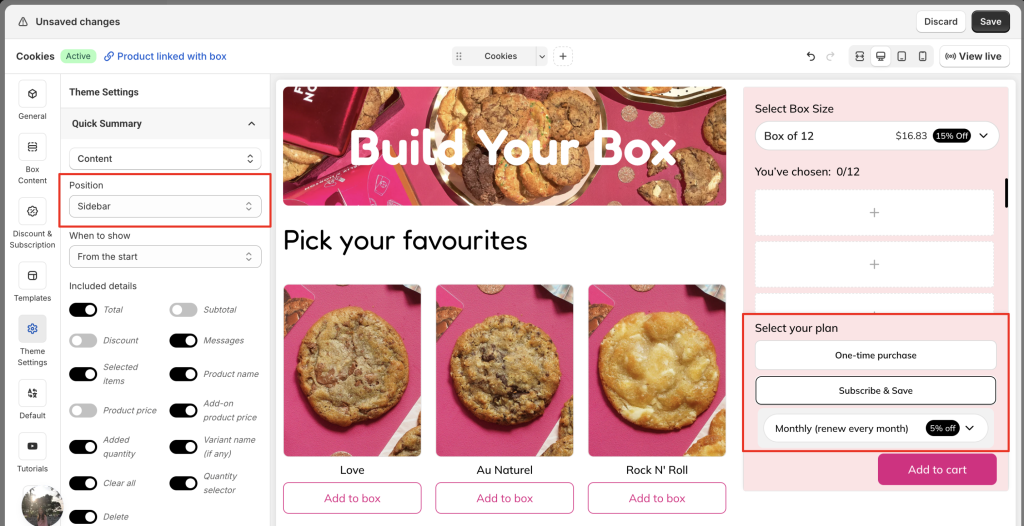
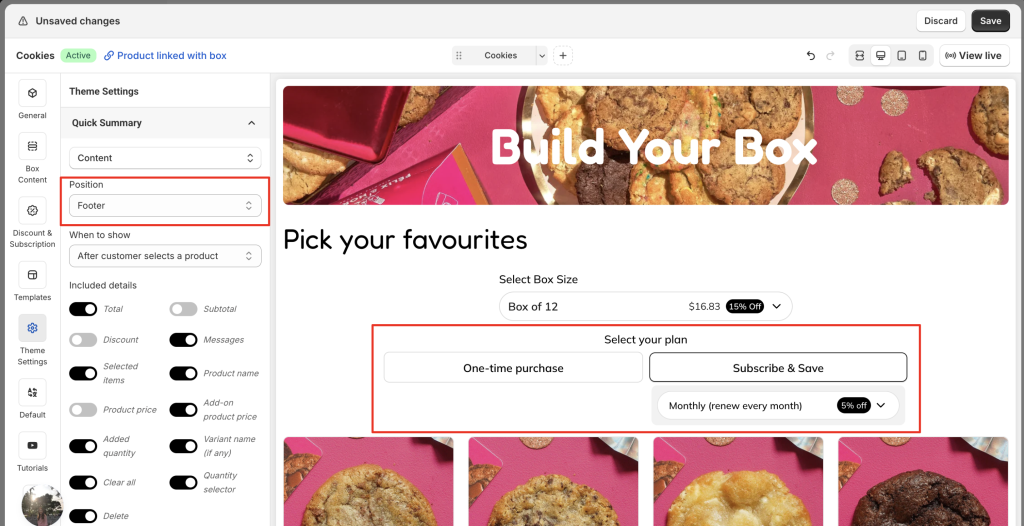
There are several simple changes you can apply to the subscription plan selection block in your Box Builder page, such as customizing the title, subscription button label, default plan, or frequency display.

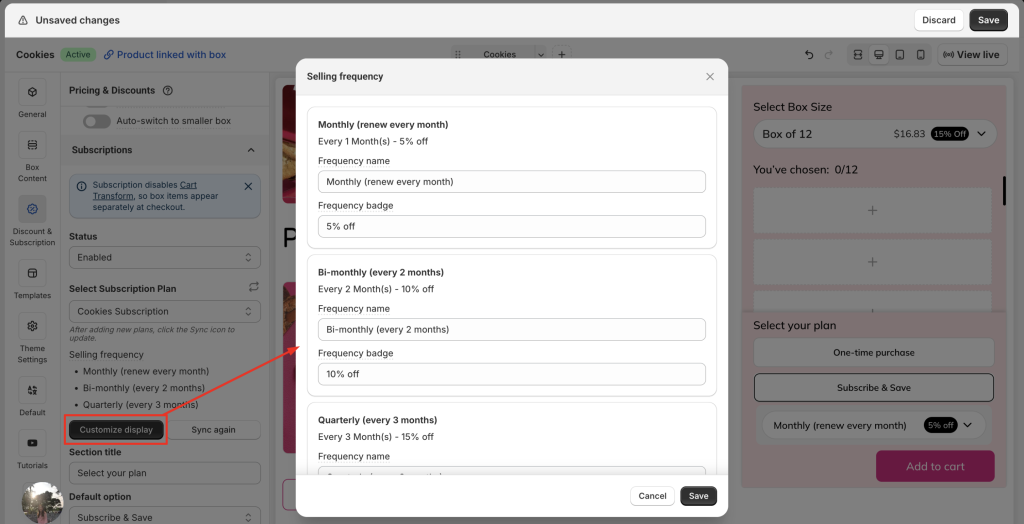
  • Customize Display: Click “Customize display” to edit:

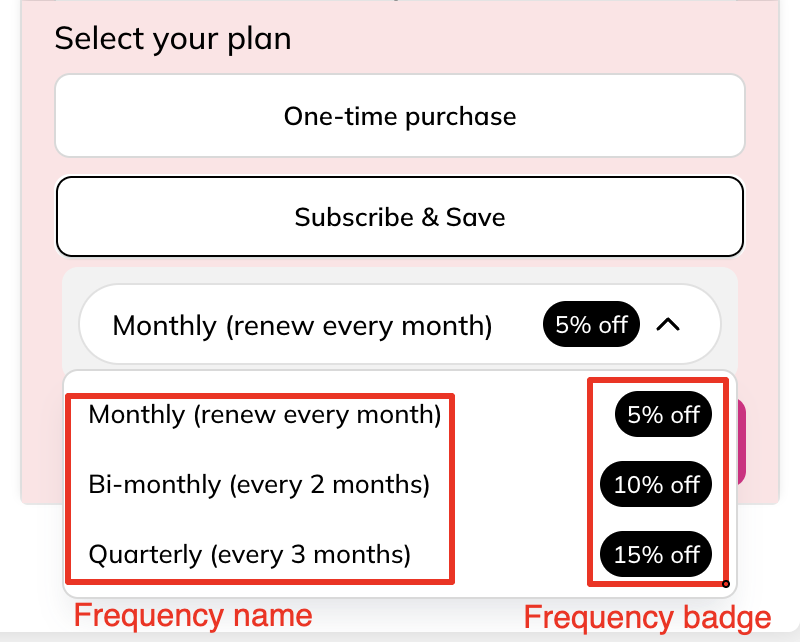
Frequency name: By default, Easify Box Builder will import the frequency name from your third-party subscription app.
However, you can change it to display shorter or more user-friendly names in the subscription block.

Frequency badge: By default, Easify Box Builder shows any discounts or incentives of each frequency as defined in your subscription app. You can leave the Frequency badge blank to hide it or only add a badge to highlight a specific frequency (for example, mark one as “Most popular”).

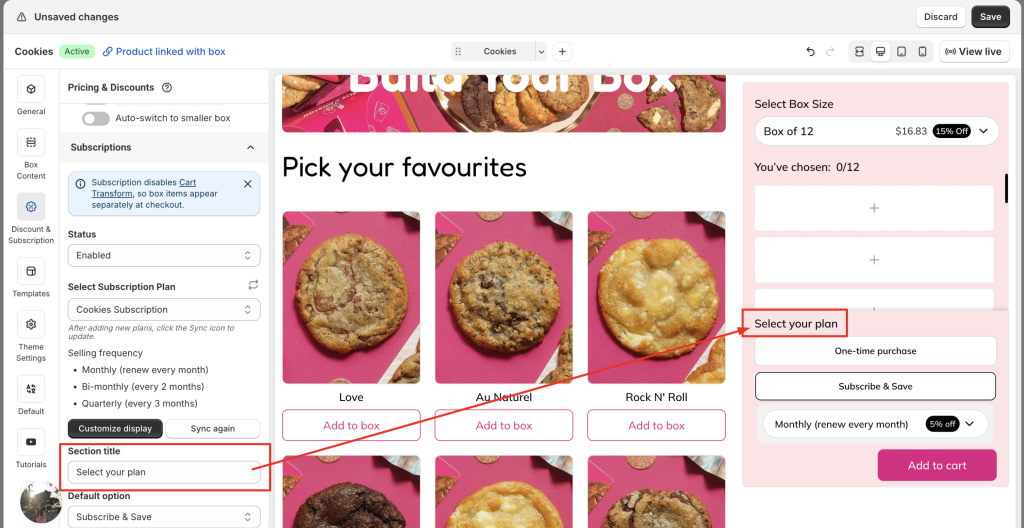
  • Section title: You can also change the default title “Select your plan” to your preferred title, or remove it entirely by leaving the Section title field blank.
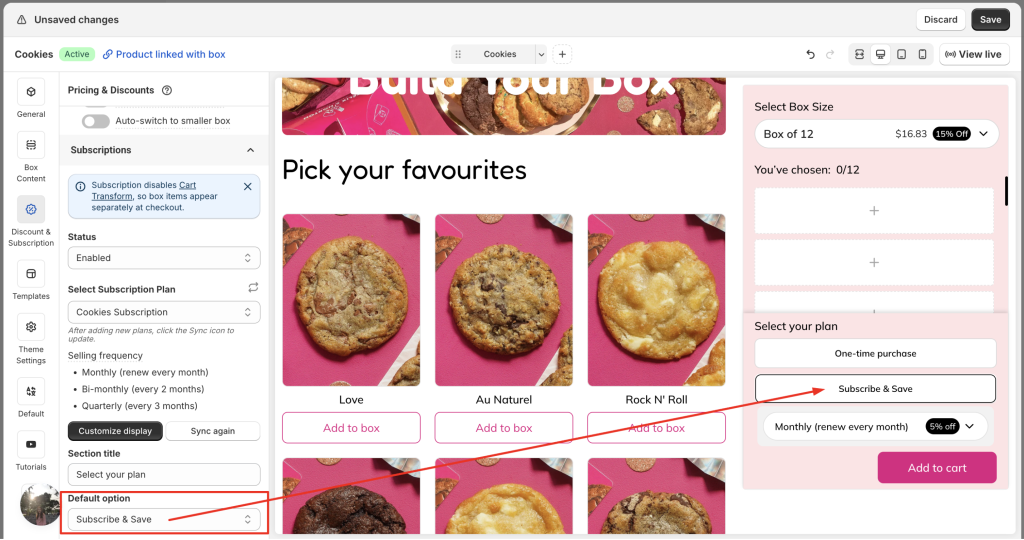
  • Default option: Choose which subscription plan (“One-time purchase” or “Subscribe & Save”) is pre-selected for customers when the page loads.
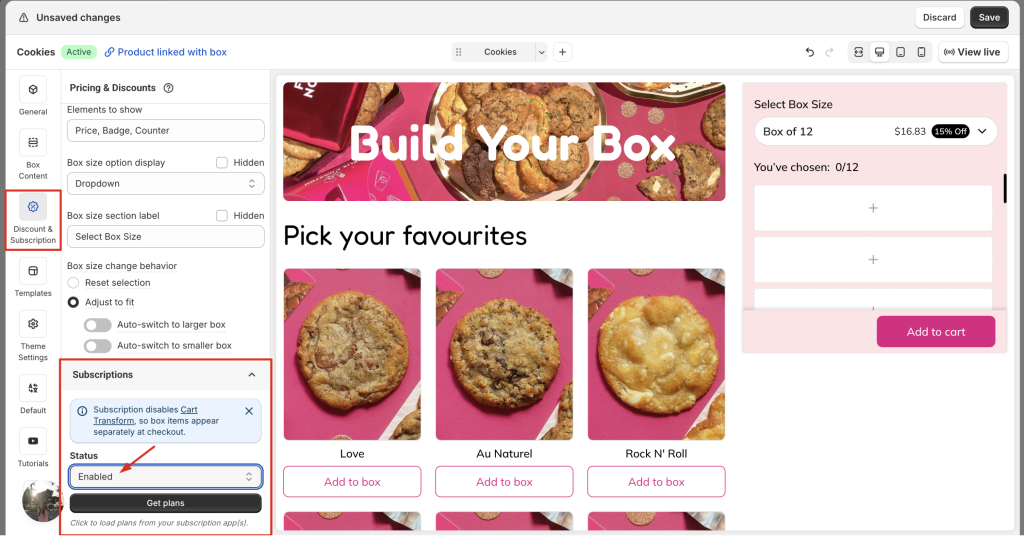
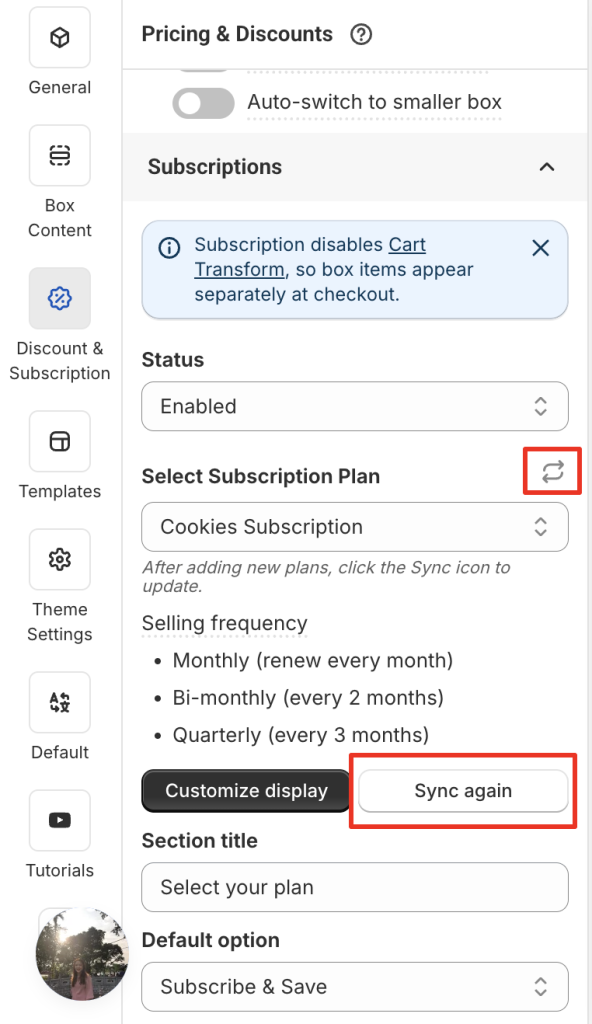
3. Managing Your Subscription Updates #

  • Re-sync Subscription Plans: If you change (add/remove) subscription plans in your subscription app, or switch to another app, you need to re-sync by clicking the Sync (🔄) icon next to the “Select Subscription Plan” dropdown. This ensures Easify Box Builder displays the latest plans from your subscription app.
  • Re-sync Selling Frequency: If you update frequencies or other plan details in your subscription app, go back here and click â€śSync again” to reflect the updates in your box. (Note: updates are not automatic.)

Storefront Behavior #

We’ve noticed some merchants misunderstand how subscriptions apply in Easify Box Builder. Let’s clear this up:

âś… Subscriptions work when customers go through the box flow. Customers must:

  • Open the box page.
  • Select products.
  • Add the box to cart.
  • Checkout with the subscription plan enabled.

❌ Subscriptions do NOT apply if customers just add the Product Linked with Box directly to cart.

  • The Linked Product is created for admin purposes (to group items or handle addon prices), but it cannot carry subscription logic on its own.
  • Subscriptions cannot work if customers just add the Linked Product and don’t go through the box builder flow.

Need Assistance? #

If you need help connecting or setting up your subscription boxes, our support team is always ready to assist. You can reach us anytime through our 24/7 in-app live chat support.

Table of Contents
  • Step 1: Create a Subscription Plan in Your Subscription App
  • Step 2: Create Your Box with Easify Box Builder
  • Step 3: Set Up Subscription for Your Box
    • 1. Enable and Link Your Subscription Plan
    • 2. (Optional) Customizing Subscription Display
    • 3. Managing Your Subscription Updates
  • Storefront Behavior
  • Need Assistance?
Essentials Logo

Make the Complex Simple for Shopify Stores

Our AppsHelp CenterPartner ProgramPrivacy PolicyTerms of ServiceBlogContact Us

Copyright © 2025 Easify. All rights reserved.

Close
Search

Hit enter to search or ESC to close

cookie By using this website, you agree to our cookie policy. Close