If there’s no product linked with the box, all selected items will appear individually in the Summary, Cart, and Checkout pages. As a result, if your box includes many items, the cart and checkout might look long and cluttered.
Linked products help enable the advanced Cart Transform feature, which groups all selected items under 1 main product (the product linked with the box), offering a much cleaner cart and checkout experience.
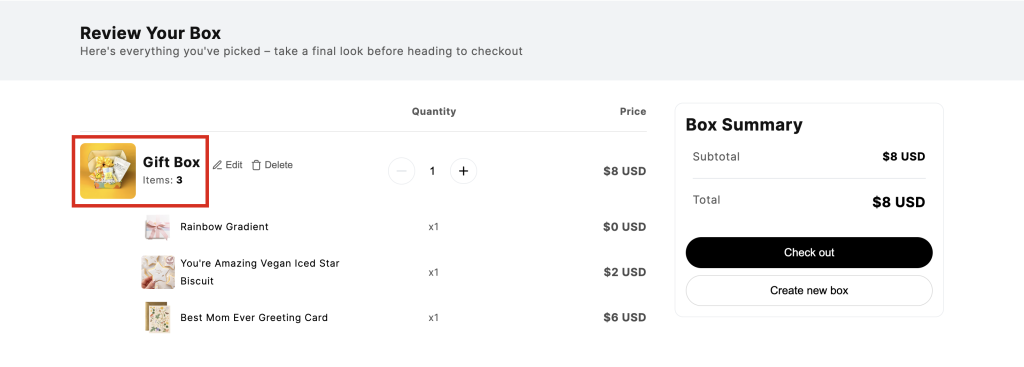
Summary page:
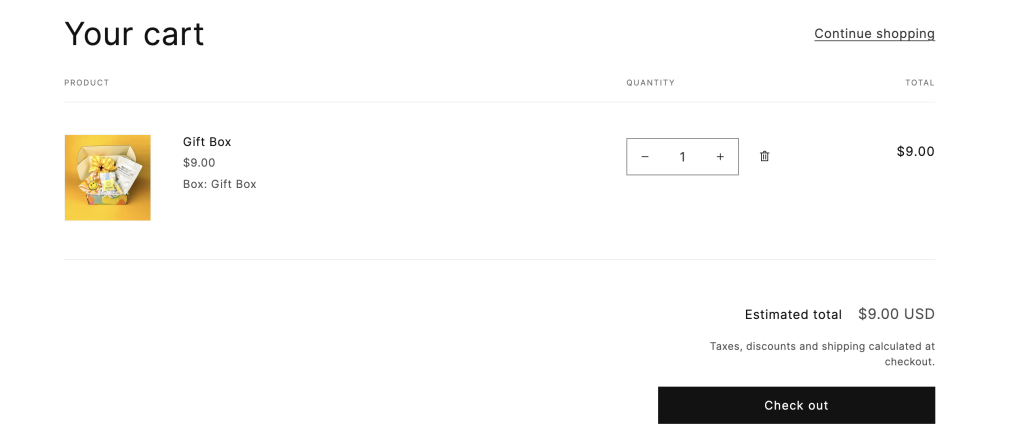
Cart page:
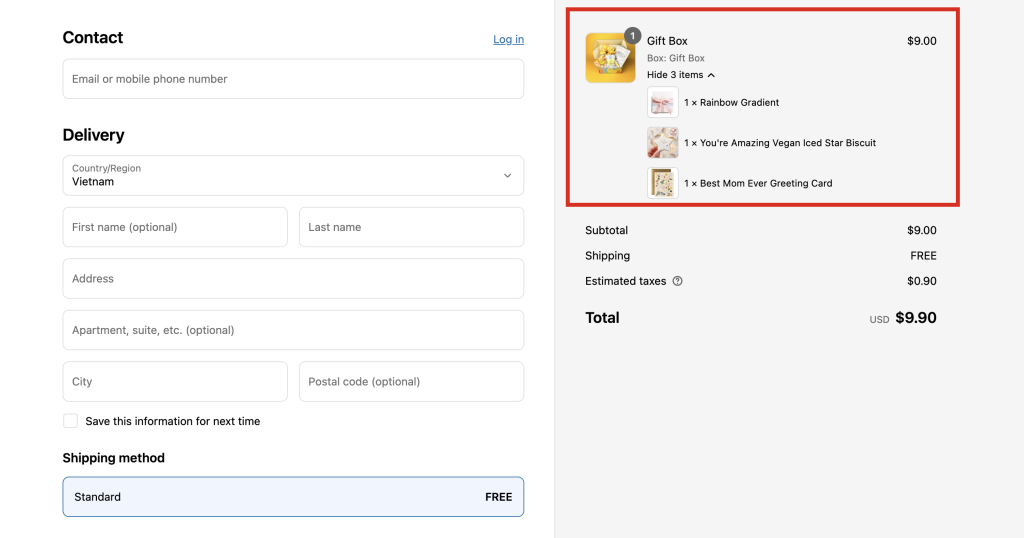
Checkout page:
Note: Easify Box Builder enables Cart Transform by default in Settings. If you prefer to show selected items separately, you can disable this feature anytime in Settings.
In many “Build A Box” setups, store owners prefer not to take customers straight to the step-by-step box builder.
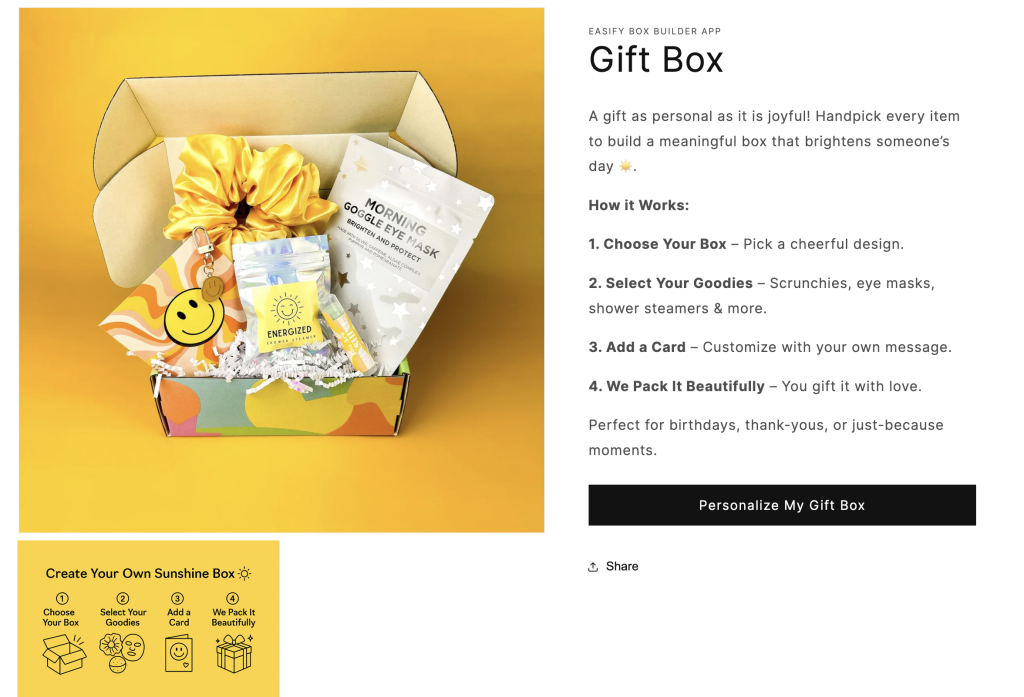
Instead, they first show a regular product page with engaging content about the box – like descriptions, images, and highlights – to build excitement before customers dive into customization.
That’s where the product linked with the box comes in.
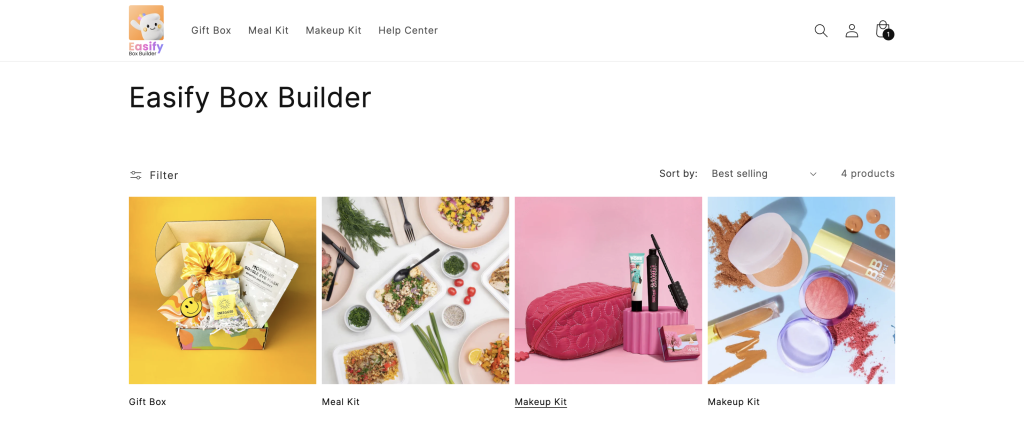
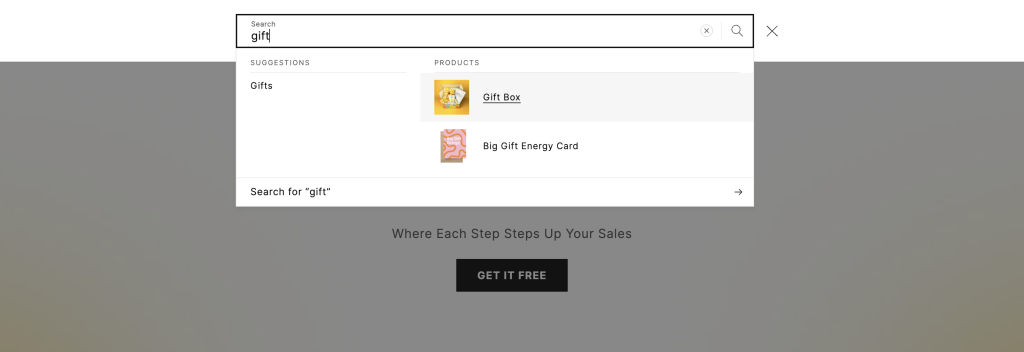
Many stores want their boxes to appear like regular products on Home page (e.g.; Featured product, Featured collection) or in specific Collection pages.
This allows customers to easily browse, select a box, read more, and then enter the Box Builder flow.
If you don’t create a product linked to the box, customers won’t be able to find it through your store’s search or collections. Only individual items will appear.
By creating a linked product, you let customers know this type of box exists. When they click it, they’ll be directed to your Box Builder page, where they can select the box style and customize each item inside.
It’s not for buying the whole box directly, it’s a gateway to help customers start building their own.
As soon as you name your box and begin setting it up, the app will automatically create a product linked with the box.
In the Visual Editor, you’ll see a “Product linked with box” link in the top navigation. Clicking this will take you to the product’s details page in your Shopify admin.
Characteristics of Auto-generated Linked Products #
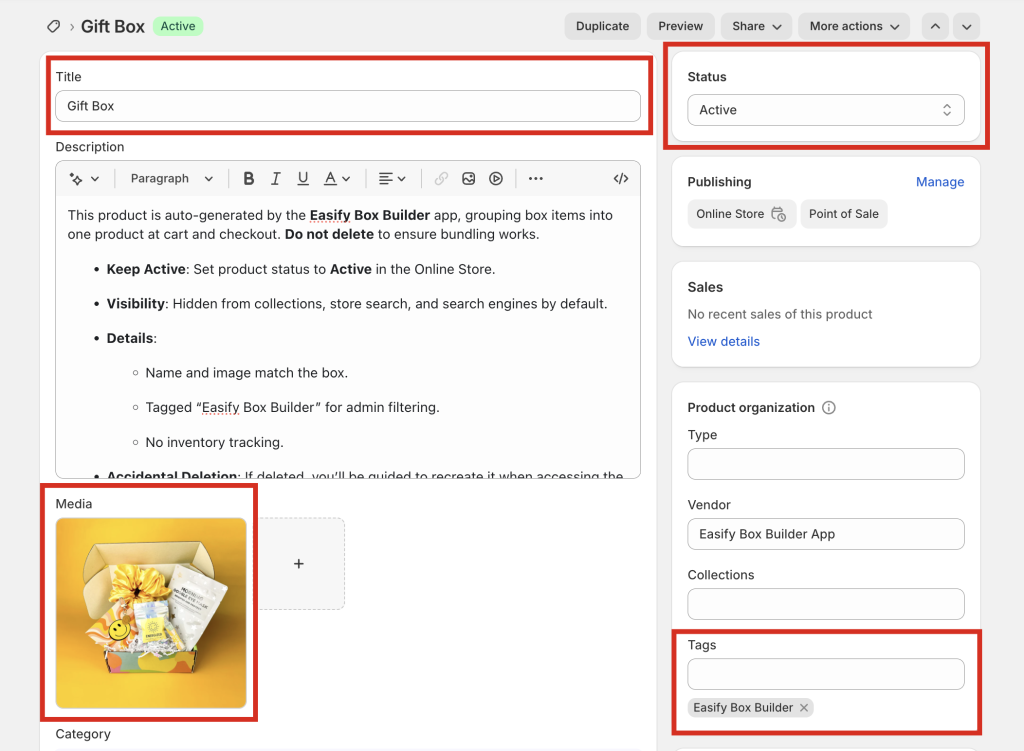
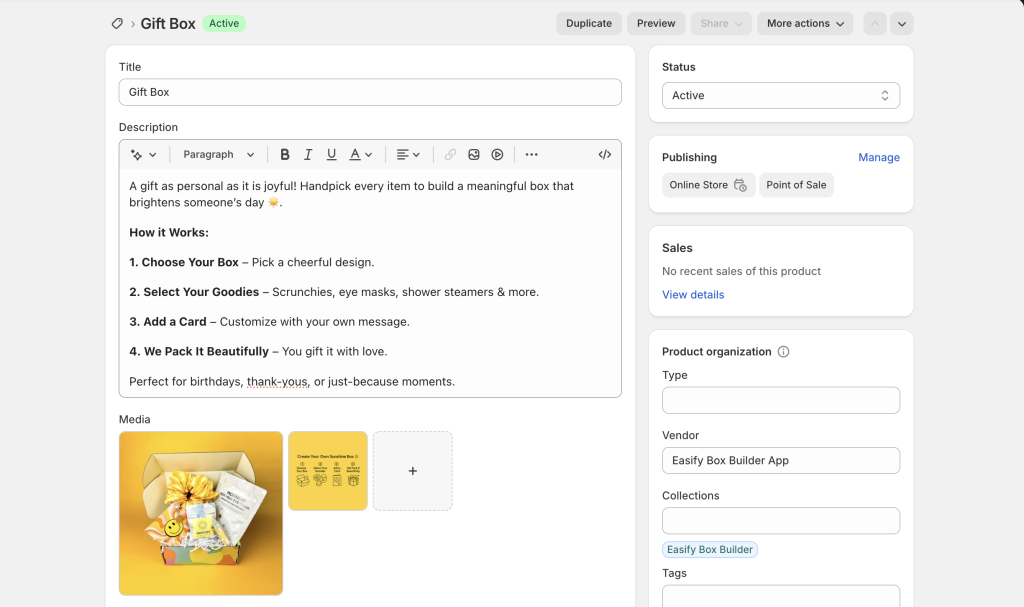
Status: Set to Active in the Online Store.
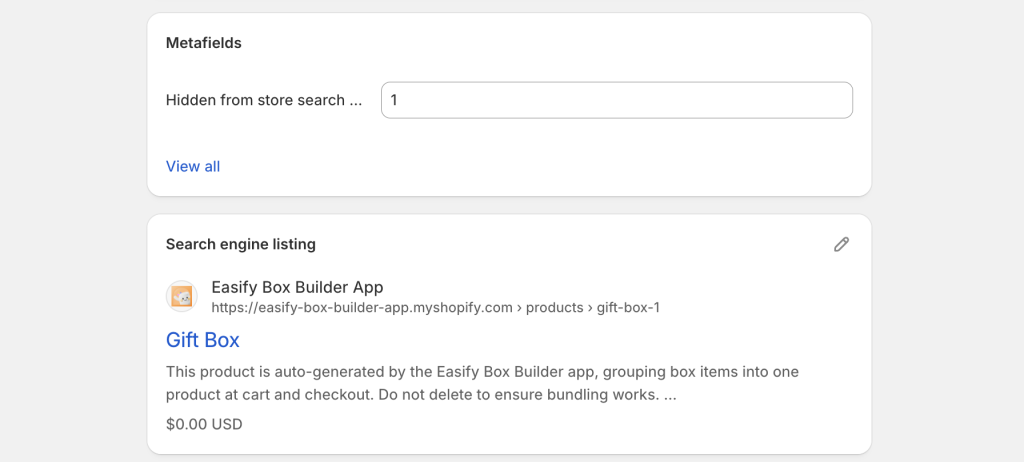
Visibility: Hidden from collections, store search, and search engines by default.
Details:
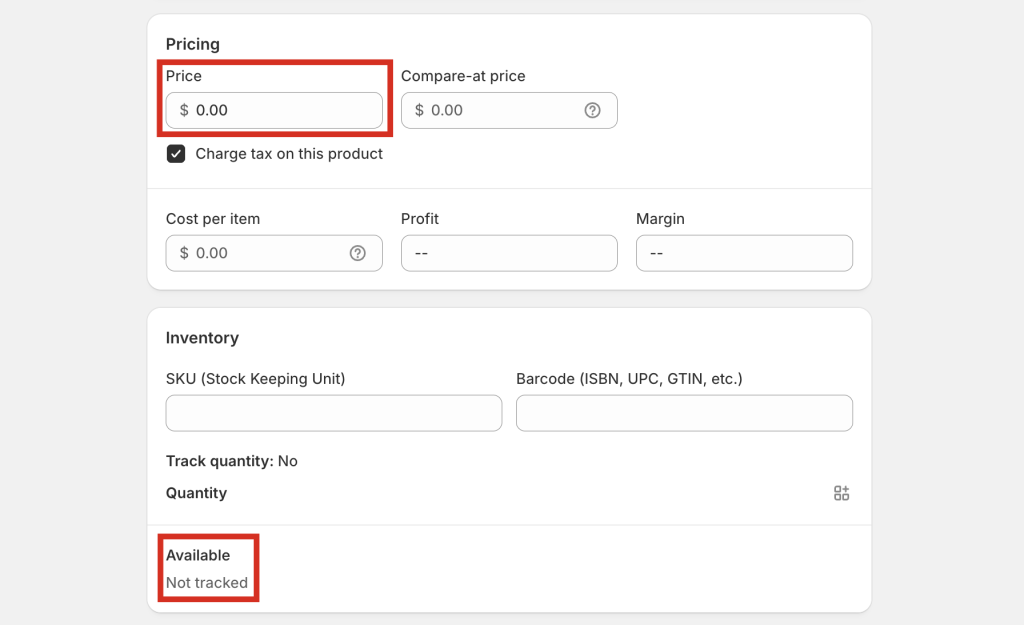
Product name and image match the box’s name and image.
Price: Set to $0.00 by default, but you can change it to any value you prefer. This is just a display price and does not affect the final box price that customers will pay. The actual price is calculated based on the total cost of the selected items, including any discounts, or as a fixed price if you’ve specified one in the box settings. You can freely adjust the display price without affecting the total, unless you enable Quantity tracking and set specific inventory for the linked product. In that case, the changed price may be added to the final box price, which could result in an incorrect calculation.
Tagged as “Easify Box Builder” for easy filtering in Shopify admin.
Update product details: By default, the app uses your box’s name and image for the product. You can rename it, upload more images, and revise the description (feel free to remove the internal note about not deleting the product).
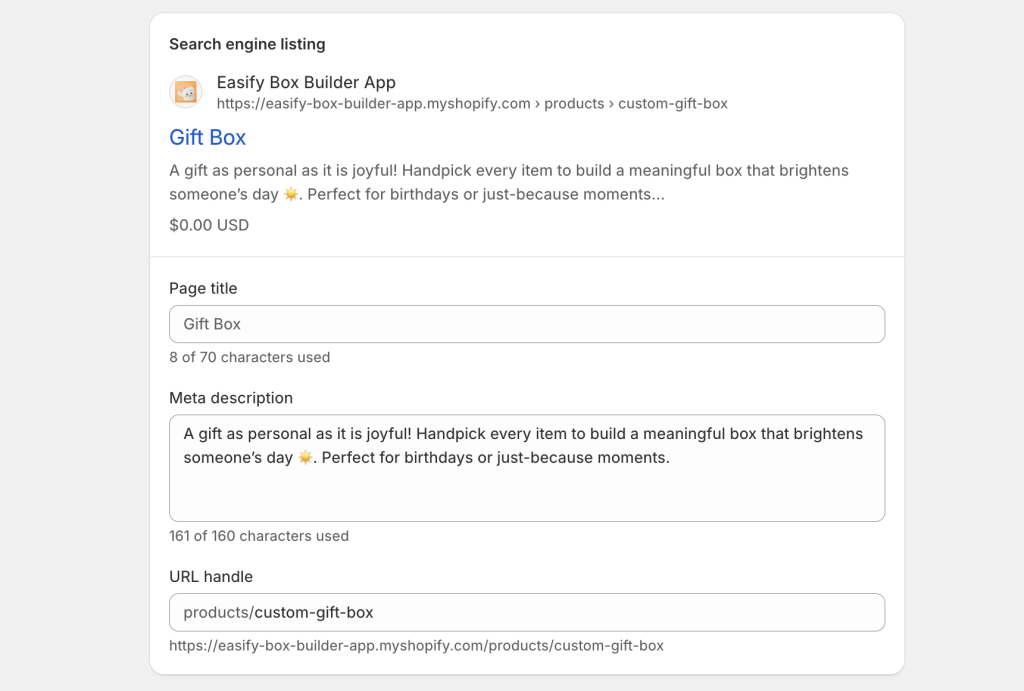
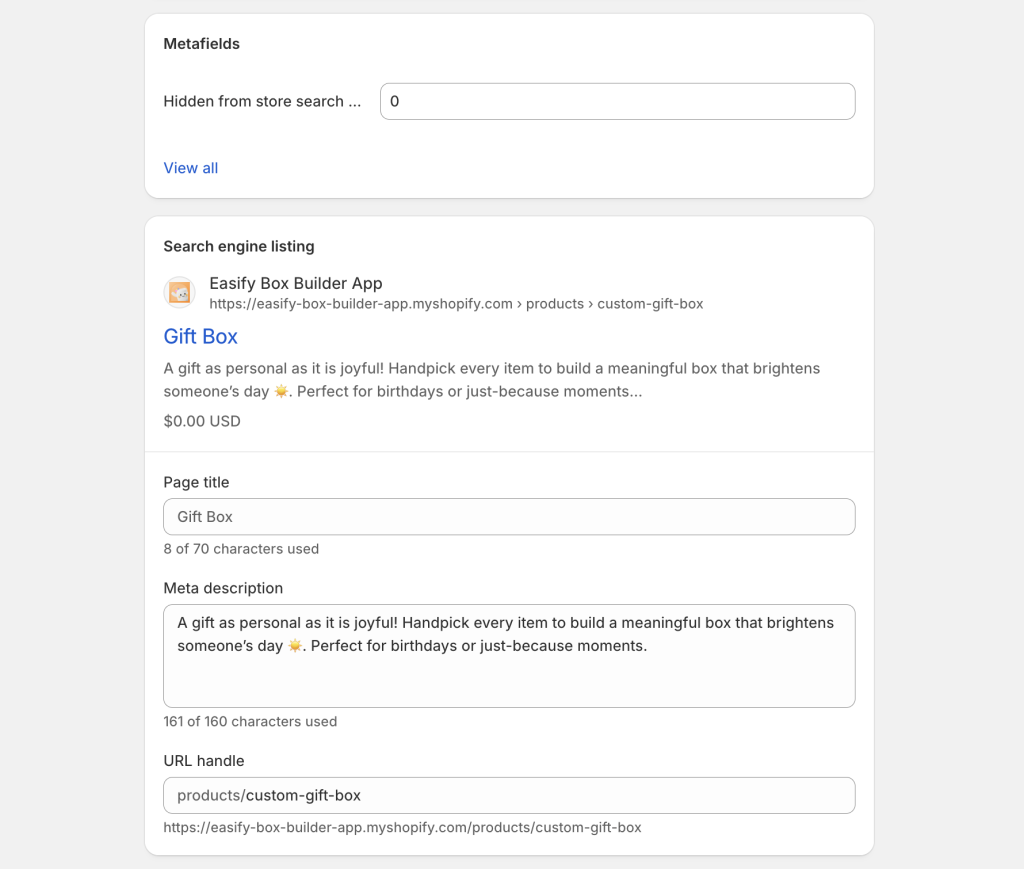
Change visibility: By default, the app hides the linked product from site search and search engines. To make it visible, go to the Metafields section of the product details and change the value of “Hidden from store search…” from “1” to “0”. Additionally, you can update the Search engine listing settings (SEO title and description) as needed to improve visibility on search engines.
From:
To:
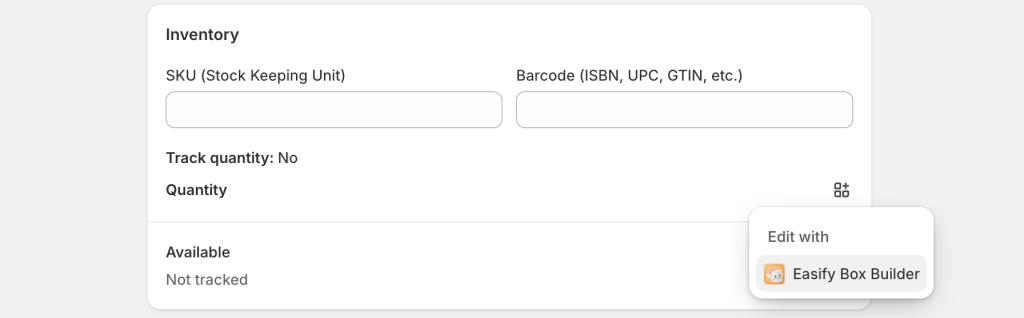
Manage inventory (optional): By default, inventory isn’t tracked. You can keep it that way or turn on inventory tracking (especially useful if you sell limited boxes). Just make sure to update stock through the app – not directly in Shopify product settings.
Before managing product inventory in the app, you’ll need to grant Easify Box Builder the necessary access. This is a one-time permission request, after it’s done, you won’t be asked again and can manage inventory directly in the app.
Once access is granted, Shopify will redirect you to the app dashboard.
After that, go back to the linked product in Shopify, scroll to the Inventory section again, and select Edit with Easify Box Builder. This will take you straight to the inventory management page in the app.
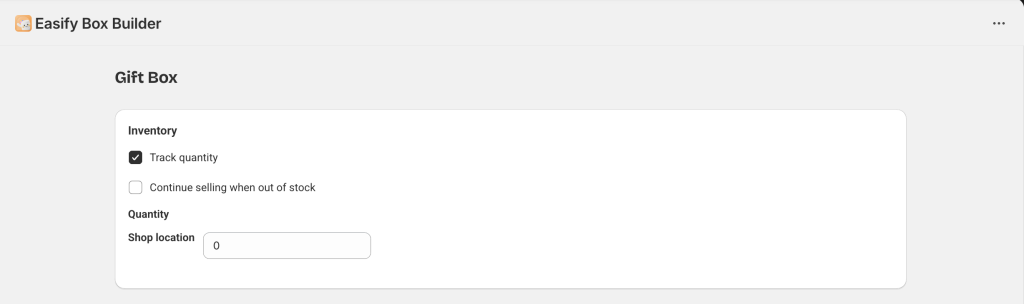
In the in-app inventory settings, check the “Track quantity” box. Enter the desired stock quantity for each corresponding location.
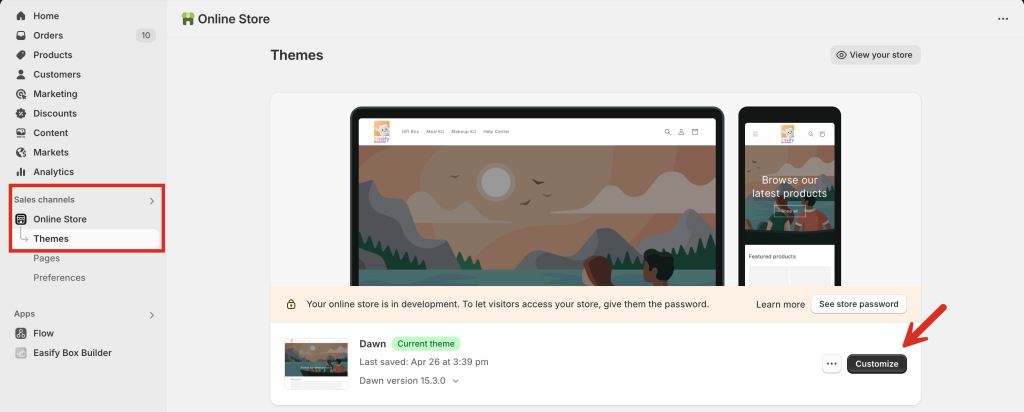
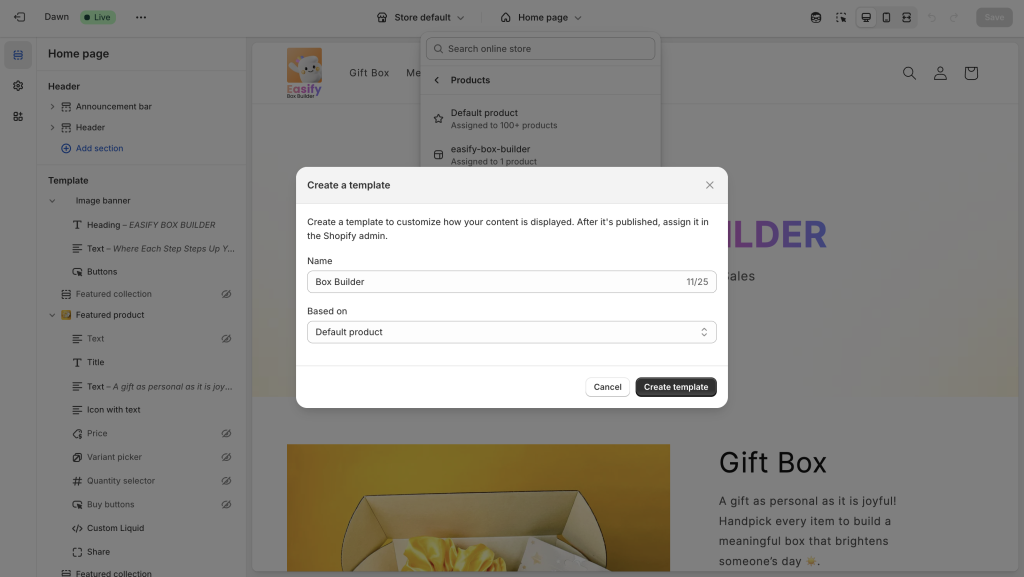
Go to Sales channels > Online Store > Customize in your active theme.
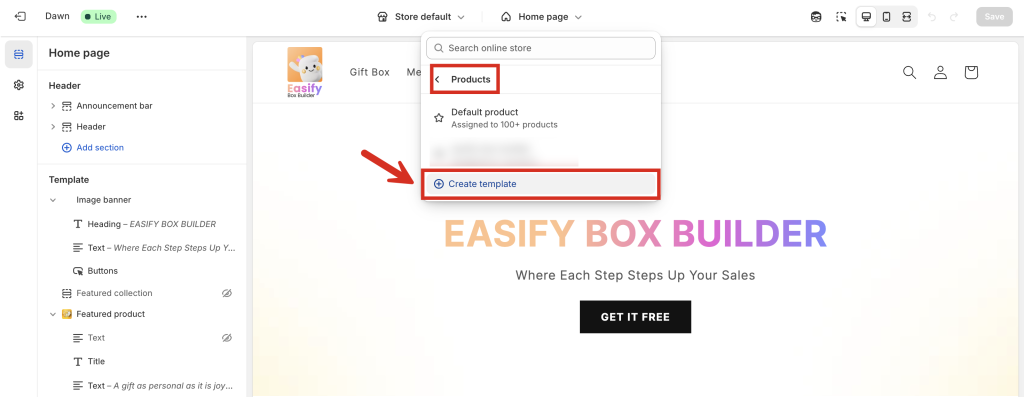
Select Products and click “Create template” to generate a new product template exclusively for items linked with your box. You can name it anything you like, such as “Box Builder“.
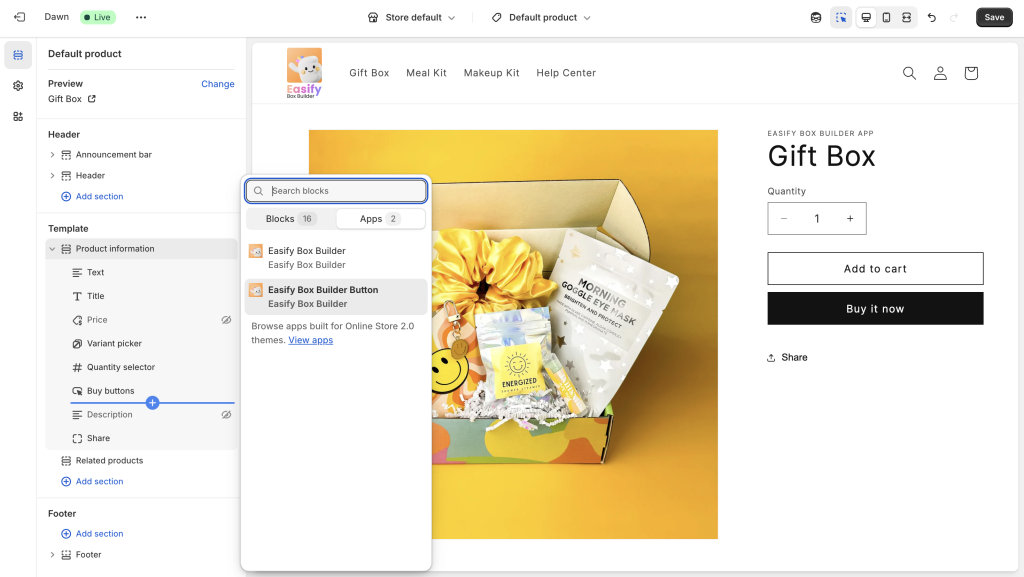
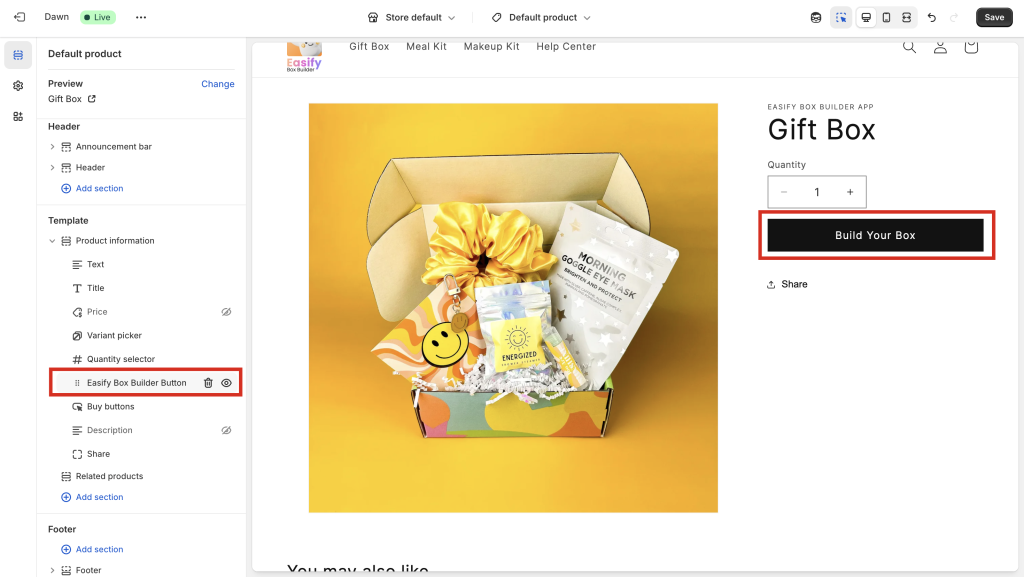
This will replace the default Add To Cart button with a Build Your Box button.
Move the button block to your preferred position.
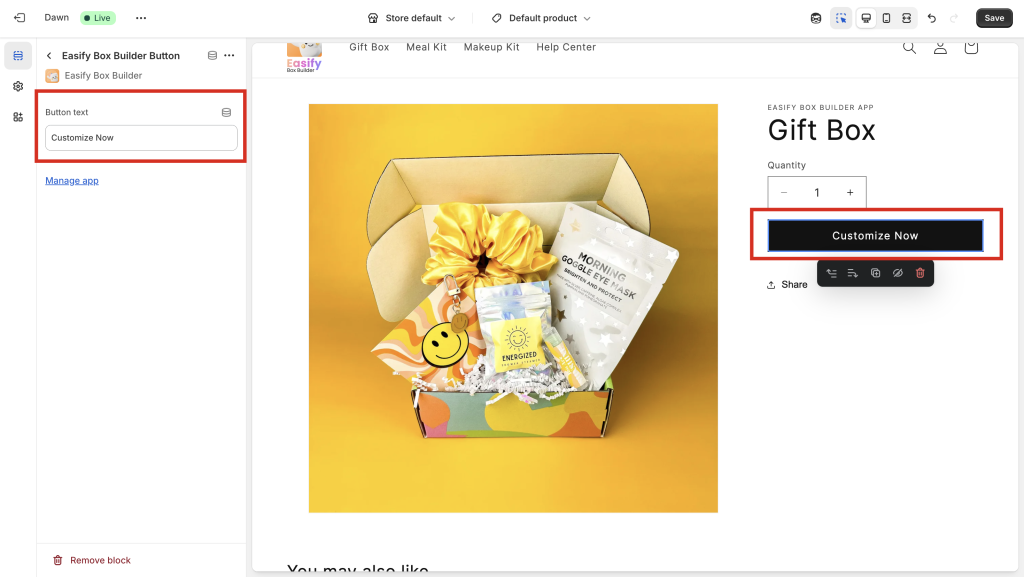
You can also customize the Button text (e.g. “Customize Now”).
Notes:
Other regular products that use the same template will not display the Easify Box Builder Button. This button only appears on product pages that are linked with boxes.
When you preview a linked product in the Theme Editor, you’ll immediately see the default Add To Cart button replaced by the Easify Box Builder button (as shown in the example above).
However, if you preview a random product that is not linked with a box, the preview won’t change even after adding the Easify Box Builder Button block. This is expected, as the button is designed to appear only for linked products.
Step 3: Display Linked Product on Other Pages (Optional) #
You can display linked products anywhere on your store such as the homepage, specific collections, and more.
Home – Featured collection
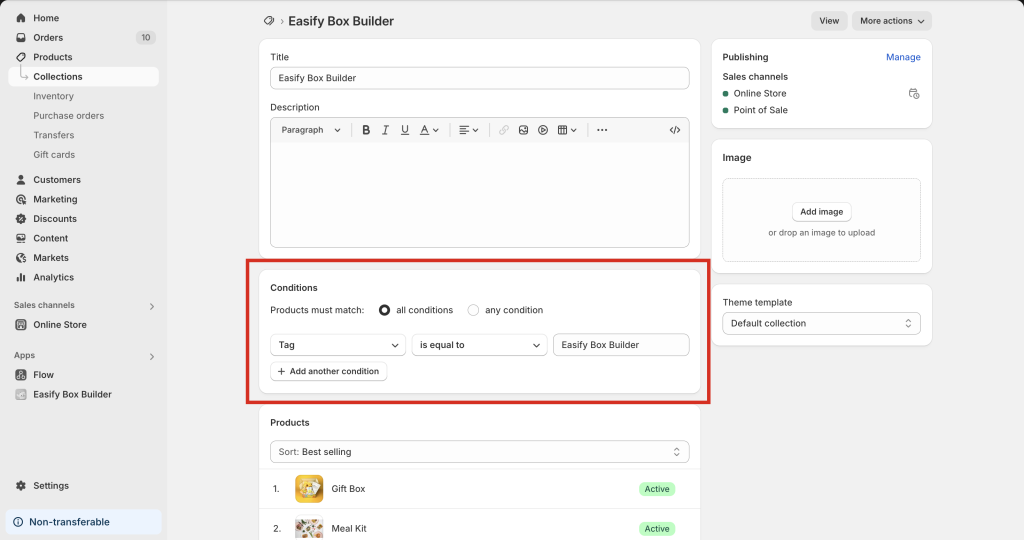
You can create a collection that gathers all products linked with boxes by simply creating a new collection filtered by the tag “Easify Box Builder”.
Once created, you can display this collection as a Featured Collection on your homepage.
Notes:
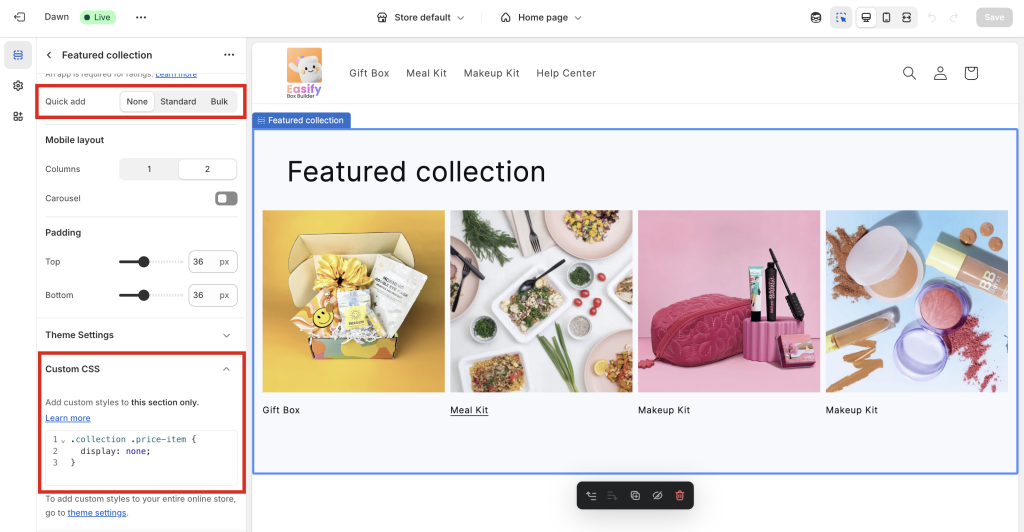
The Easify Box Builder Button is not yet supported in Featured Collections. Therefore, you should hide the default Add to Cart button in these sections.
For example, in the Dawn theme, go to Quick Add settings and select “None” to disable the Add to Cart button.
Since all linked products have no price, you should also hide the price display in the Featured Collection.
How to hide prices depends on your theme.
In Dawn theme, there’s no built-in setting for this, but you can easily hide prices using Custom CSS. If you need help with this, feel free to contact our support team via in-app live chat 💬 for instant assistance.
Example CSS code:
.collection .price-item {
  display: none;
}
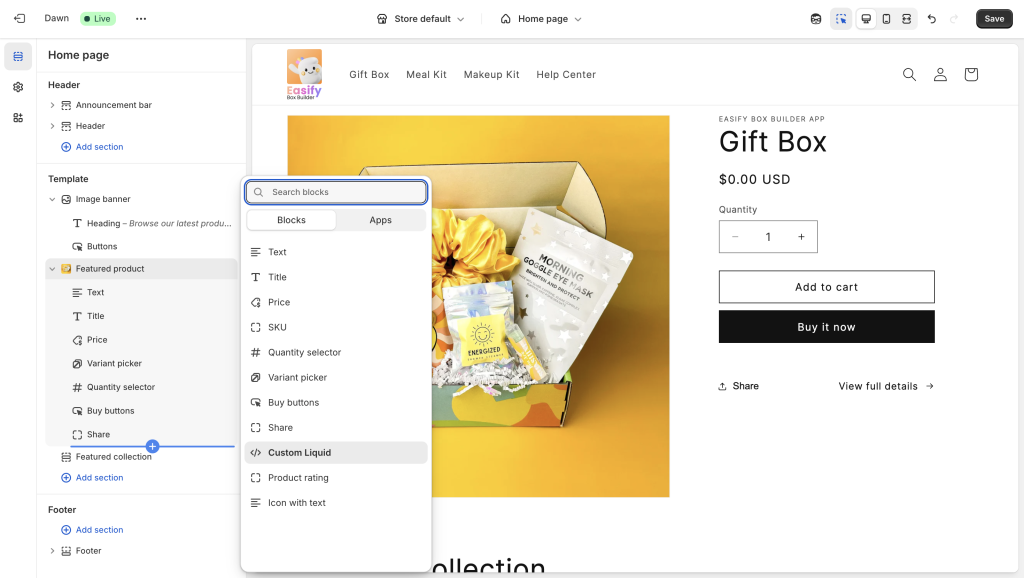
Home – Featured product
Similarly, the Easify Box Builder Button is not yet available in the Featured Product block.
If you want to showcase a linked product as a Featured Product on the homepage, you can create a custom button that links directly to the corresponding box page.
This can be done by adding a Custom Liquid block to replace the default Add to Cart button.
Not sure how to use Custom Liquid? Just reach out to our support via in-app live chat 💬 , and we’ll guide you through it.
We’re working on releasing official support for the Easify Box Builder Button in Featured Product sections soon.
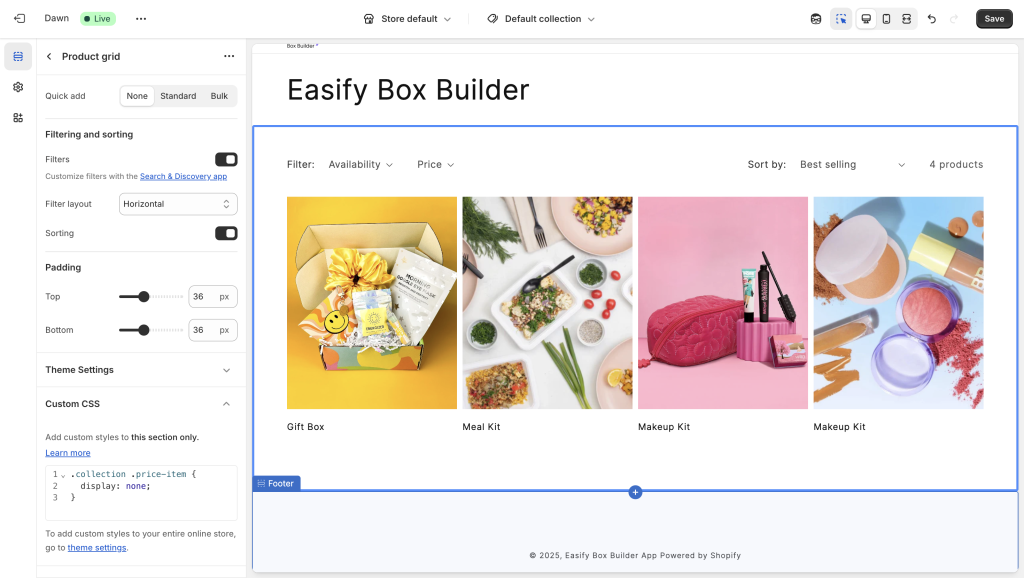
Collection Page
You can also display a full collection of products linked with boxes on your Collection pages.
Just like with the Featured Collection on the homepage, you should:
Hide the item price.
Hide the default Add To Cart button.
This ensures a clean presentation and avoids misleading actions since these products require the Box Builder flow.
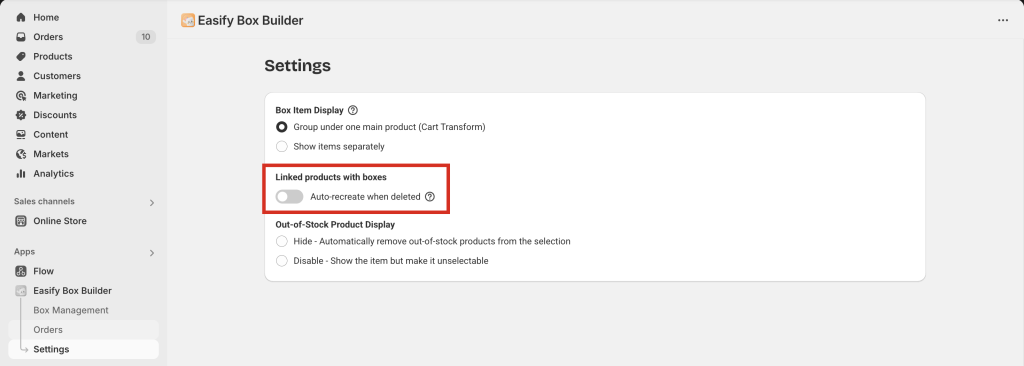
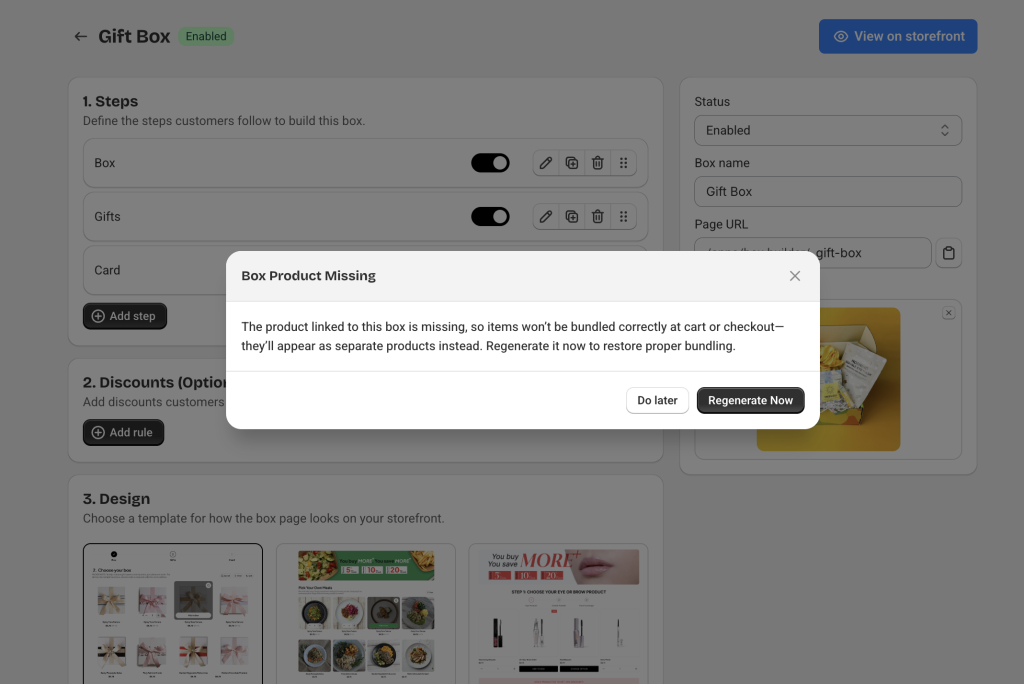
We’ve built a feature that automatically recreates a deleted linked product to ensure your box still works, especially when Cart Transform is enabled.
If you don’t want this to happen automatically, you can disable the auto-recreate feature in Settings.
If the auto-recreate setting is turned off, the app will show a popup on the Box details page when a linked product is missing. You can then choose to manually recreate it.