EasifyApps
  • About
  • Apps
    Easify Product Options
    Easify Product Attachments
  • Resources
    Help Center
    Easify Product Options
    Easify Box Builder
    Easify Inventory Sync
    Easify Product Attachments
    Video Tutorials
    Easify Product Options
    Easify Product Attachments
  • Partners
  • Blog
  • Contact
All Easify Apps
EasifyApps
  • About
  • Apps
    Easify Product Options
    Easify Product Attachments
  • Resources
    Help Center
    Easify Product Options
    Easify Box Builder
    Easify Inventory Sync
    Easify Product Attachments
    Video Tutorials
    Easify Product Options
    Easify Product Attachments
  • Partners
  • Blog
  • Contact

Easify Product Options App

Getting Started
    Key Terminology Simplified
    • Custom options & variants
    • Option set
    • Option set templates
    • Option type (Option input)
    • Your option sets
    • Option label
    • Option name
    • Option value
    • Option group
    • Conditional logic
    • Live preview
    • Help text
    • Placeholder
    • Information (Tooltip)
    • Option widget
    Option Input Types
    • Design Layer
    • Text Box
    • Text Area
    • Number Text Box
    • Color Swatches
    • Image Swatches
    • Radio Buttons
    • Dropdown
    • Checkbox
    • Button(s)
    • Switch/ Toggle
    • Modal (Popup)
    • File Upload
    • Option Group
    • Product List
    • Date Range
    • Date Picker
    • Time Picker
    • Font Picker
    • Color Picker
    • Dimension
    • Quantity
    • Custom HTML
    • Heading
    • Paragraph
    • Spacer
    • Divider
    App Activation
    • Activate the app on your theme
User Guide (PO)
    Set Up Option Sets
    • Create A New Option Set From Scratch
    • Use Ready-made Templates To Create Your Option Set
    Conditional Logic
    • What is Conditional Logic (CL)?
    • Standard Conditional Logic – Among Easify Options
    • Advanced Conditional Logic – Show Easify Options Based On Shopify Variants
    Extra Pricing (Add Charges)
    • Set Up Extra Fees (Version 3 – From July 24, 2025)
    • Set Up Extra Fees (Version 2 – July 18, 2024 – July 23, 2025)
    • Add-on Prices vs. Add-on Products (Version 1 – Before July 18, 2024)
    • Set Up Add-on Prices (Version 1 – Before July 18, 2024)
    • Set Up Add-on Products (Version 1 – Before July 18, 2024)
    • Convert Add-on Prices To Add-on Products (Version 1 – Before July 18, 2024)
    • Hide Specific Products from Shopify Storefront while Keeping Them Buyable
    Option URL
    • What is Option URL?
    • Establish Cross-Product Links
    • Include Option Detail Links For Add-on Products/Custom Options
    Option Design
    • Customize Option Styles
    • Distinct Option Styles for Light & Dark Themes
    • Modern and Classic Option Styles
    App Settings
    • General Settings
    • App Translation
    Tiered Wholesale Pricing
    • What is Tiered Wholesale Pricing?
    • Set Up Tiered Wholesale Pricing
    • Customize Tiered Wholesale Pricing Table
    Option Import/Export
      Option Export
      • Export All Option Sets
      • Export Specific Option Sets
    • Option Import
  • Track Real-time Analytics
  • Set Up One-time Charge
  • Set Up Badges for Option Values
  • Set Up Quantity Selector Per Option Value
  • Add Option Value Descriptions & Tooltips
  • Enable Image Editor for File Upload
  • Show Image/ Color Swatch Slider
  • View & Export Orders With Easify Options
  • Hide Main Product Price & Shopify Quantity Selector
  • Display Option Set In Popup Triggered By Button Click
  • Switch Product Images Upon Option Selection
  • Set Up Option/ Option Set Templates
  • Translate Option Set Into Multiple Languages
  • Separate or Combine Add-ons with Main Product in Cart
  • Reposition Option Set On Product Page
  • Set Up Product Bundles
  • Show Custom Options On Order Confirmation Emails (To Customers)
  • Show Custom Options On New Order Notification Emails (To Staff)
  • Show Custom Options On Packing Slips
Product Personalizer (Live Preview)
  • What Is Product Personalizer – Live Preview?
  • How It Works
  • Ready-to-use Templates with Product Personalizer
  • Upcoming Features
Subscription & Billing
  • Pricing Plans
  • How to upgrade
  • How to cancel subscription
Customization & Support
  • App Maintenance Notification
  • Get support
  • Request a new feature
Frequently Asked Questions
  • Why does the app remain “Inactive” even after activation?
  • What to do if custom options aren’t visible on product pages?
  • Why weren’t custom option prices included in my customer orders?
  • How many custom options can I create per product?
  • Does the app work with Shopify Online Store 2.0?
  • Will the app slow down my website?
  • How can I stay informed about updates for the app?
  • What happens if I uninstall the app, and how does it affect my store?
Integrations
  • Easify Product Options x GemPages Landing Page Builder

Easify Box Builder App

Getting Started
  • Pricing Plans, Trial, and Billing
  • Activate the App
  • Key Terms
Visual Editor
  • Create a New Box with the Visual Editor (Overview)
  • Create a New Box with a Template
  • Create a Box from Scratch (Without a Template)
  • Create Custom Fields/ Options
Box Types
  • Predefined Box Sizes
  • Regular Box
  • Tiered Quantity Discounts
  • Fixed Box Price
Product List
  • Product List (Overview)
  • Product List: Grid
  • Product List: Tabs
  • Product List: Accordion
  • Product List: Carousel
  • Default Selected Products
  • Hover to Show Second Image in Product List
Conditional Logic
  • Conditional Logic: Overview and Use Cases
  • Setting Up Conditional Logic
  • Conditional Logic Best Practices
Sales Boosters
  • Sales Boosters: The End of “I’ll Buy It Later”
  • Low Stock Counter
  • Sales Notifications
  • Countdown Timer
Advanced Features
  • Connect Subscription Plans to Boxes
  • Display Variants as Individual Products
  • Create Products Linked with Boxes
  • Set Up Add-on Price or Add-on Product for Custom Fields
  • Translate App Default Texts
  • Translate Box-Specific Content
Help & Support
  • Get Support
  • Frequently Asked Questions – Most Common Questions
  • FAQs – Theme Settings: Product Cards
  • FAQs – Theme Settings: Step bar, Quick Summary, Quick View
  • FAQs – Theme Settings: Quantity selector, Box Review Page
More Features
  • Use Cart Transform or List Items Separately at Checkout
  • Show Custom Options On Order Confirmation Emails (To Customers)
  • Show Custom Options On New Order Notification Emails (To Staff)

Easify Inventory Sync App

  • Welcome to Easify Inventory Sync
Multi-store Sync
    Getting Started
    • Overview and Key Terminology
    Sync Setup & Management
    • How to Connect Source and Destination Stores
    • Understand Connection & Sync Statuses
    • How to Track Sync Activity
    • Disconnect or Delete Connection
    Data Sync Types
    • Product Sync
    • Inventory and Order Sync
    • Page, Blog and Blog post Sync
    Subscription & Billing
    • Pricing Plans
Single-store Sync
    Getting Started
    • Quick Start Guide
    • Frequently Asked Questions
    • Roadmap Spotlight – A Sneak Peek Into The Future
    • Get Support
    Inventory Groups
    • Create Inventory Groups Automatically by SKUs
    • Create Inventory Groups Manually
    • Events Triggering Syncs among Products in Inventory Groups
    • When do Inventory groups Fail to sync?
    • How to Set Up Common Cases
    Bundle Groups
    • Create A New Bundle Group
    • How Master product inventory is Calculated from Component product inventory (Modified Quantity)
    • Events Triggering Syncs among Products in Bundle Groups
    • When do Bundle groups Fail to sync?
    • How to Set Up Common Cases
    Inventory Thresholds
    • What is Inventory Threshold?
    • Set Up Universal Inventory Threshold
    • Create A New Inventory Threshold
    Advanced Features
    • Bulk Edit Inventory Groups
    • Import/ Export Inventory Groups
    • Import/ Export Bundle Groups
    • Export Product Variant & Location IDs
    • Bulk Duplicate Products
    Subscription & Billing
    • Pricing Plans (& FAQs)
    • How to Change Plans
    Common Scenarios & Setup Guides
    • Roast Coffee
    • Loose Leaf Tea
    • Stationery Set
    • Retail & Wholesale Items
    • Blank & Personalized Tees
    • Unisex Tees
    • Baby Gift Hamper
    • Flowers
    • Chocolate Cookies
    • 3-Pack T-Shirts (mixed sizes & colors)
    • Batteries
    • Beverage (Inventory by Cans)
    • Beverage (Inventory by Packs)
    • Multivitamins (from Single Pack)
    • Multivitamins (from Double Pack)
    • Incense Sticks (Inventory by Packs)
    • Incense Sticks (Inventory by Sticks)
    • Candle Trio Set
    • Perfume Set
    • Pick n Mix Sweets
    • Top & Skirt Set (Same Size)
    • Top & Skirt Set (Mixed Sizes)
    • 2-Pack Tops (1 Color)
    • 2-Pack Tops (1 Color) – Only in Packs
    • 2-Pack Tops (Multicolor – Fixed)
    • 2-Pack Tops (Multicolor – Optional)
    • Custom Print Shirts
    • Shoes & Free Socks

Easify Product Attachments App

App Activation
  • Activate the app on your theme
User Guide
  • Upload Product Attachments
  • Upload Attachment Icons
  • Add Attachments To Templates
  • Import Bulk Product Attachments
  • Export Product Attachments
  • Add Attachments To Collapsible Rows On Product Pages
Customization & Support
  • Get support
  • Roadmap Spotlight – A Sneak Peek Into The Future
  • Frequently Asked Questions
  • Feature Requests

Recommended Shopify Apps

  • Page builder
  • Marketing
  • Affiliate programs
  • Image gallery
  • Pricing quotes
  • Invoices and receipts
  • Others

Announcements

  • 🎊 Easify Lucky Draw 2026: Winners Announcement!
  • 🎉 Easify Lucky Draw 2026: Terms and Conditions
  • Become a VIP Founder of Easify Box Builder – Limited to the First 100 Users Only!
  • Limited Support During Lunar New Year (Jan 25th- Feb 3rd, 2025) – Your Patience Is Our Greatest Gift!
  • Go Beyond Options: Easify Product Options Premium Is Here!
  • Limited Support During Our Summer Holiday (September 27th-29th, 2025) – Your Patience Is Our Greatest Gift!
  • Easify Box Builder: New Plans, Your Box Sales Get a Power-Up

Setting Up Conditional Logic

Table of Contents
  • What Can Be Configured
    • Scope of Conditional Logic
  • How To Set Up Conditional Logic
    • Step 1: Access Conditional Logic
    • Step 2: Set Show/Hide Rules
    • Step 3: Define Your Conditions
      • Select step
      • Select section
      • Select relation & Select value
  • Behavior of Conditional Logic on Storefront
    • Dynamic Display  
    • Validation Popup
  • What's Next?
  • đź’¬ Need Help?

Conditional Logic lets you create smart, personalized product flows in Easify Box Builder. Instead of showing the same options to every shopper, you can set rules: if the customer chooses X, then show Y. This makes the shopping experience smoother, more relevant, and more engaging.

👉 In this guide, we’ll deep dive into the step‑by‑step configuration of Conditional Logic, showing you exactly how to set it up in your store.

If you’d prefer a broader overview and want to explore real‑world use cases, check out our Overview Guide to Conditional Logic.

What Can Be Configured #

With Conditional Logic, you can decide what your customers see (or don’t see) as they build their box.

What you can show/hideWhat that means
StepsYou can show or hide a whole step in the builder, including everything inside.
SectionsYou can show or hide a section group  within a step, such as a heading paired with a product list.
Individual ElementsYou can show or hide specific elements, such as:
– Content: Headings, text, images, product lists
– Custom fields: Dropdowns, radio buttons, checkboxes, text fields, file uploads…

Scope of Conditional Logic #

  • Conditional Logic can work within a step: You can set rules based on elements inside the same step.
  • Conditional Logic can also work across steps. You can set rules based on elements in the previous or current steps.

💡Note: Conditional Logic can only depend on choices customers have already made (previous steps or elements above). It cannot depend on future choices that haven’t been selected yet.

How To Set Up Conditional Logic #

Step 1: Access Conditional Logic #

You can add Conditional Logic at different levels — steps, section groups or elements. Here’s how:

1. For a Step: Go to Box Content → Open the step you want to edit → In Settings, click Add Conditional Logic.

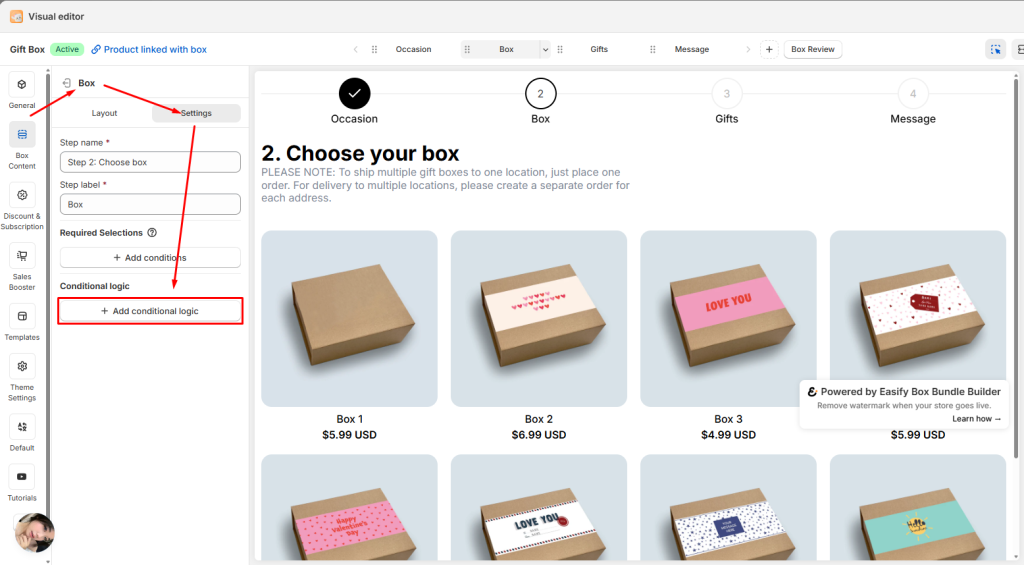
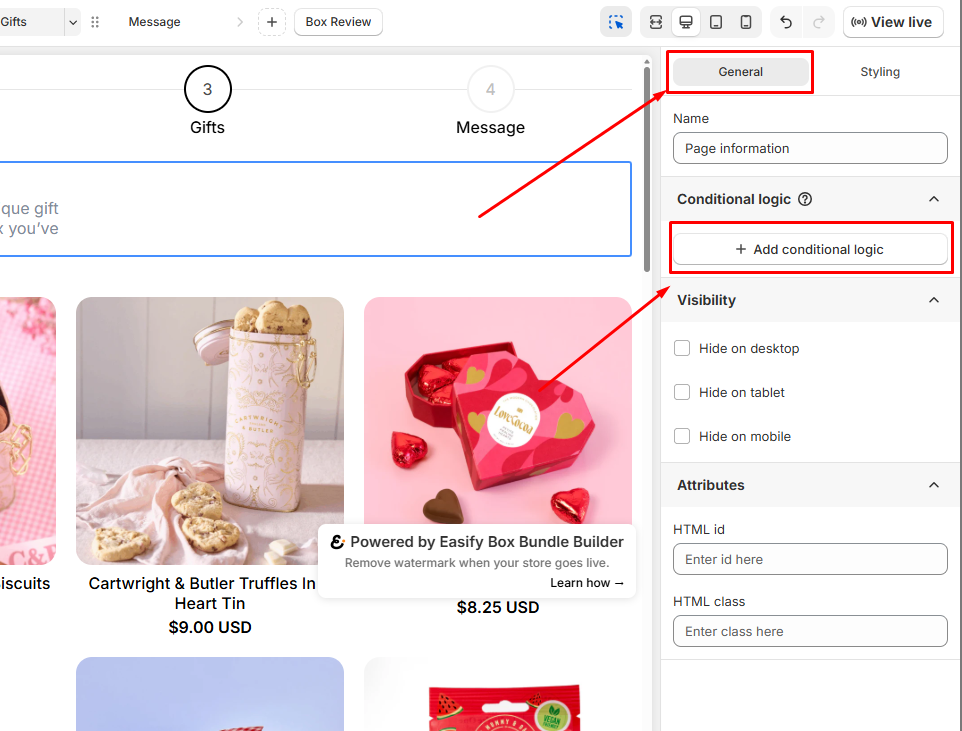
2. For an Element: Go to Box Content → Open the element you want to edit → In the General tab, scroll down and click Add Conditional Logic.

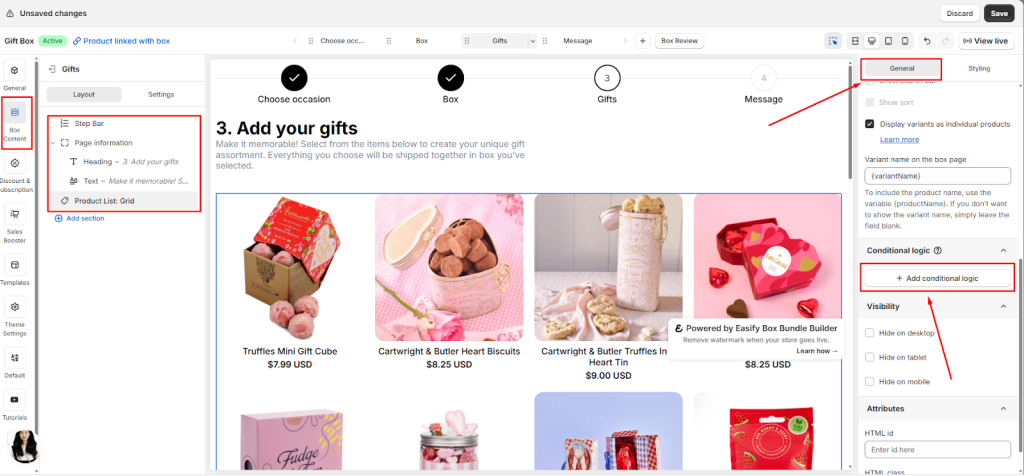
3. For a Section Group: Go to Box Content → Open the section group you want to edit → In the General tab, scroll down and click Add Conditional Logic.

Step 2: Set Show/Hide Rules #

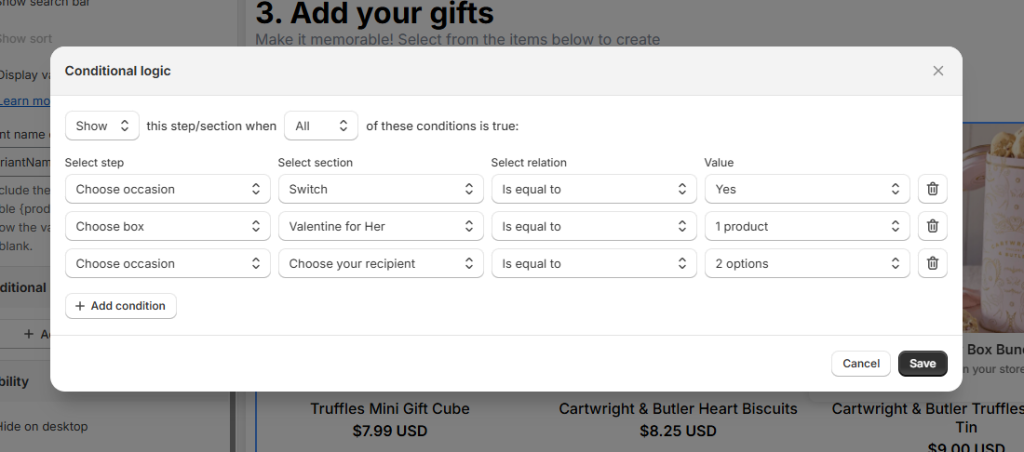
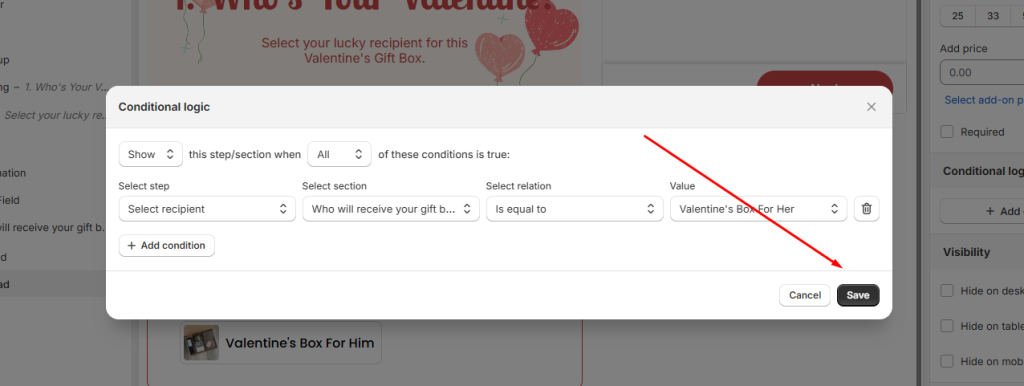
After clicking at Add conditional logic button, a popup will appear. 

At the top of the popup, you’ll see this line: 

[Show/Hide] this step/section when [All/Any] of these conditions is true.

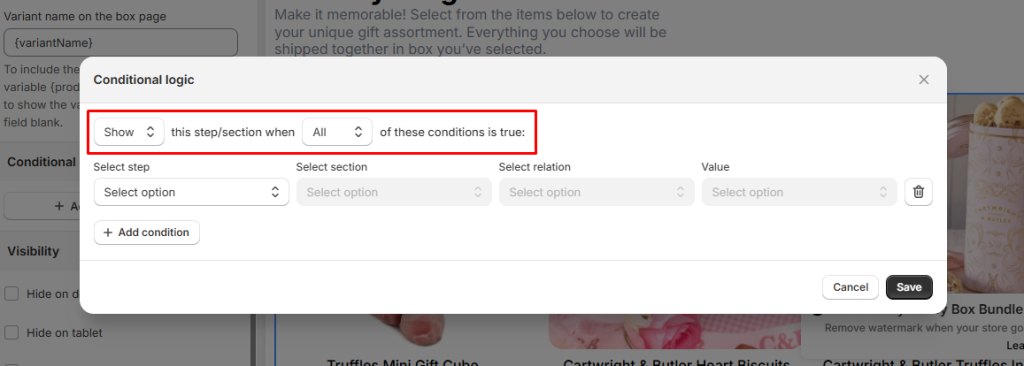
Here’s what it means:

  • Show → The step/section starts off hidden. It will only appear once the condition is met.
  • Hide → The step/section starts off visible. It will disappear once the condition is met.

You can add multiple conditions and decide how they work together:

  • All (AND) → Every condition must be true for the rule to apply.
    • Example: Show Step 2 only if the customer selects both “Large Box” and “Premium Sleeve.”
  • Any (OR) → Only one condition needs to be true.
    • Example: Show Step 3 if the customer selects either “Birthday” or “Holiday.”

Step 3: Define Your Conditions #

Next, use the condition table to define exactly what triggers the logic. Here’s how to do it step by step:
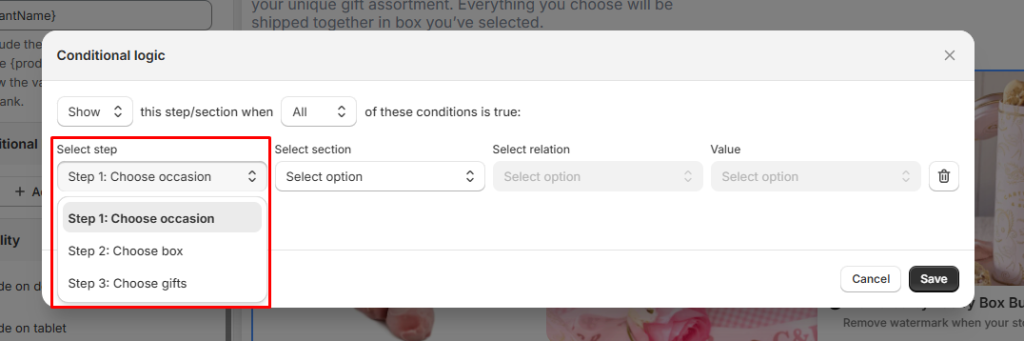
Select step #
  • Choose the step that contains the element you want to use as a condition.
  • You can select from any previous step or the current one.
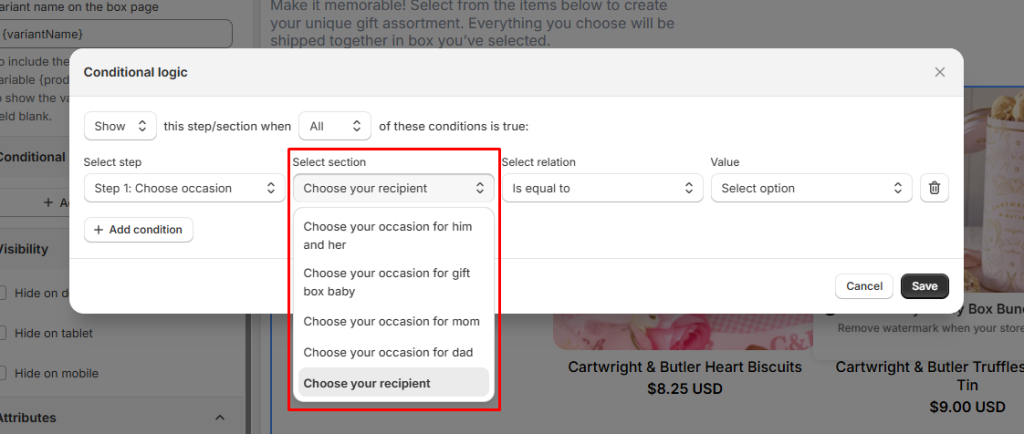
Select section #
  • The list of available sections will depend on what was added in the step you selected earlier.
  • Choose the section that contains the element you want to use as a condition.
  • Available section types include:
    • Product List
    • Dropdown
    • Radio Button
    • Button
    • Switch
    • Checkbox
Select relation & Select value #

Define how the selected element should be evaluated.

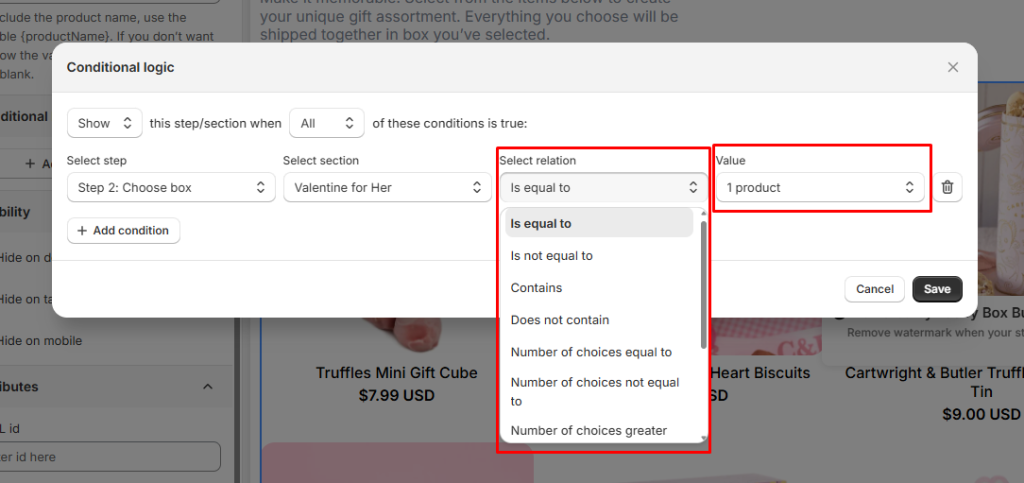
The available options depend on the section you’ve selected. Each section type comes with its own set of relations and value formats. Below is a clearer breakdown with examples.

Section TypeRelation OptionsValue ExamplesWhat It Means for Customers
Product ListIs equal to / Is not equal to“Red Roses Bouquet”, “Chocolate Box”This condition is valid if the customer choice is an exact match (or not) to specific products.

Example: Show this step only if they add Red Roses Bouquet.
Contain / Does not contain“Red Roses Bouquet”, “Chocolate Box”This condition is valid if customer’s selection includes or excludes certain products.

Example: Show this step if the box contains Red Roses Bouquet and Chocolate Box.

You can also choose whether it should match any or all selected products.
Number of choices =, ≠, >, <, ≥, ≤2, 3, 5This condition is valid if the customer picked exactly, more than, or fewer than X products.

Example: Show Step 2 only if they selected 3 or more items in step 1.
DropdownIs equal to / Is not equal to“Birthday”, “Anniversary”This condition is valid if the customer selected (or didn’t select) a specific dropdown option.

Example: Show Birthday Gift Cards only if they choose Birthday as the occasion.
Radio ButtonIs equal to / Is not equal to“Add Greeting Card”This condition is valid if the customer selected (or didn’t select) a specific radio option.

Example: Show Add a card message step if they selected Add Greeting Card.
Button (Single Select)Is equal to / Is not equal to“Add Greeting Card”This condition is valid if the customer selected (or didn’t select) a specific button.
Button (Multi Select)Is equal to / Is not equal to“Birthday Box for Him”, “Birthday Box for Her”This condition is valid if the customer selected (or didn’t select) specific buttons.
Contain / Does not contain“Red Roses Bouquet”, “Chocolate Box”This condition is valid if customer’s selection includes or excludes certain button options.

You can also choose whether it should match any or all selected button options.
Number of choices =, ≠, >, <, ≥, ≤2, 3, 5This condition is valid if the customer picked exactly, more than, or fewer than X buttons.
SwitchIs equal to / Is not equal toYes / NoThis condition is valid if the customer turned the switch on or off.

Example: Show this step only if the “Express Delivery” switch is Yes.
CheckboxIs equal to / Is not equal to“Birthday Box for Him”, “Birthday Box for Her”This condition is valid if the customer selected (or didn’t select) specific checkboxes.
Contain / Does not contain“Red Roses Bouquet”, “Chocolate Box”This condition is valid if the customer select (or didn’t select) specific checkboxes.

You can also choose whether it should match any or all selected products.
Number of choices =, ≠, >, <, ≥, ≤2, 3, 5This condition is valid if the customer picked exactly, more than, or fewer than X checkboxes.

Once you have done setting up your conditions, click at Save!

Behavior of Conditional Logic on Storefront #

Dynamic Display   #

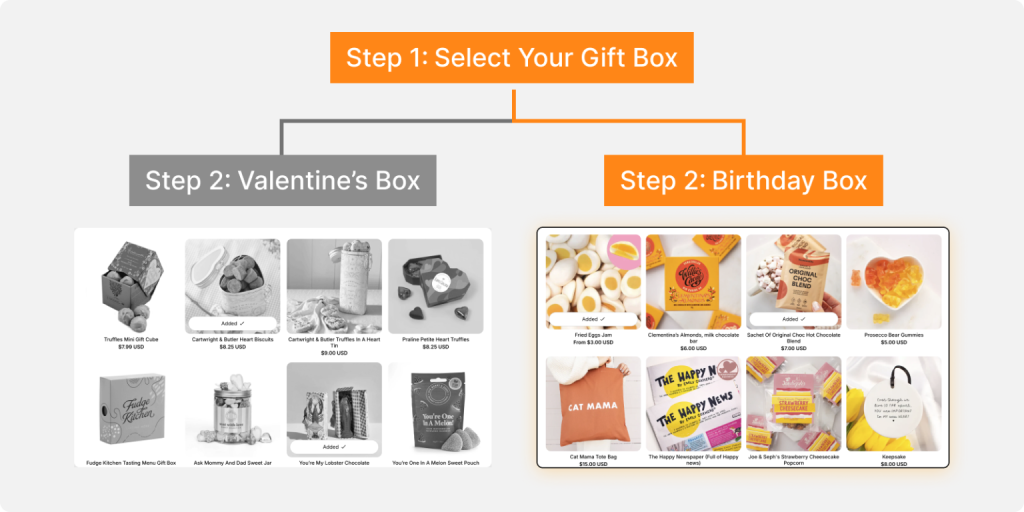
  • Customers only see options that are relevant to their previous choices. 
  • Irrelevant steps, sections, or products stay hidden, which keeps the box builder clean and uncluttered.
  • This makes the process feel tailored — for example, if a shopper selects “Birthday Gift Box,” only products with Birthday theme will appear in the next steps. Product with Valentine theme will not display.
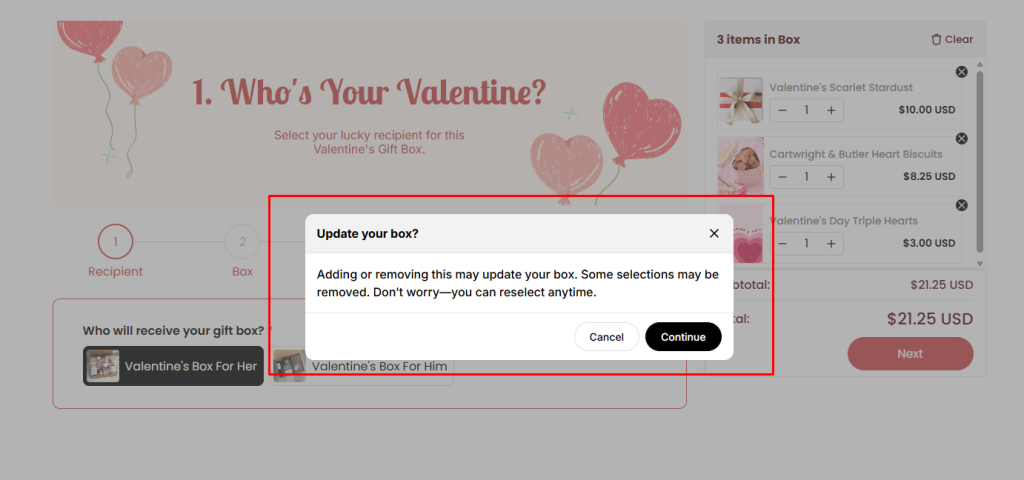
Validation Popup #

If a customer deletes or modifies a product or option that affects a conditional logic rule related to items or pricing in the Box cart, the system will automatically display a popup validation message asking them to confirm their action.

âś… When customers click Continue, any related products or options may be removed, and they may be redirected back to the step where the logic originates.

❌ If the customer clicks Cancel, no changes will be applied. Nothing will change and customers will stay in their current flow.

  • For example:
    • A customer selects “Valentine’s Box for Her” and adds several gifts designed for her (e.g., Perfume, Chocolate, Hand Cream)
    • Later, they to back to step 1 and change the option to “Valentine’s Box for Him.”
    • Because the products available for “Box for Him” are different, the items they previously added no longer match the logic rules. In this case, the system will display a popup validation message to alert them.
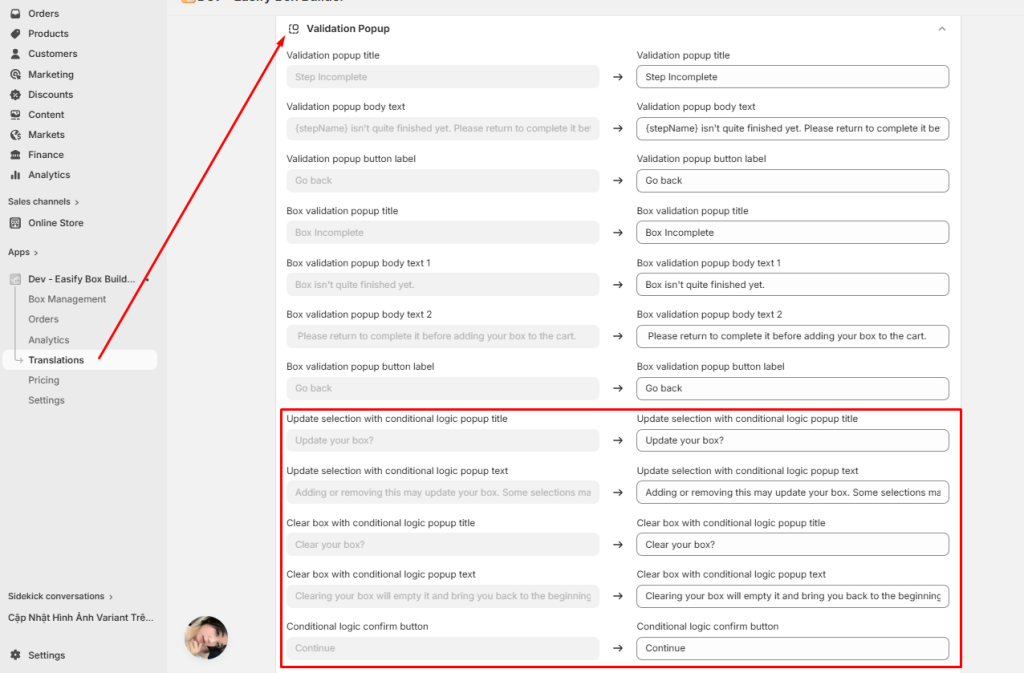
  • You can also update the validation message in Translation → Validation Popup

What’s Next? #

👉 Explore the best practices to optimize your Conditional Logic setup in the box.

đź’¬ Need Help? #

If you run into any issues or have questions, feel free to reach out via our in-app 24/7 live chat. We’re always here to help!

Table of Contents
  • What Can Be Configured
    • Scope of Conditional Logic
  • How To Set Up Conditional Logic
    • Step 1: Access Conditional Logic
    • Step 2: Set Show/Hide Rules
    • Step 3: Define Your Conditions
      • Select step
      • Select section
      • Select relation & Select value
  • Behavior of Conditional Logic on Storefront
    • Dynamic Display  
    • Validation Popup
  • What's Next?
  • đź’¬ Need Help?
Essentials Logo

Make the Complex Simple for Shopify Stores

Our AppsHelp CenterPartner ProgramPrivacy PolicyTerms of ServiceBlogContact Us

Copyright © 2025 Easify. All rights reserved.

Close
Search

Hit enter to search or ESC to close

cookie By using this website, you agree to our cookie policy. Close