In scenarios where your product offers a wide range of customization with multiple options that customers can mix and match, especially when specific quantities need to be selected for each option, the Quantity Selector feature becomes crucial.
Unlike the default Shopify quantity selector, which only adjusts the quantity of the main product, our Quantity Selector is intricately attached to each custom option within the primary product.
Supported Option Types #
- Image Swatch
- Color Swatch
- Button
- Radio Button
- Checkbox
- Dropdown
- Product List
Common Use Cases #
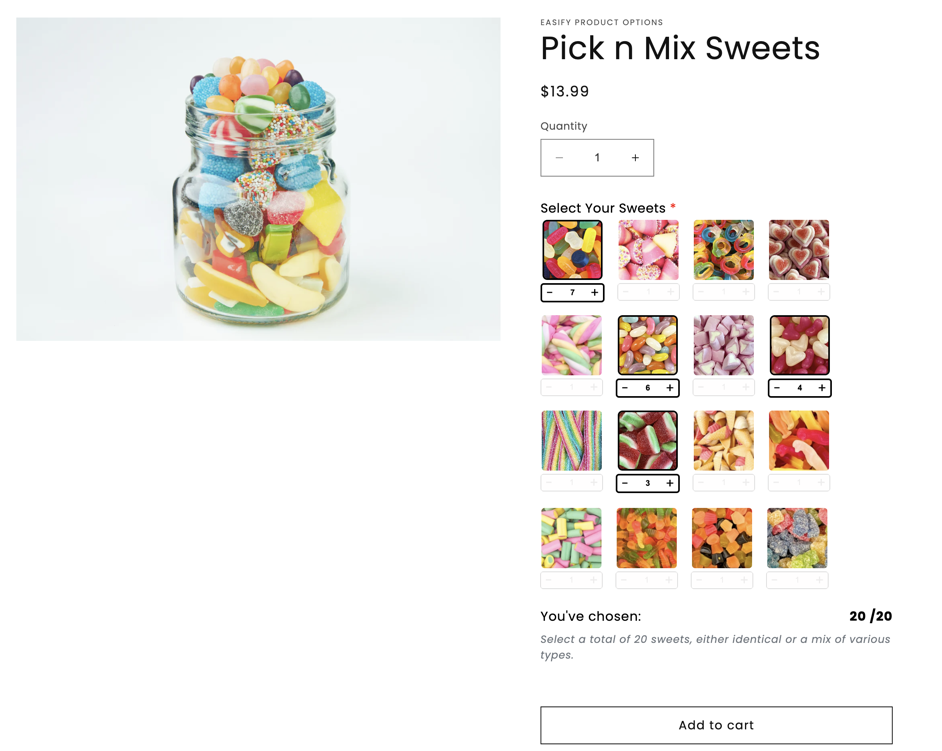
- Create a product with mixed sweets, allowing customers to choose specific quantities of various flavors, ensuring the total equals a predefined quantity (e.g., 20 sweets).
- Optionally set a maximum number of flavors customers can choose.
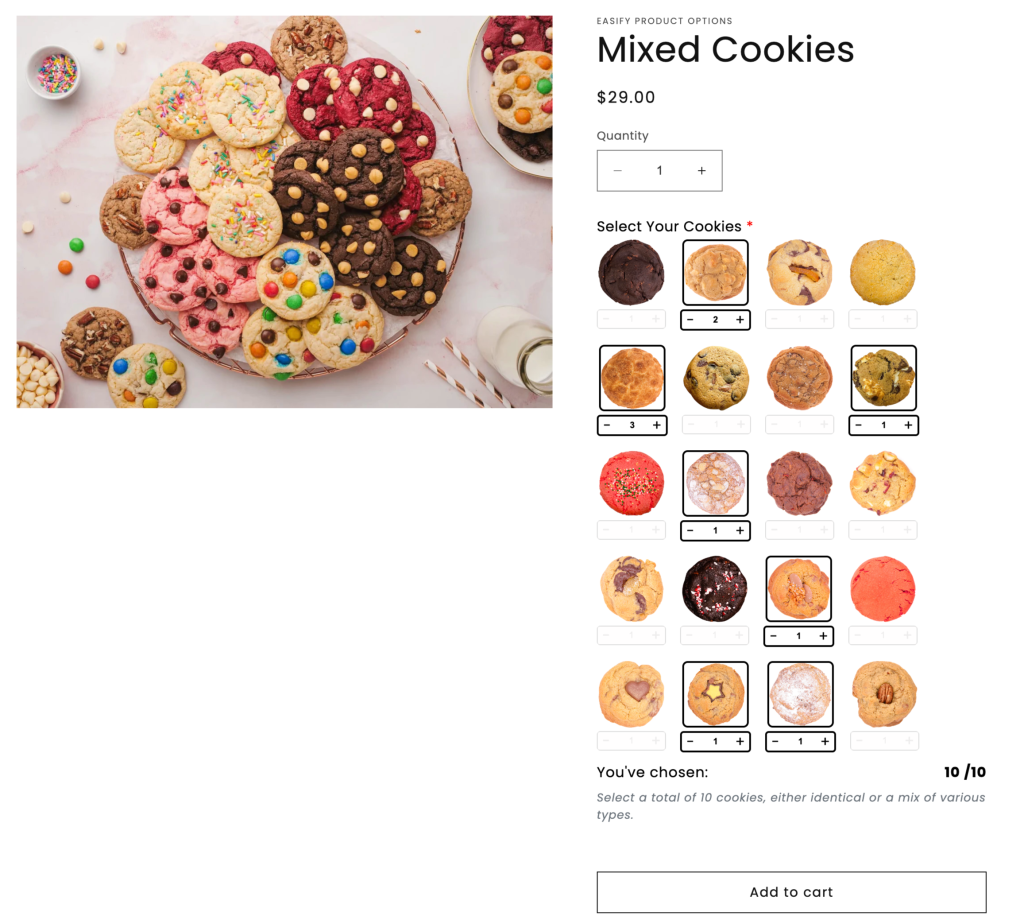
- Sell cookie sets with a fixed quantity (e.g., 10 cookies per set).
- Enable customers to select any combination of cookies with specific quantities, totaling 10 cookies.
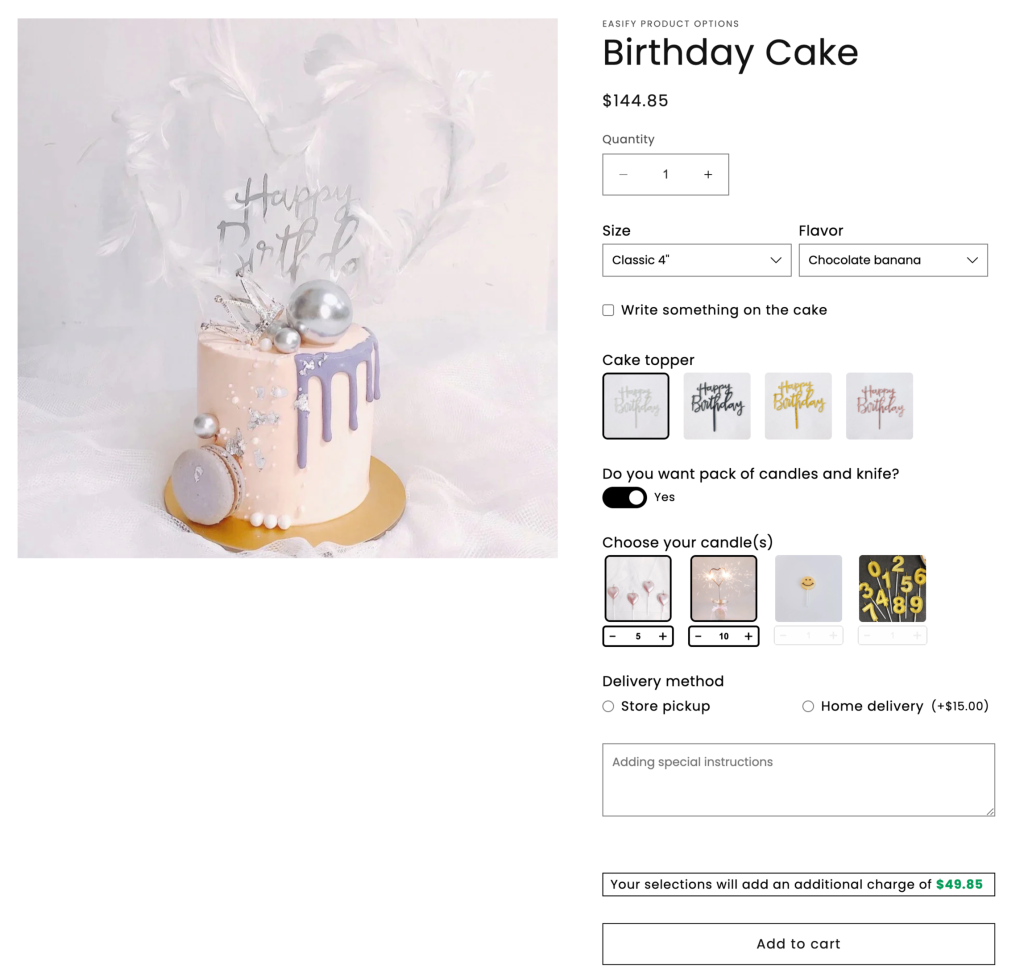
Candles bought with Birthday Cakes
- Let customers decide whether to include candles with their main cake purchase.
- Enable them to select specific candle types and quantities.
How To Set Up Quantity Selector For Custom Option Values #
1. Create your option set and custom options #
- Create a new option set, choosing the option type that supports the Quantity Selector feature (e.g.: Image Swatch).
- Add your option values to the chosen option.

Notes:
- If your products are made to order and you don’t require inventory management, simply incorporate the option values’ images and labels as illustrated above.
- Conversely, if each option value corresponds to a product that necessitates price and inventory management, designate them as Add-on products and link them to the respective option values. Find detailed information about Add-on products here. Additionally, when utilizing the Add-on product feature, if the associated product runs out of stock, the linked option values will either be hidden or disabled (based on your app settings).
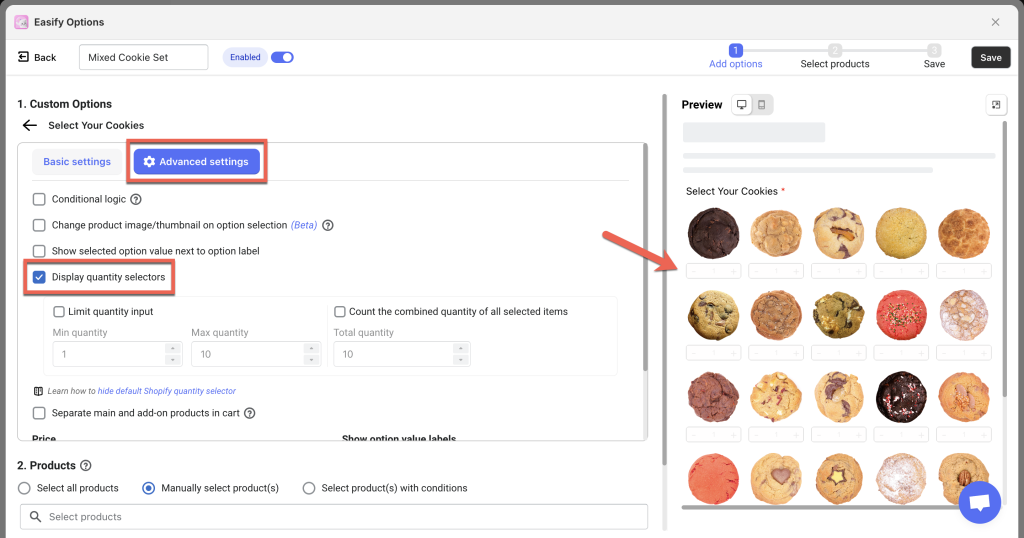
2. Enable & configure Quantity Selector within the option #
- Open the Advanced settings tab.
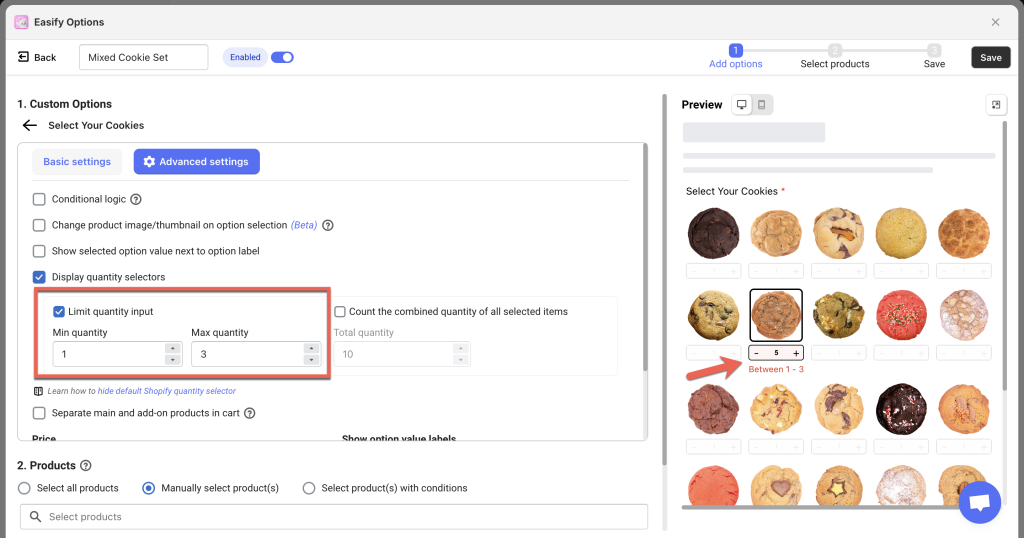
- Select the “Display quantity selectors” checkbox to enable the Quantity Selector feature.
- Limit quantity input:
Tailor the minimum and maximum values for each chosen option to suit your preferences. For example, when customers opt for a specific cookie flavor, you can require a minimum of 3 cookies or allow a maximum of 5 cookies for that flavor. Alternatively, set a range of 3-5 cookies for added flexibility.
If no Min (or Max) restriction is needed, simply leave the it as default. To disable both Min and Max values, uncheck the “Limit quantity input” checkbox.
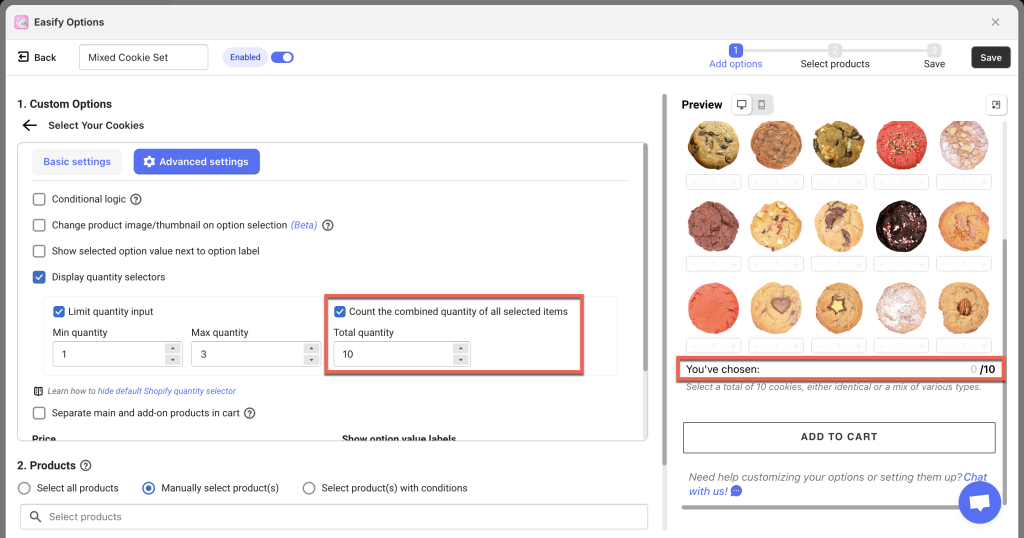
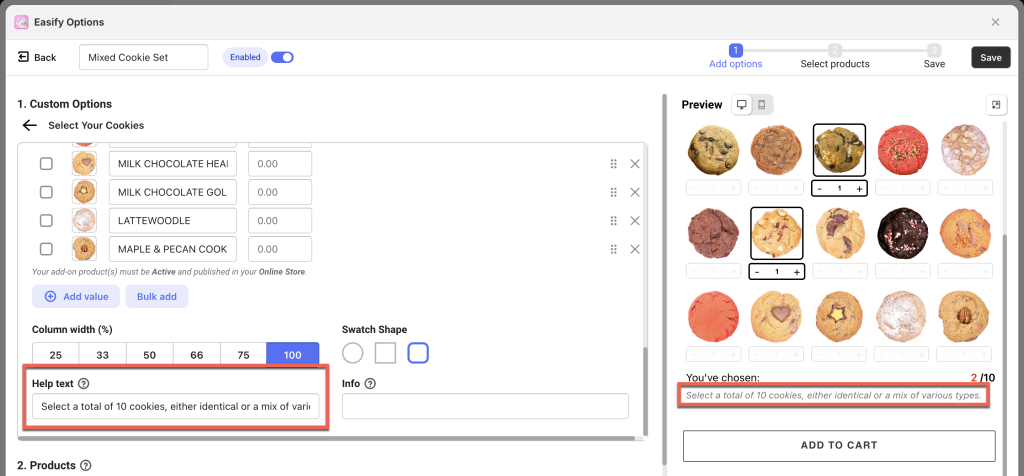
- Count the combined quantity of all selected items:
Enable this feature to display the combined quantity of all selected items, regardless of the option values chosen. This is particularly useful for products with a predetermined quantity, such as a mixed cookie set containing 10 cookies.
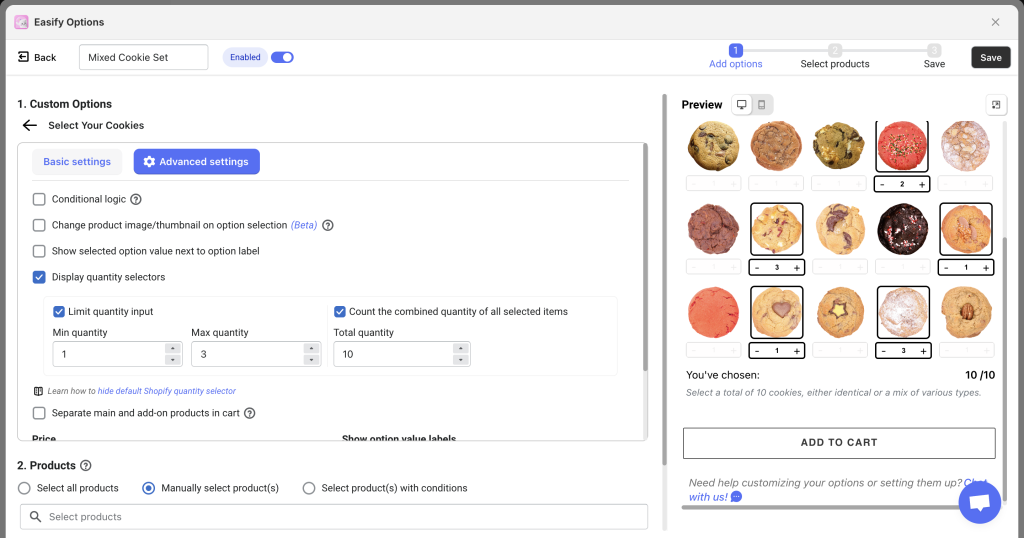
The real-time counting on the storefront ensures that customers can easily monitor their selected items and only proceed to checkout if they have added or selected the required quantity.
Notes: The counting feature doesn’t apply to Dropdown, Radio Button, and Product List (with single selection) option types. Since these options allow only one value to be selected, the total number of selected items will match the quantity chosen for that single option.
If customers haven’t added the required total combined quantity (e.g., only 7 out of 10), they won’t be able to add the product to their cart.

3. Enable Multiselection #
If your product offerings include a variety of options and you want customers to choose only 1 option with a specified quantity, there’s no need to activate the multiselection feature. However, if you want to grant customers the flexibility to select multiple options, then you should enable this feature.
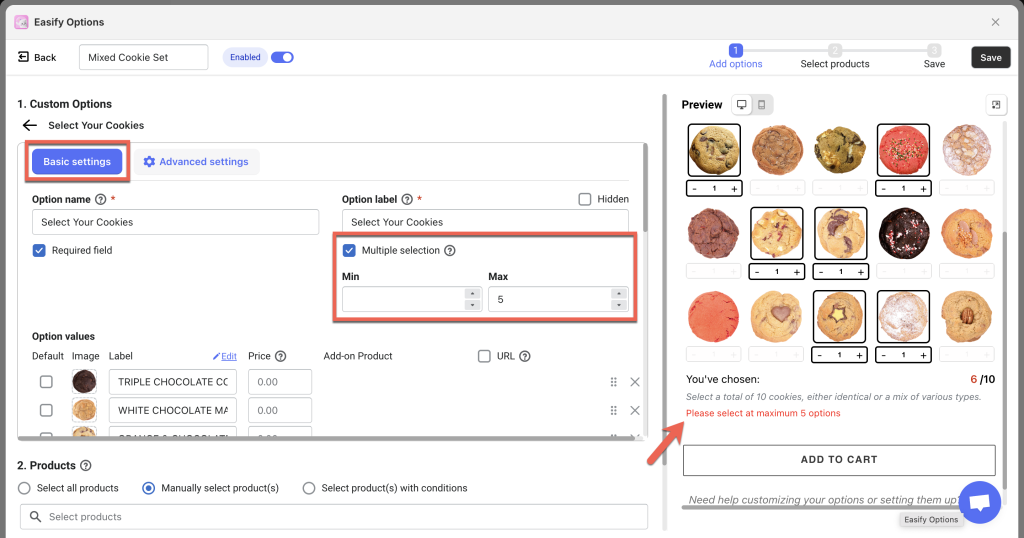
To enable multiselection, check the “Multiple selection” checkbox within the option.
Upon activation, you’ll notice 2 Min and Max fields become available, allowing you to define the minimum and maximum number of option values customers can select.
For instance, if your store boasts 20 enticing cookie flavors, but you want customers to limit their selection to a maximum of 5 flavors in a set, you can set the Max field accordingly. If a customer attempts to choose more than 5 flavors, a validation message will prompt them, preventing them from proceeding to checkout until a valid selection is made.
If you prefer to enable multiselection without restricting the number of different option values customers can choose, you can simply disregard the Min and Max fields and leave them at their default settings.
4. Enhance user guidance with Help Text and Tooltips (Optional) #
Consider incorporating helpful text and tooltips to assist customers in making informed selections. For instance:
“Choose a combination of 10 cookies, either identical or a mix of various types.”
“Opt for a total of 10 cookies, but limit the selection to a maximum of 3 different flavors.”
“Select a total of 10 cookies, ensuring a minimum of 2 cookies for each chosen flavor.”
…
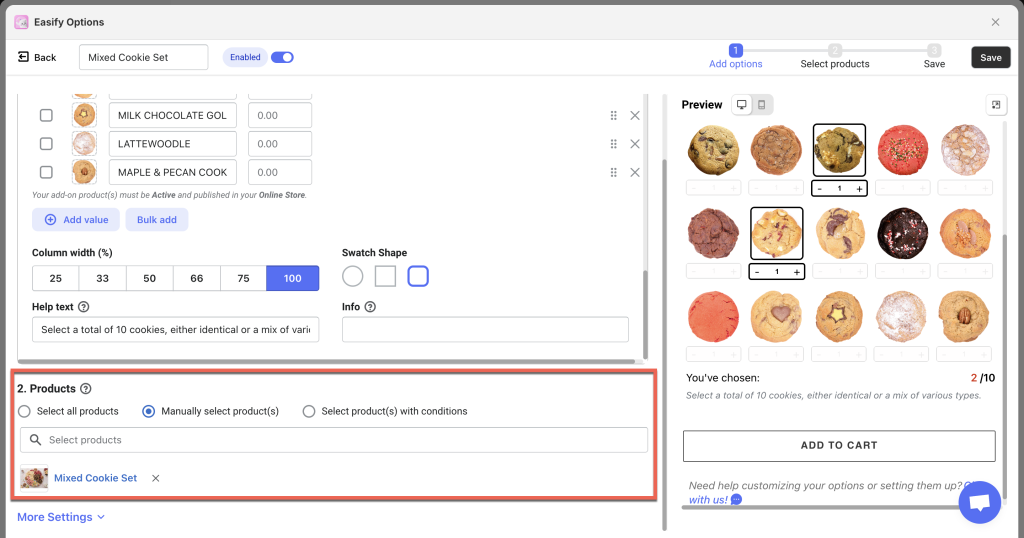
5. Add the option set to your main products #
- Select the main product(s) to which the custom options belong.
- Save the option set and publish it on the storefront.
Need Assistance? #
If you run into any challenges while configuring the Quantity Selector, feel free to reach out to us for assistance through our convenient in-app live chat. We’re here to help!