Problems #
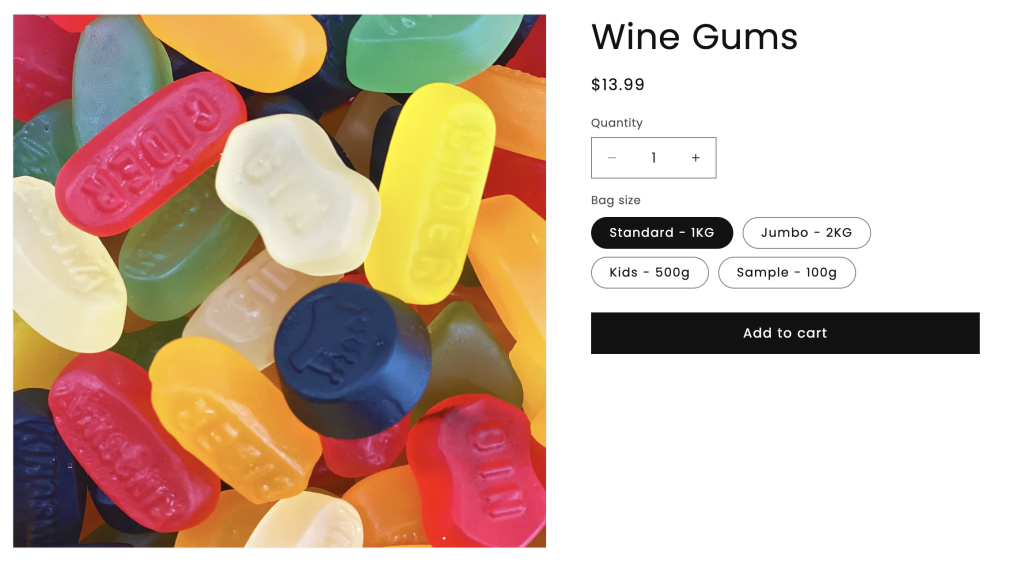
You sell sweets, and each filling is sold as a separate product (e.g., Wine Gums with different bag size options) and also as an option in the Pick n Mix Sweets products, such as:
- 250g (5 fillings)
- 500g (10 fillings)
- 1kg (20 fillings)
- 2kg (40 fillings)
Each filling accounts for 50g in the mixed sweets bag.
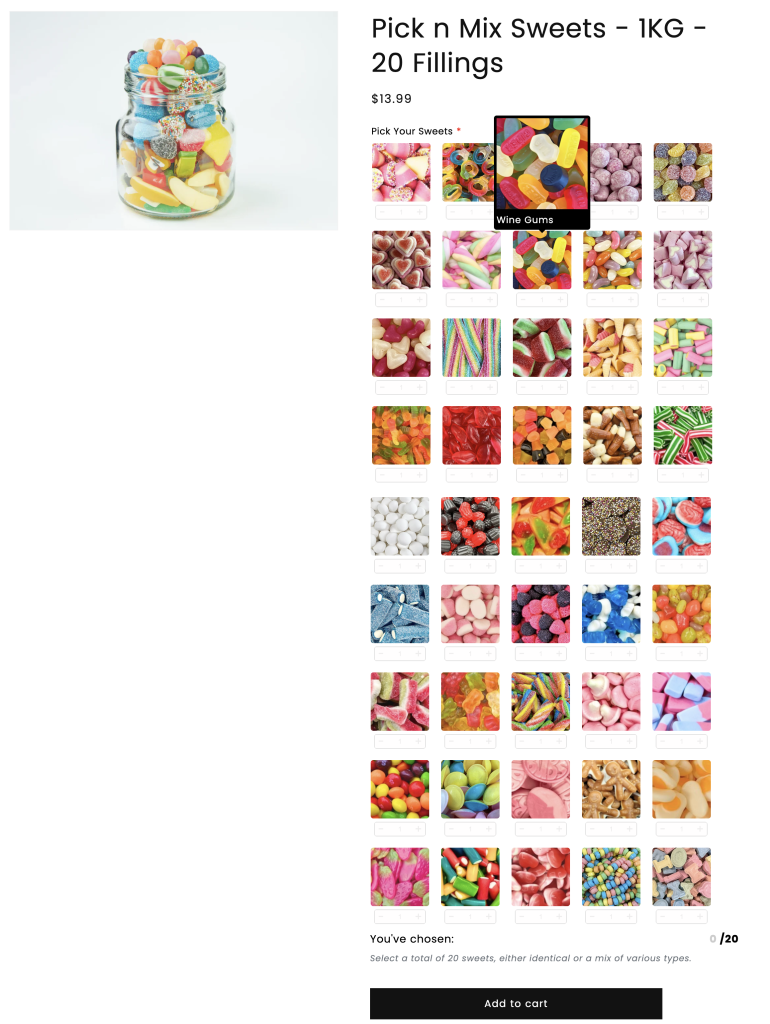
Notes: For the Pick n Mix Sweets product shown in the example, its custom options are set up using the Easify Product Options app, which uses Image Swatch, Quantity Selector, and Add-on Product features.
The issue is that there is no link between the inventory of your single sweets sold individually and the sweets available as options in the Pick n Mix Sweets bags. As a result:
- When customers purchase single-flavor sweets that are not in any mixes, the stock for the sweet options in the Pick n Mix Sweets bags does not automatically update. This means that even if the individual sweets are out of stock, that sweet flavor is still shown as in stock for selection in the mixed bag.
- Conversely, when a Pick n Mix Sweets bag is sold with specific selected sweet fillings, the inventory for those individual sweets isn’t reduced accordingly.
- Additionally, in each sweet filling’s separate product, there are also different bag sizes (e.g., 100g, 500g, 1kg, 2kg). These are separate Shopify variants with separate inventories that are not linked together, even though they are actually the same product drawing from the same inventory. For example: If you have 10kg (10,000g) of Wine Gums, the inventories you can set for 100g, 500g, 1kg, and 2kg bag sizes available for selling are 100, 20, 10, and 5 respectively.This leads to a total of 40kg (40,000g) shown in inventory, which is far from your actual inventory of 10kg.
The lack of synchronization between the individual sweet fillings and the Pick n Mix Sweets bags, as well as between different bag sizes for each sweet flavor, creates significant mismatches in inventory. This makes it challenging and inaccurate to manage stock levels effectively.
Solutions #
By combining the powers of the Easify Inventory Sync and Easify Product Options apps, you can effortlessly solve your inventory management issues.
Overview: #
1/ Create Add-on Products #
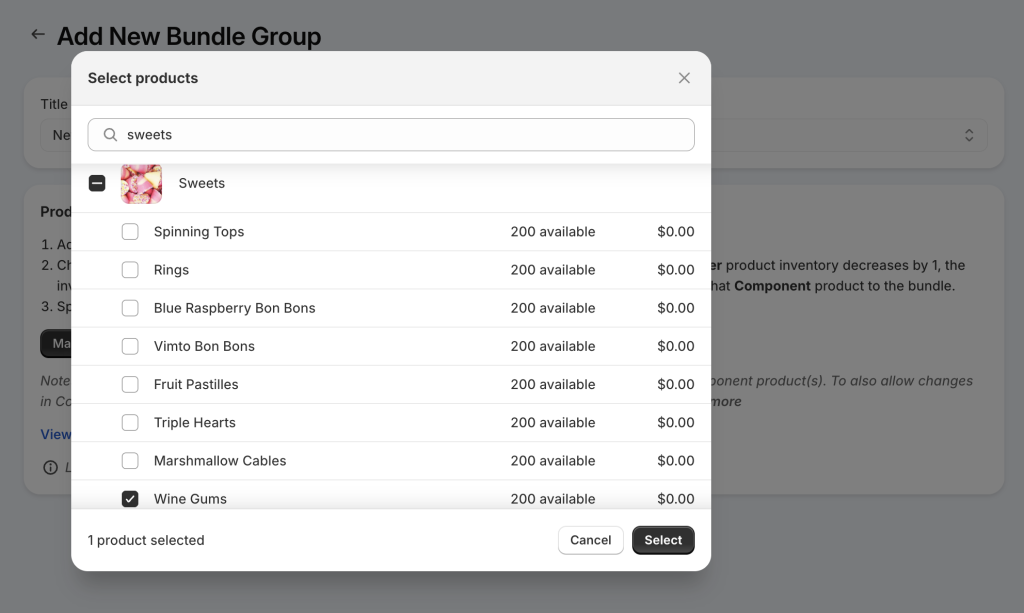
To create sweet options for Pick n Mix Sweets bags and manage their inventories, start by creating a product in Shopify admin (e.g., named “Sweets“). This product should include a sweet option with variants representing all the available sweets.
For instance, if you want customers to choose from 45 fillings, create a product with the filling option and 45 variants, each representing one of the 45 fillings.
Add images for each variant and set the price for all variants to $0.00. Since this product is for selection purposes only and not for individual sale, individual variant prices are not necessary; otherwise, these prices would be added to the total cost of the mixed sweet bags.
Additionally, set this product as Active in your Online Store to make it buyable, but use simple techniques to hide it from the storefront so it cannot be purchased outside the mixed sweets bags.

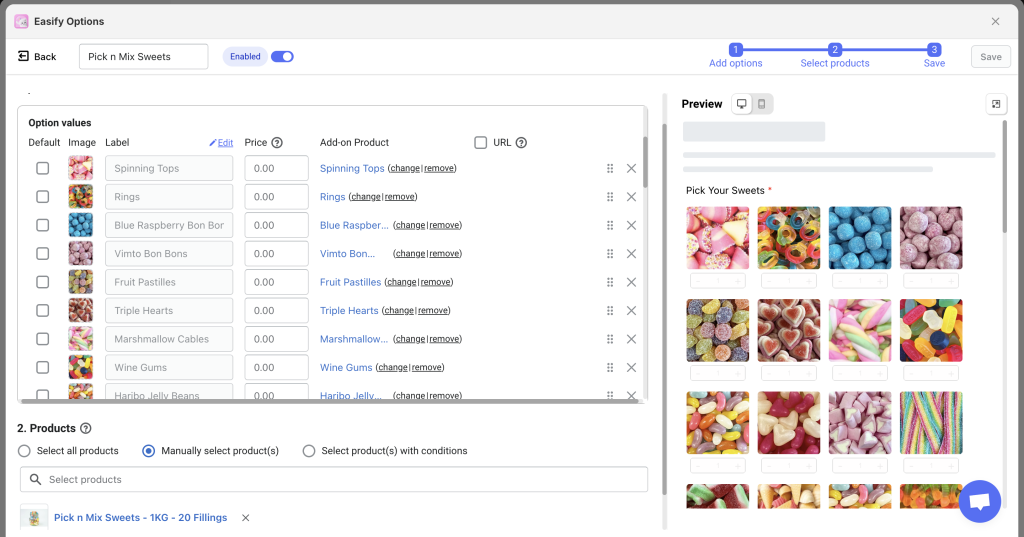
2/ Create Sweet Options #
Utilize the Easify Product Options app to set up sweet options for the Pick n Mix Sweets products. Link each option value to the variant of the “Sweets” product you created earlier. This will allow customers to choose their preferred fillings. For example:
3/ Create a Base product for Inventory Tracking #
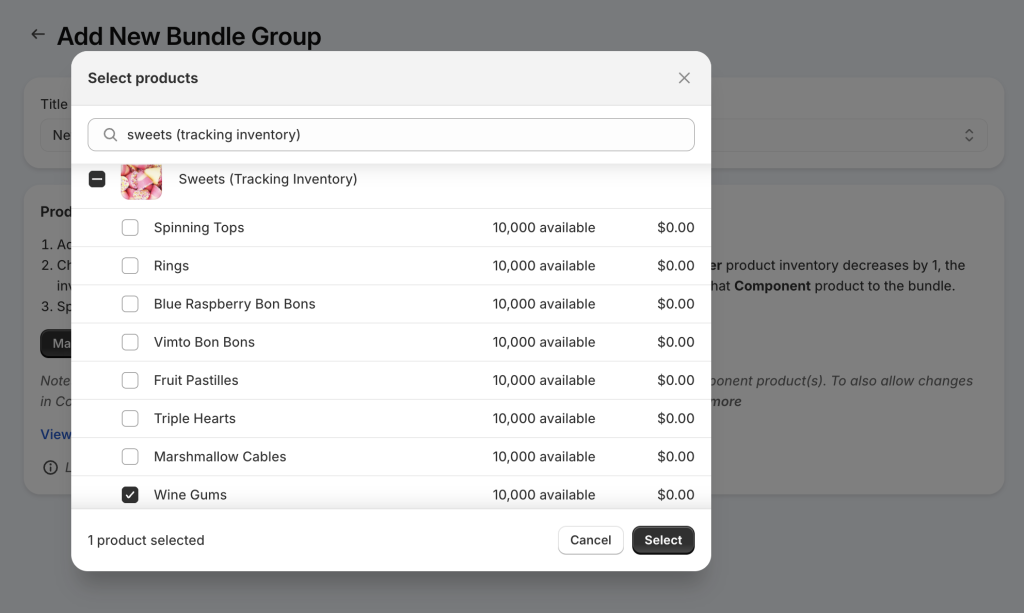
Duplicate the Sweets (Add-on Product) to create a new product, e.g., “Sweets (Tracking Inventory)“. This product is essential for reflecting the actual inventories of all sweets.
The inventory levels of this product will determine the available inventory for both individual sweets products (e.g., Wine Gums) and the variants of the Sweets (Add-on products in the Pick n Mix Sweets bags).
Essentially, it acts as a central hub: when an individual sweets product is purchased, its inventory is synced with the Base product, which then adjusts the quantity of the Sweets product accordingly. This creates a closed inventory loop for accurate management.
Note that the Base product should be set as a Draft product, existing only in the Shopify backend for inventory management purposes and not visible on the storefront.
4/ Sync Inventories #
Set up Bundle Groups in the Easify Inventory Sync app to create essential inventories links between:
- Each individual sweets product (its variants) and the Base product (create a separate bundle group for each variant)
- The Sweets (Add-on product) and the Base product.
If your store has many products, consider using the app’s import/export features to create your bundle groups in bulk.
Steps to Set up Bundle Groups: #
For each sweet filling, you will create:
- A bundle group to connect the Base product with the Add-on product (e.g., the Wine Gums variant of the Sweets (Tracking Inventory) product and the Wine Gums variant of the Sweets product).
- X bundle groups to connect each bag size variant of the individual sweets products with the Base product (e.g., 1 group for the Wine Gums variant of the Sweets (Tracking Inventory) product and the 100g bag size variant of the Wine Gums product, and similar groups for the remaining bag sizes). If your individual sweets product (Wine Gums) has 4 bag sizes (100g, 500g, 1KG, 2KG), you will need to create 4 bundle groups for these sizes.
Tips:
You can manually create all bundle groups for a sweet filling first (e.g., 5 bundle groups for Wine Gums).
Then, export these groups to a CSV file, and create other groups for additional sweet fillings by following the same pattern in the CSV file.
Finally, import the CSV file to the app to generate bundle groups for all sweet fillings in bulk.
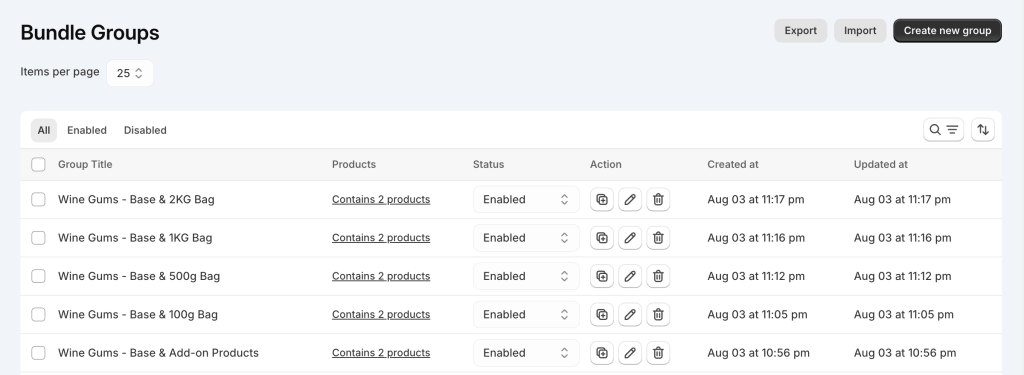
Step 1: Create a Bundle Group for the Base and the Add-on Product #
- On the Bundle Groups page, click the “Create new group” button.
- Set the group name, for example, “Wine Gums – Base & Add-on Products”.
- Manually select 2 products to add to the group:
- The Wine Gums variant of the Sweets product (“Sweets – Wine Gums“): Set it as Master.
- The Wine Gums variant of the Sweets (Tracking Inventory) product (“Sweets (Tracking Inventory) – Wine Gums): This is the Component product. Set the Quantity per bundle for this product to 50. Explanation: Each unit of the filling option (Add-on product of the Pick n Mix Sweets bags) if selected will account for 50g in the bag. When 1 unit of the filling is selected (-50g), the relevant Base/Component product will be deducted by the same amount (50g), so the Quantity per bundle here is 50.

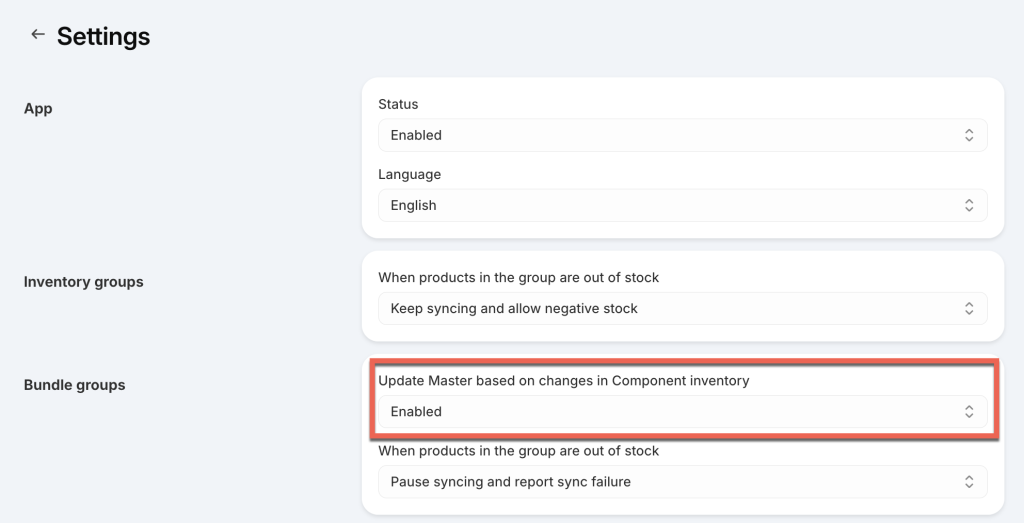
- Save the bundle group. After saving, the quantity of the Master product (“Sweets – Wine Gums“) will be adjusted based on the inventory of the Base/Component product (“Sweets (Tracking Inventory) – Wine Gums“). Notes: Enable the feature “Update Master based on changes in Component inventory” in the app’s Settings page before creating the group.
Learn more
How Master product inventory is Calculated from Component product inventory
Step 2: Create Bundle Groups for the Base and the Bag Size Variants #
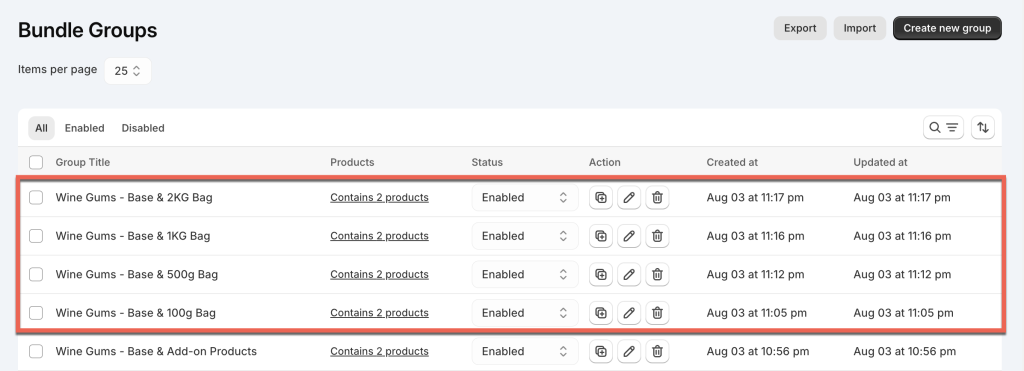
- Duplicate the first group of the Base and the Add-on Products to create the second group for the first bag size, such as 100g.
- Change the group name, for example, from “Wine Gums – Base & Add-on Products” to “Wine Gums – Base & 100g Bag“.
- Enable the new group.
- Remove the Add-on products (Sweets – Wine Gums) from the group and add the 100g variant of the Wine Gums product (Wine Gums – 100g) to the group, and set it as the new Master of the group.
- Set the Quantity per bundle for the Base/Component product (Sweets (Tracking Inventory) – Wine Gums) to 100. This means that when 1 unit of the Wine Gums – 100g variant is bought, the quantity of the Base/Component product will be deducted by 100g.

- Save the group and update the quantity of the Wine Gums – 100g variant based on the Base/Component product.
- Repeat these steps to create bundle groups for the remaining bag sizes of Wine Gums.
Step 3: Export Bundle Groups of One Sweet Filling to Create Groups for Remaining Sweet Fillings in a CSV File #
- After creating all bundle groups for the first sweet filling, you can continue creating bundle groups for other sweet fillings similarly.
- Alternatively, export all these groups as sample data to a CSV file. Add more data to the CSV file for other sweet fillings. Import the CSV file to the app to create bundle groups for all sweet fillings in bulk.
Learn more
Need Assistance? #
If you run into any challenges while setting up your inventory syncs, feel free to reach out to us for assistance through our convenient in-app live chat. We’re here to help!