EasifyApps EasifyApps
  • About
  • Apps
    Easify Product Options
    Easify Product Attachments
  • Resources
    Help Center
    Easify Product Options
    Easify Product Attachments
    Video Tutorials
    Easify Product Options
    Easify Product Attachments
  • Partners
  • Blog
  • Contact
All Easify Apps
EasifyApps EasifyApps
  • About
  • Apps
    Easify Product Options
    Easify Product Attachments
  • Resources
    Help Center
    Easify Product Options
    Easify Product Attachments
    Video Tutorials
    Easify Product Options
    Easify Product Attachments
  • Partners
  • Blog
  • Contact

Easify Product Options App

Getting Started
    Key Terminology Simplified
    • Custom options & variants
    • Option set
    • Option set templates
    • Option type (Option input)
    • Your option sets
    • Option label
    • Option name
    • Option value
    • Option group
    • Price Add-ons
    • Conditional logic
    • Live preview
    • Help text
    • Placeholder
    • Information (Tooltip)
    • Option widget
    Option Input Types
    • Design Layer
    • Text Box
    • Text Area
    • Number Text Box
    • Color Swatches
    • Image Swatches
    • Radio Buttons
    • Dropdown
    • Checkbox
    • Button(s)
    • Switch/ Toggle
    • Modal (Popup)
    • File Upload
    • Option Group
    • Product List
    • Date Range
    • Date Picker
    • Time Picker
    • Font Picker
    • Color Picker
    • Dimension
    • Quantity
    • Custom HTML
    • Heading
    • Paragraph
    • Spacer
    • Divider
    App Activation
    • Activate the app on your theme
    • Video Tutorial
User Guide (PO)
    Set Up Option Sets
    • Create A New Option Set From Scratch
    • Use Ready-made Templates To Create Your Option Set
    Conditional Logic
    • What is Conditional Logic (CL)?
    • Standard Conditional Logic – Among Easify Options
    • Advanced Conditional Logic – Show Easify Options Based On Shopify Variants
    Extra Pricing (Add Charges)
    • Set Up Extra Fees (New Version – From July 18, 2024)
    • Add-on Prices vs. Add-on Products (Old Version – Before July 18, 2024)
    • Set Up Add-on Prices (Old Version – Before July 18, 2024)
    • Set Up Add-on Products (Old Version – Before July 18, 2024)
    • Convert Add-on Prices To Add-on Products (Old Version – Before July 18, 2024)
    • Hide Specific Products from Shopify Storefront while Keeping Them Buyable
    Option URL
    • What is Option URL?
    • Establish Cross-Product Links Using Option URL
    • Include Detail Links For Add-on Products/Custom Options
    Option Design
    • Customize Option Styles
    • Distinct Option Styles for Light & Dark Themes
    • Modern and Classic Option Styles
    App Settings
    • General Settings
    • App Translation
    Tiered Wholesale Pricing
    • What is Tiered Wholesale Pricing?
    • Set Up Tiered Wholesale Pricing
    • Customize Tiered Wholesale Pricing Table
    Option Import/Export
      Option Export
      • Export All Option Sets
      • Export Specific Option Sets
    • Option Import
  • Add Option Value Descriptions & Tooltips
  • Show Image/ Color Swatch Slider
  • Track Real-time Analytics
  • View & Export Orders With Easify Options
  • Enable Image Editor for File Upload
  • Hide Main Product Price & Shopify Quantity Selector
  • Set Up Product Bundles
  • Set Up One-time Charge
  • Set Up Quantity Selector Per Option Value
  • Display Option Set In Popup Triggered By Button Click
  • Switch Product Images Upon Option Selection
  • Set Up Option/ Option Set Templates
  • Translate Option Set Into Multiple Languages
  • Separate or Combine Add-ons with Main Product in Cart
  • Reposition Option Set On Product Page
  • Show Custom Options On Order Confirmation Emails (To Customers)
  • Show Custom Options On New Order Notification Emails (To Staff)
  • Show Custom Options On Packing Slips
Product Personalizer (Live Preview)
  • What Is Product Personalizer – Live Preview?
  • How It Works
  • Ready-to-use Templates with Product Personalizer
  • Upcoming Features
Subscription & Billing
  • Pricing Plans
  • How to upgrade
  • How to cancel subscription
Customization & Support
  • App Maintenance Notification
  • Get support
  • Request a new feature
Frequently Asked Questions
  • Why does the app remain “Inactive” even after activation?
  • What to do if custom options aren’t visible on product pages?
  • Why weren’t custom option prices included in my customer orders?
  • How many custom options can I create per product?
  • Does the app work with Shopify Online Store 2.0?
  • Will the app slow down my website?
  • How can I stay informed about updates for the app?
  • What happens if I uninstall the app, and how does it affect my store?
Integrations
  • Easify Product Options x GemPages Landing Page Builder

Easify Box Builder App

Getting Started
  • Activate the app
  • Create New Box
  • Frequently Asked Questions
  • Get Support

Easify Inventory Sync App

Getting Started
  • Quick Start Guide
  • Frequently Asked Questions
  • Get Support
Inventory Groups
  • Create Inventory Groups Automatically by SKUs
  • Create Inventory Groups Manually
  • Events Triggering Syncs among Products in Inventory Groups
  • When do Inventory groups Fail to sync?
  • How to Set Up Common Cases
Bundle Groups
  • Create A New Bundle Group
  • How Master product inventory is Calculated from Component product inventory (Modified Quantity)
  • Events Triggering Syncs among Products in Bundle Groups
  • When do Bundle groups Fail to sync?
  • How to Set Up Common Cases
Inventory Thresholds
  • What is Inventory Threshold?
  • Set Up Universal Inventory Threshold
  • Create A New Inventory Threshold
Advanced Features
  • Bulk Edit Inventory Groups
  • Import/ Export Inventory Groups
  • Import/ Export Bundle Groups
  • Export Product Variant & Location IDs
  • Bulk Duplicate Products
Subscription & Billing
  • Pricing Plans (& FAQs)
  • How to Change Plans
Common Scenarios & Setup Guides
  • Roast Coffee
  • Loose Leaf Tea
  • Stationery Set
  • Retail & Wholesale Items
  • Blank & Personalized Tees
  • Unisex Tees
  • Baby Gift Hamper
  • Flowers
  • Chocolate Cookies
  • 3-Pack T-Shirts (mixed sizes & colors)
  • Batteries
  • Beverage (Inventory by Cans)
  • Beverage (Inventory by Packs)
  • Multivitamins (from Single Pack)
  • Multivitamins (from Double Pack)
  • Incense Sticks (Inventory by Packs)
  • Incense Sticks (Inventory by Sticks)
  • Candle Trio Set
  • Perfume Set
  • Pick n Mix Sweets
  • Top & Skirt Set (Same Size)
  • Top & Skirt Set (Mixed Sizes)
  • 2-Pack Tops (1 Color)
  • 2-Pack Tops (1 Color) – Only in Packs
  • 2-Pack Tops (Multicolor – Fixed)
  • 2-Pack Tops (Multicolor – Optional)
  • Custom Print Shirts
  • Shoes & Free Socks

Easify Product Attachments App

App Activation
  • Activate the app on your theme
  • Video Tutorial
User Guide
  • Upload Product Attachments
  • Upload Attachment Icons
  • Add Attachments To Templates
  • Import Bulk Product Attachments
  • Export Product Attachments
  • Add Attachments To Collapsible Rows On Product Pages
Customization & Support
  • Get support
  • Request a new feature

Recommended Shopify Apps

  • Page builder
  • Affiliate programs
  • Marketing
  • Invoices and receipts

Announcements

  • Limited Support During Lunar New Year (Jan 25th- Feb 3rd, 2025) – Your Patience Is Our Greatest Gift!
  • Go Beyond Options: Easify Product Options Premium Is Here!

Multivitamins (from Single Pack)

Table of Contents
  • Problems
  • Solutions
  • Results
  • Need Assistance?

Problems #

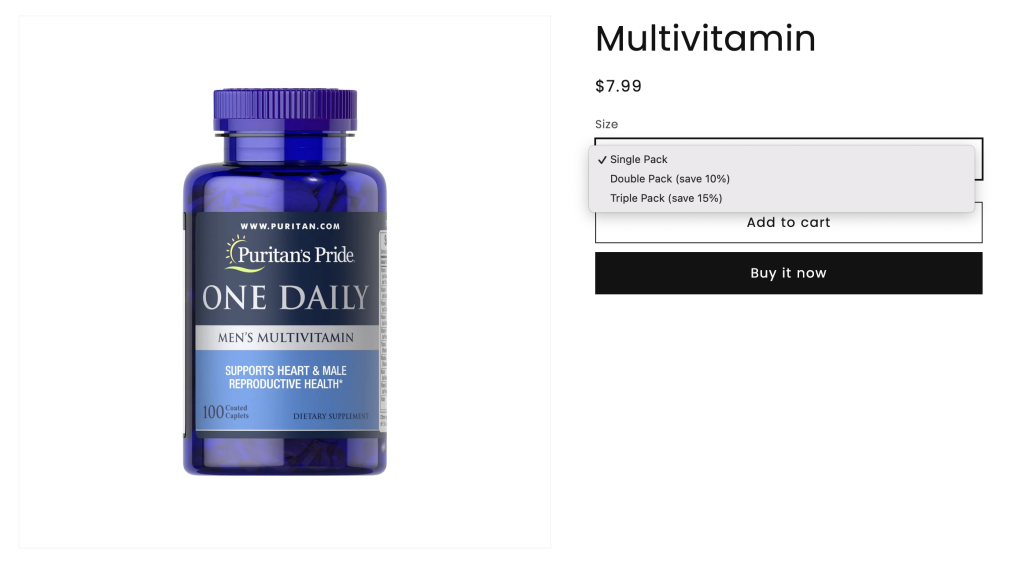
You sell multivitamins in various pack combinations, starting from 1 Pack (Single Pack). For example:

  • Single Pack (1 Pack)
  • Double Pack (Pack of 2)
  • Triple Pack (Pack of 3)

Notes: This guide will show you how to set up bundle groups when you sell your multivitamins starting from 1 bottle. If you sell your product starting from pack of 2 (or more), this guide is not applicable. Please follow the other guide for instructions on how to set up in that scenario.

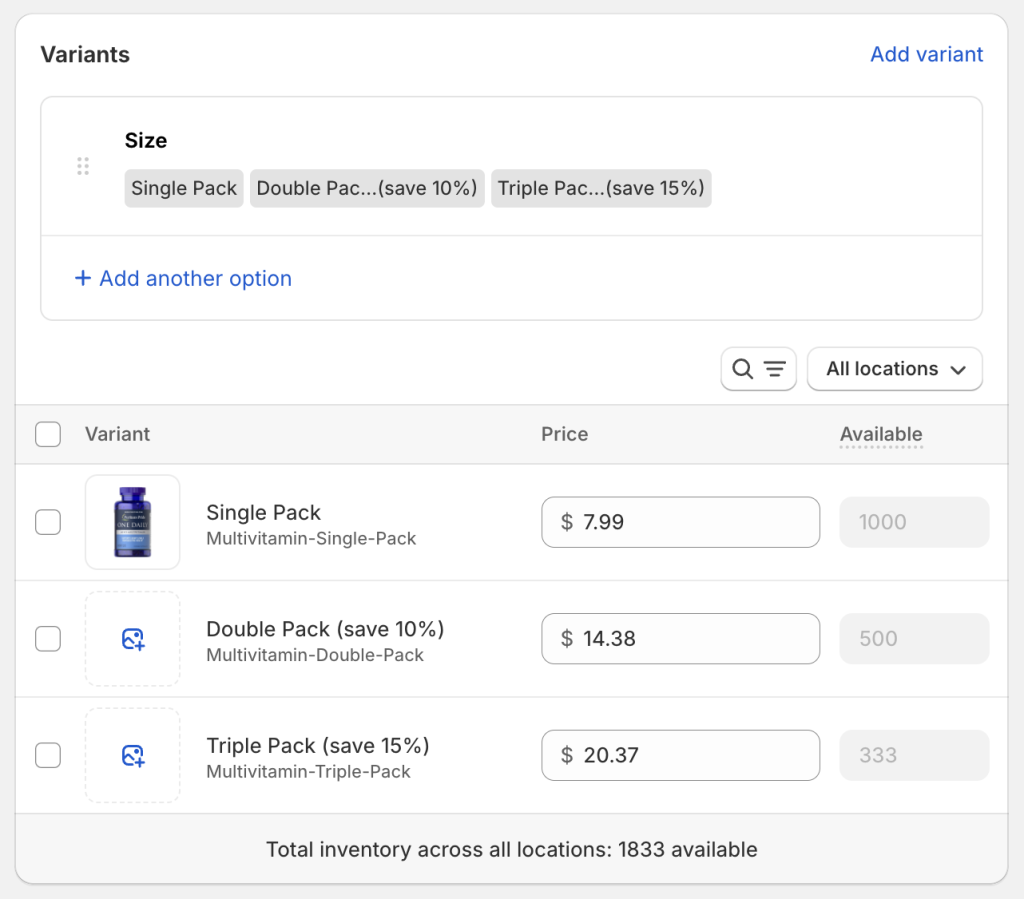
In Shopify, you must specify quantities for each pack combo variant, but this doesn’t accurately reflect your actual inventory. For example, if you have 1,000 bottles of multivitamins available, it can be divided into:

  • Quantity of Single Pack: 1,000 (1,000 bottles in total)
  • Quantity of Double Pack: 500 (1,000 bottles in total)
  • Quantity of Triple Pack: 333 (1,000 bottles in total)

Setting quantities individually for each Multivitamin product variant can result in a total inventory that’s much higher than what you actually have (e.g., 3,000 bottles in total instead of 1,000 bottles).

Furthermore, since all product variants draw from the same inventory, choosing 1 variant should deduct from the available quantity of others. However, Shopify treats each variant quantity separately.

These challenges highlight the need for a solution that accurately manages inventory across all Multivitamin product variants.

Solutions #

To address this issue, consider implementing the following solution:

A. Consider “Single Pack” Product Variant as Base Product

This product variant serves to set the total inventory available.

Its inventory will determine the quantities available for selling for other product variants (Double Pack, Triple Pack). For example, the inventory of the Single Pack variant is 1,000 so the quantity of Double Pack variant available for selling is 500.

It will reflect the actual remaining inventory. When a product variant is purchased (e.g., the Double Pack option), the inventory of the Single Pack variant will be adjusted accordingly (deducted by 2).

Updating the inventory of the Double Pack triggers adjustments in the Single Pack (base product), which in turn automatically updates the inventory of the Triple Pack (or any other remaining pack option).

B. Create Bundle Groups in Easify Inventory Sync app

Establish connections between the Single Pack (Base product) and other product variants (Double Pack, Triple Pack) using Bundle Groups. This ensures that changes in inventory are synchronized accurately across all variants.

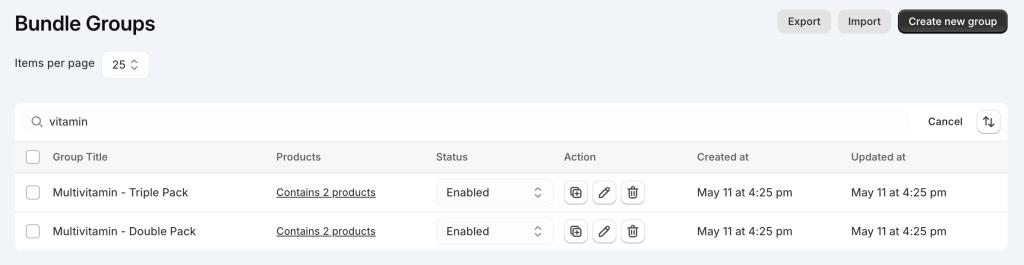
How to Set Up the Bundle Groups

  • You’ll need to create separate bundle groups for each product variant, excluding Single Pack since it’s the Base product.
  • For example, if your Multivitamin product has 3 variants, you’ll need to create 2 bundle groups.
  • After creating the first bundle group (e.g., Multivitamin – Double Pack), you can duplicate that group to create groups for the Triple Pack.
  • Each group will contain the Single Pack product variant and another pack variant.
  • If you have multiple Multivitamin products requiring similar Bundle Group setups, consider using the app’s Import function to create all bundle groups for all products in a CSV file and import them into the app.

Below is the setup guide for creating the bundle group for the Double Pack variant:

1. Navigate to the app’s menu and select Bundle Groups.

2. Click on the Add new group button to create a new bundle group.

3. Set a Title for the bundle group, which should include the pack variant name to distinguish among bundle groups. For example: “Multivitamin – Double Pack”.

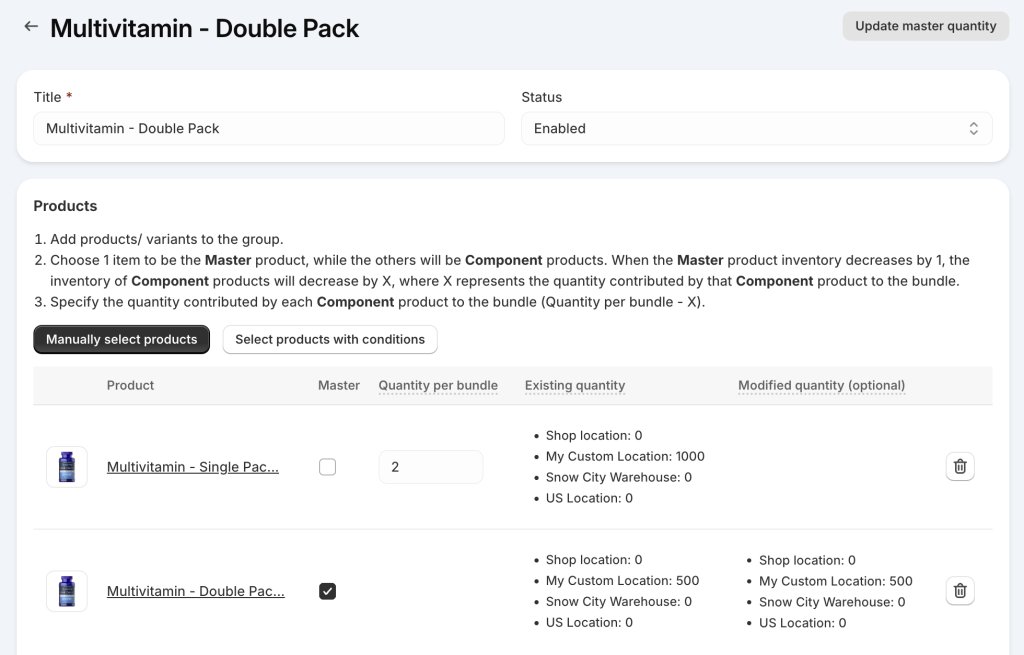
4. Add 2 product variants to the group: Single Pack & Double Pack

5. Define the Master and Component products:

  • Master product: Multivitamin – Double Pack
  • Component product: Multivitamin – Single Pack

6. Specify the Quantity per bundle for the Component product:

Since when the Double Pack product variant is bought, the quantity of the Single Pack variant will be deducted by 2. So, the Quantity per bundle of the Single Pack product will be 2.

7. Save the bundle group.

Learn more

How to Set Up a New Bundle Group

Results #

Once your bundle groups are set up, inventory synchronizations will begin.

When a Multivitamin product variant is purchased, e.g.: Double Pack variant, (reducing its quantity by 1), the quantities of the Component/ Base product – Single Pack will automatically adjust based on the predefined Quantity per bundle (2).

Notes:

Automatic Master Quantity Adjustment:

To automatically adjust the available quantities of Multivitamin product variants (Double Pack, Triple Pack) based on the quantity of the Single Pack variant, follow these steps:

  • Enable the “Update Master based on changes in Component inventory” feature on the Settings page.
  • The adjustment will occur immediately after you create the bundle group or enable this setting.

Manual Quantity Update Process:

If you update the Component product quantity (here, Single Pack) on Shopify’s Product editing page, the Master product inventory (here, Double Pack, Triple Pack) will not update automatically, even if the “Update Master based on changes in Component inventory” setting is enabled.

Therefore, if you update the inventory of the Single Pack (in other words, update the total actual inventory of your Multivitamin product) on Shopify’s Product editing page, you should manually adjust the quantity of other product variants (Double Pack, Triple Packs) at the same time.

Another solution to consider is navigating to the Bundle Groups listing page, selecting the groups for Multivitamin, and clicking the “Update Master quantity” button. Then, all the Master products in those groups (Double Pack, Triple Pack) will have their quantities adjusted based on the Component product inventory (Single Pack) that you’ve edited on Shopify’s Product editing page. For more details, refer to our guide here.

Learn more

Events Triggering Syncs among Products in Bundle Groups

Need Assistance? #

If you run into any challenges while setting up your Bundle Groups, feel free to reach out to us for assistance through our convenient in-app live chat, by submitting your request via our contact form, or by sending an email to support@tigren.com. We’re here to help!

Table of Contents
  • Problems
  • Solutions
  • Results
  • Need Assistance?
Essentials Logo

Make the Complex Simple for Shopify Stores

Our AppsHelp CenterPartner ProgramAffiliate ProgramBlogContact Us

Copyright © 2023 Easify. All rights reserved.

Close
Search

Hit enter to search or ESC to close

cookie By using this website, you agree to our cookie policy. Close