Overview #
Easify Product Options is a powerful, easy-to-use app that helps you create custom product options to enhance customer experience and drive sales. GemPages Landing Page Builder is a robust page builder designed to create stunning pages with a focus on conversion rate optimization (CRO). Together, these apps form the perfect solution for Shopify merchants looking to create highly customizable product pages that convert!
This guide will walk you through the seamless integration of Easify Product Options into product page templates built with GemPages. Let’s dive in!
Requirements #
Before you begin, ensure you have both the Easify Product Options and GemPages Landing Page Builder apps installed and activated in your Shopify theme.
You’ll need to configure option sets in Easify Product Options and create product pages in GemPages.
Once you’ve set them up separately, follow this guide to quickly add the Easify options widget to your GemPages product templates.
#
How to add Easify Product Options to GemPages Product Page Templates #
Step 1: Create Your Product Page Templates with GemPages #
Before integrating Easify options, you need to create your product page template. For detailed instructions on building your product pages with GemPages, click here.
After creating your product page templates, proceed to the next steps to add the Easify options widget.
Tip:
You can either add the Easify widget to your templates first and configure the custom options later in the Easify app, or set up both simultaneously and bring everything together at the end.
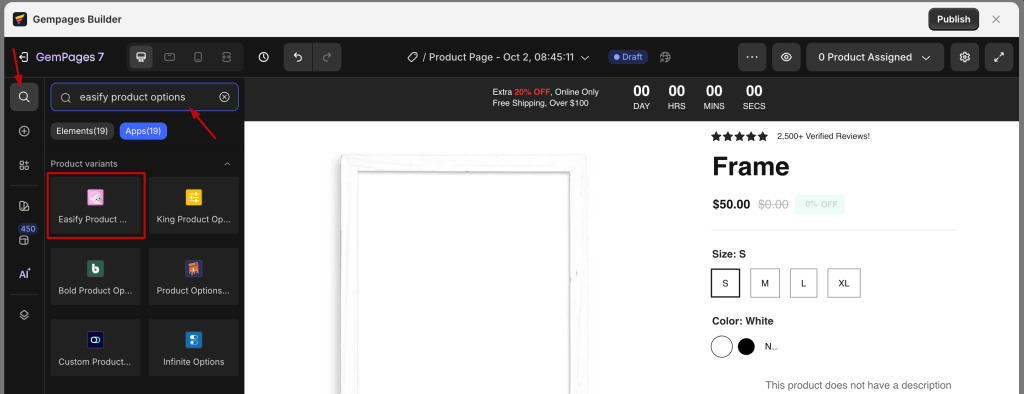
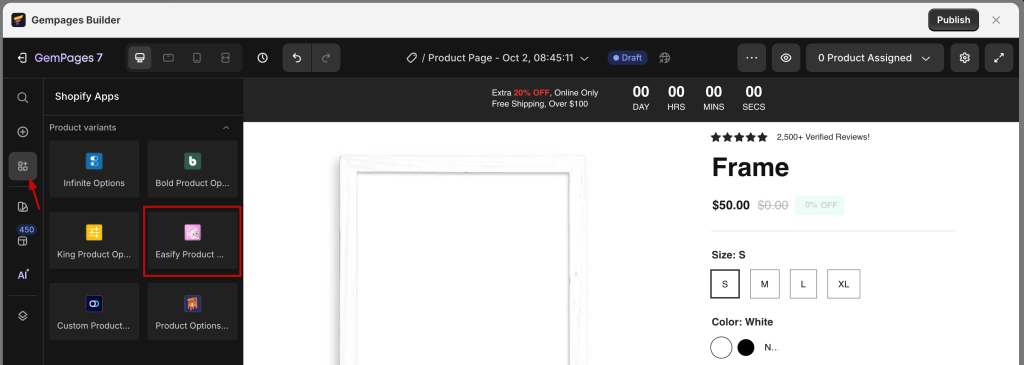
Step 2: Locate the Easify Product Options Widget in GemPages Editor #
There are two simple ways to locate the Easify Product Options widget in the GemPages editor:
- Using Search:
- Click the search icon.
- Type “easify product options”.
- Select “Apps” from the dropdown and locate the Easify Product Options block.
- From Shopify Apps:
- Click on “Shopify Apps” in the left panel.
- Scroll down to the “Product variants” category, and you’ll find the Easify Product Options block.
Step 3: Drag and Drop the Easify Widget onto Your Product Page #
Now that you’ve located the Easify Product Options block:
- Drag the widget from the left panel and drop it into your desired location within the product information section on your product page preview.

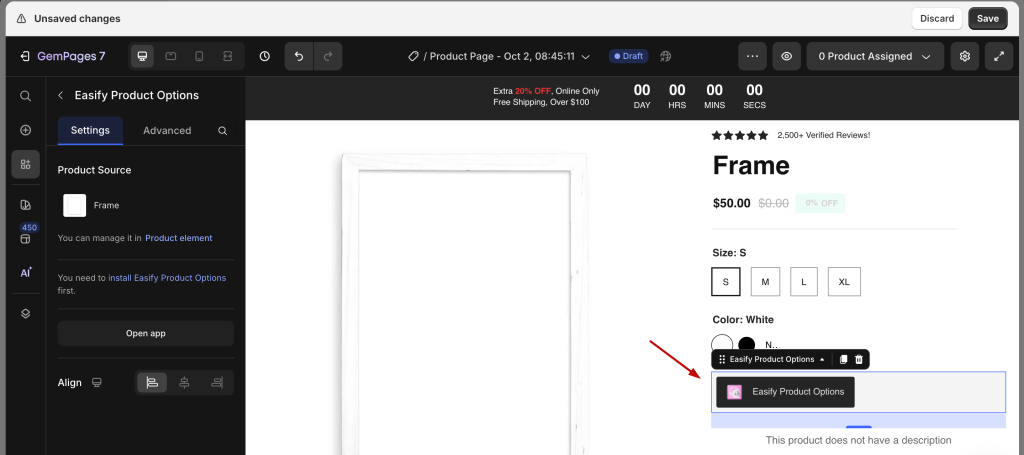
Common placements include:
- Under the product price
- Below Shopify variants
- Under the Quantity Selector
Step 4: Final Check #
The most important final check is to confirm that your layout includes a functional Add to Cart button. For the Easify options to appear and function correctly on your page, an Add to Cart element must be present in the design.
If you are using a Gempages template that lacks this button, or if it has been removed, your custom options will not load. Please make sure to drag an Add to Cart element into your layout. This is typically positioned right below your custom options to ensure everything displays and works perfectly.
Once you have confirmed the button is in place, click Save and Publish to see your live results.
Important Notes:
- If you need to update the design of your product pages, you’ll do this in the GemPages editor.
- Any changes to the product options themselves will be managed through the Easify Product Options app.
- If you’re working with multiple product page templates, you’ll need to add the Easify widget to each one individually.
Frequently Asked Questions #
How can I get support if I encounter issues during integration?
If you need help, you can contact the support teams for both Easify Product Options and GemPages via the In-app live chat for assistance.
Do I need coding skills to integrate Easify with GemPages?
No coding skills are required! The integration is designed to be user-friendly, allowing you to simply drag and drop the Easify Product Options widget into your GemPages templates.
Can I use Easify options on all product pages created with GemPages?
Yes, you can add the Easify Product Options widget to any product page template created with GemPages. If you have multiple templates, you’ll need to manually add the widget to each one.
What should I do if my Easify options don’t appear on the product page?
Double-check that the Easify Product Options widget is correctly placed in the GemPages editor and that your option sets are properly configured in the Easify Product Options app.
Can I customize the appearance of Easify options on my GemPages product pages?
Yes, you can customize the appearance (e.g., color, font, size, shape) of Easify options in the Settings > App Design tab of the Easify Product Options app. For additional help, you can contact the Easify support team. Please note that Easify option styles cannot be modified directly within the GemPages editor.
Will changes made in GemPages affect the Easify options I created?
No, changes in GemPages won’t impact your Easify option configurations. However, if you remove the Easify Product Options widget from your product page template, those options will no longer appear on that page.
Need Assistance? #
If you run into any challenges while following this guide, please feel free to reach out to us for assistance through our convenient in-app live chat.
Our dedicated support team is available 24/7 to help you troubleshoot any issues or answer any questions you may have. We want to ensure your setup process is as smooth as possible, so please do not hesitate to contact us at any time. We are here to help you succeed!