After installing and activating the Easify Box Builder app on your active theme, you’re ready to create your first custom box (or bundle). This guide will walk you through the setup process step by step.
✅ Step 1: Set Your Box Name & Type #
A. During App Onboarding #
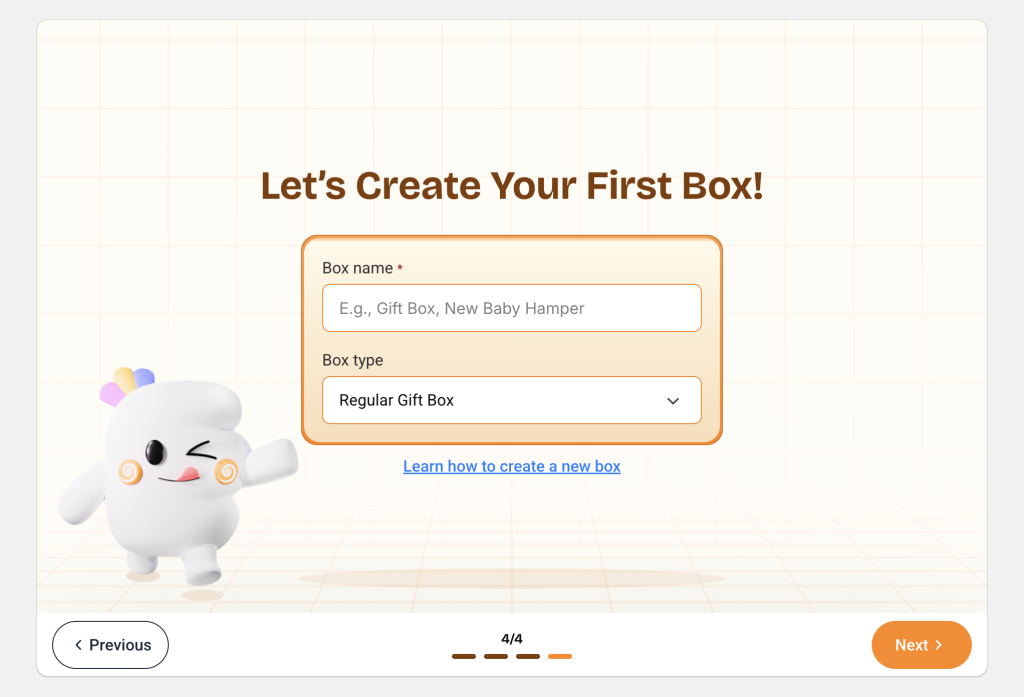
Right after installing the app, you’ll be guided through the onboarding process. At the end of this flow, you’ll create your first box.
To get started:
- Enter your Box name (e.g., Build A Box). Don’t worry, you can edit this later if needed.
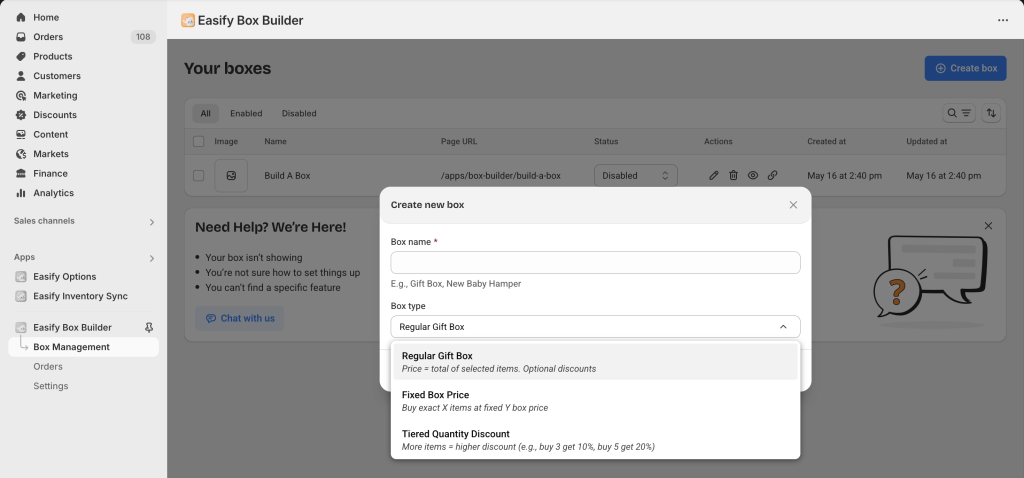
- Choose the Box type. Easify Box Builder offers 5 types to match different selling strategies:
- Regular Box: Price equals the total of selected items. You can optionally apply discounts.
- Fixed Box Price: Customers buy exactly X items at a fixed box price of Y.
- Tiered Quantity Discount: The more items customers add, the bigger the discount (e.g., buy 3 get 10% off, buy 5 get 20% off).
- Fixed Quantity Discount (Coming Soon): A set quantity equals a fixed price (e.g., 3 items = $20, 5 items = $30).
- Buy X Get Y (Coming Soon): Buy X items to get Y free or at a discount.
- Subscription Box (Coming Soon): One-time or recurring purchase boxes.

After selecting the box type, you’ll be taken to the Box details page to continue setting up your box.
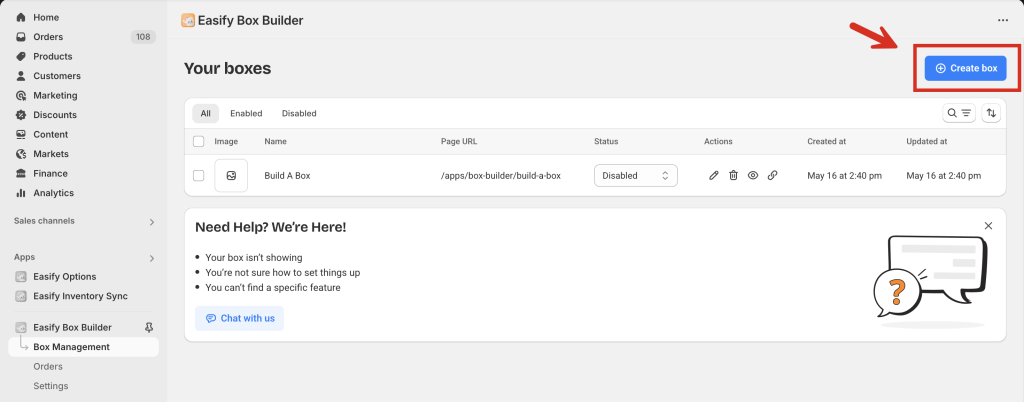
B. Creating More Boxes Later #
Once you’ve created your first box through onboarding, you can easily create more boxes anytime.
Here’s how:
- In the app’s left-hand menu, go to the Box Management tab.
- Click the Create box button.
- A popup will appear, prompting you to enter the Box name and select the Box type, just like you did during onboarding.
- Click Save to proceed. You’ll then be directed to the Box details page to configure your new box.
✅ Step 2: Configure Your Box #
Now it’s time to bring your box to life with Steps, Pricing/Discounts, Custom fields (Coming Soon) and Design.
1. Steps #
You can build a full-page “Build a Box” experience with one or multiple steps.
⚠️ If your box has only one step, the step/progress bar will be hidden by default on the storefront.
To create your first step, click Add step.

You’ll be redirected to the step configuration page to set up what customers will see and choose from.
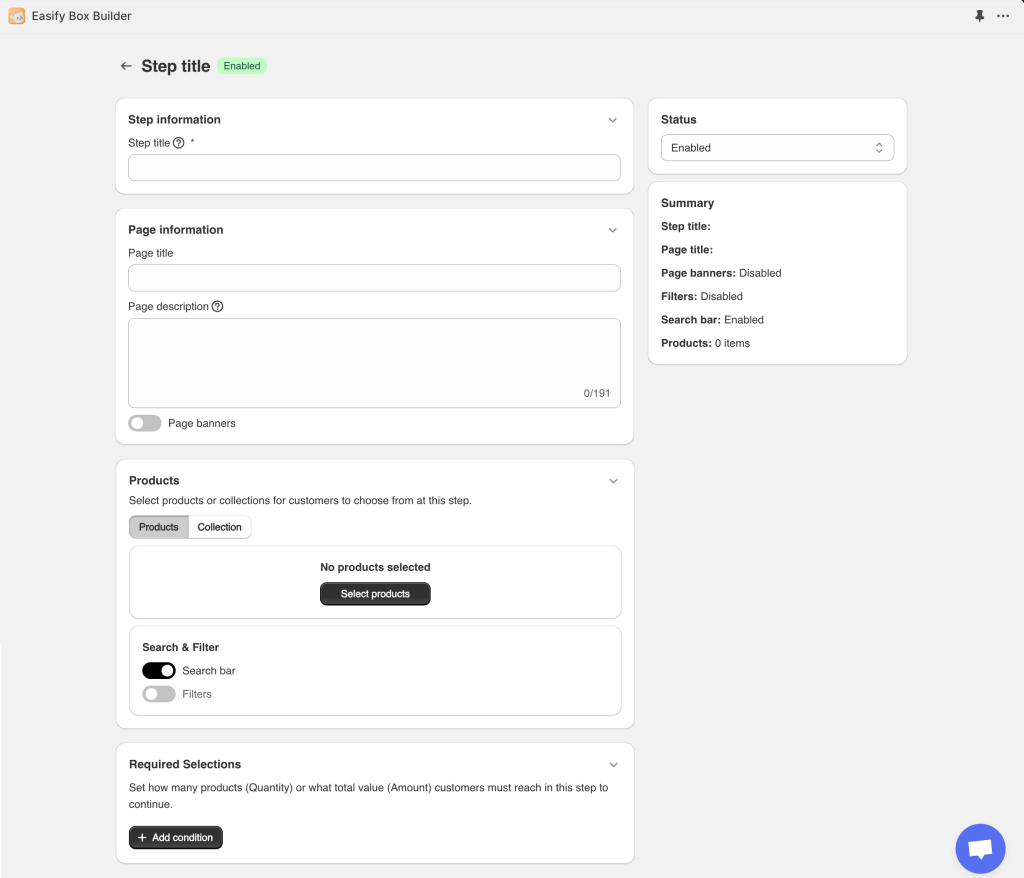
- Step title (required): This title appears both on the storefront (in the progress bar) and internally (as the step name in the list). It should be short and descriptive – something like “Choose Box” or just “Box”. This helps customers quickly understand each step and makes the progress bar clearer and more visually appealing.
- Page title (optional): Unlike the step title, this can be longer and more descriptive. For example, while your step title might be “Eye Product,” your page title could be “STEP 1: CHOOSE YOUR EYE OR BROW PRODUCT”. It’s optional, so feel free to skip it if your step title already gets the message across.
- Page description (optional): You can use this to guide customers on what they need to do in the step, or to encourage them by adding more context about the items (Max 191 characters). Example: “Select from the items below to create your unique gift assortment. Everything you choose will be shipped together in the box you’ve selected”.
- Page banners (optional): You can add a well-designed banner at the top of the page to give your box a unique look. Add separate banners for desktop and mobile, or just one, depending on your design.
- Products (required): Add the individual products or collections that customers can choose from in this step.
- Search & Filter (optional): Add the individual products or collections that customers can choose from in this step. If you add individual products → only Search is available. If you add a collection → you can enable Filter, but not Search.
- Required Selections (optional): Use this to require customers to select a certain number of items before moving to the next step. Examples: To require exactly 1 item → “Quantity is equal to 1”; To require at least 1 item → “Quantity is greater than or equal to 1”.
- Status: The step is enabled by default. You can enable or disable it from either the step details page or the step list on the box details page.
Once you’ve set everything up, scroll to the top to review the step’s Summary and check if any changes are needed.
When done, click Save to save the step settings. Then, click the Back arrow to return to the box details page and continue adding more steps or moving on to the next configurations.
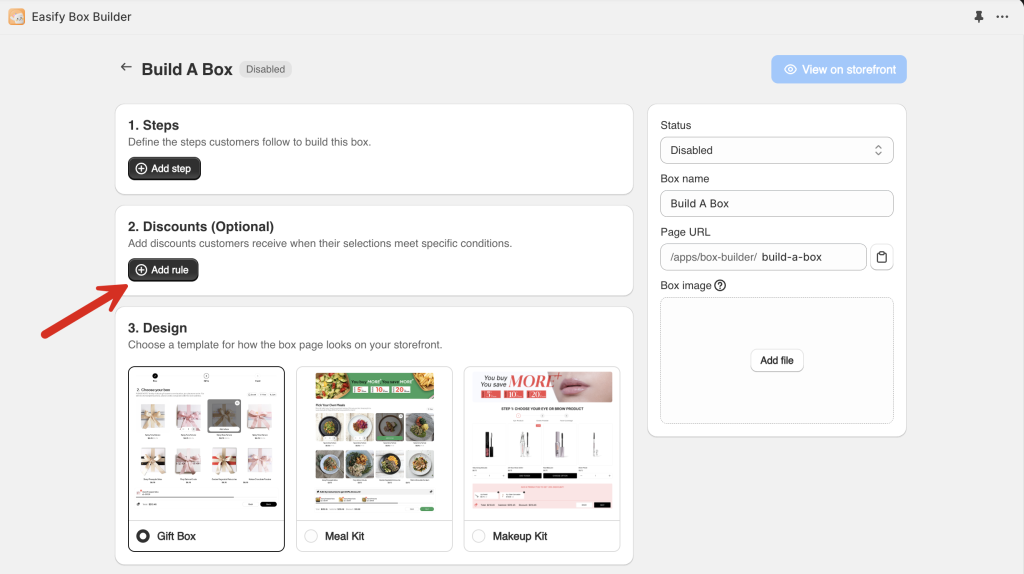
2. Pricing/ Discounts #
Depending on the Box type you select, the corresponding Pricing or Discounts section will appear for you to set up.
a. Regular Box, Tiered Quantity Discounts – Discounts
Discounts are a great way to boost custom bundle sales. Here are some examples you might offer:
- Buy 3 products, get 20% off
- Buy 3 products, get $20 off
- Spend $100, save 15%
- Spend $100, save $15
The Easify Box Builder app makes it easy to set up these discount rules for your box.
To get started, click the Add rule button in the 2. Discounts (Optional) section. This will open the Discount details page.
Here’s how to set up a discount:
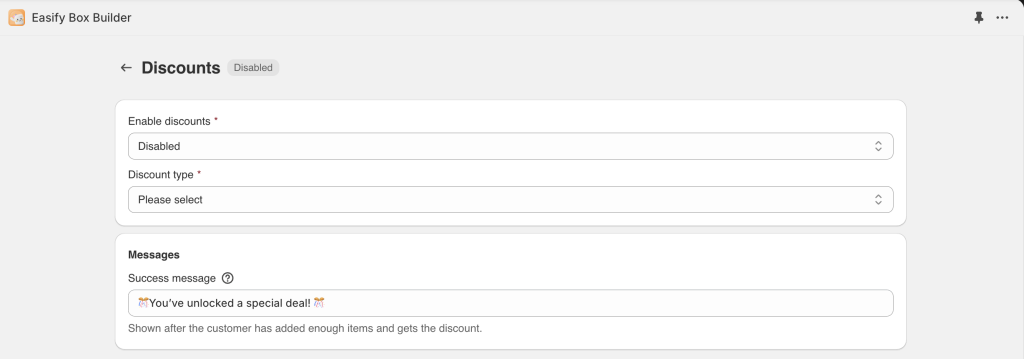
- Enable the discount.
- Choose a discount type:
- Amount off – deducts a fixed amount based on quantity or total spend.
- Percentage off – deducts a percentage.
- Click Add tier to add your discount rule.
Example: To set up “Buy 3 products, get 20% off”:
- Discount type: Percentage off
- Discount on: Quantity
- Minimum quantity: 3
- Percentage off: 20 (%)
- Code: OFF20FROM3 (this will show up in order details)
💡 If you want to offer tiered discounts (e.g., 10% off from 3 items, 20% off from 5 items), make sure to add the lower tier first to ensure they apply correctly on the storefront.
You can also customize the messages shown in the footer summary as customers build their box:
- Progress message(s): These appear as customers add items to their box, encouraging them to keep going and unlock better deals. The number of progress messages depends on how many discount tiers you’ve set up. For example, if you create 2 tiers, you’ll see 2 progress messages available to edit.
- Success message: This appears once your customer has added enough items or reached the required order value to qualify for the discount.
b. Fixed Price Box – Pricing
Fixed-price boxes are great for offering a set deal when customers add a specific number of products. Think of it as a smart discount—buyers get a better total price for meeting your exact quantity condition.
Some common examples include:
- Buy any 3 items (same or different) for $25
- Buy 5 snacks for $10
- Buy 2 small gifts for $15
(You can adjust this to fit your product offerings)
With Easify Box Builder, it’s easy to set this up.
Click the Set price & quantity button in the 2. Pricing section to open the pricing setup.
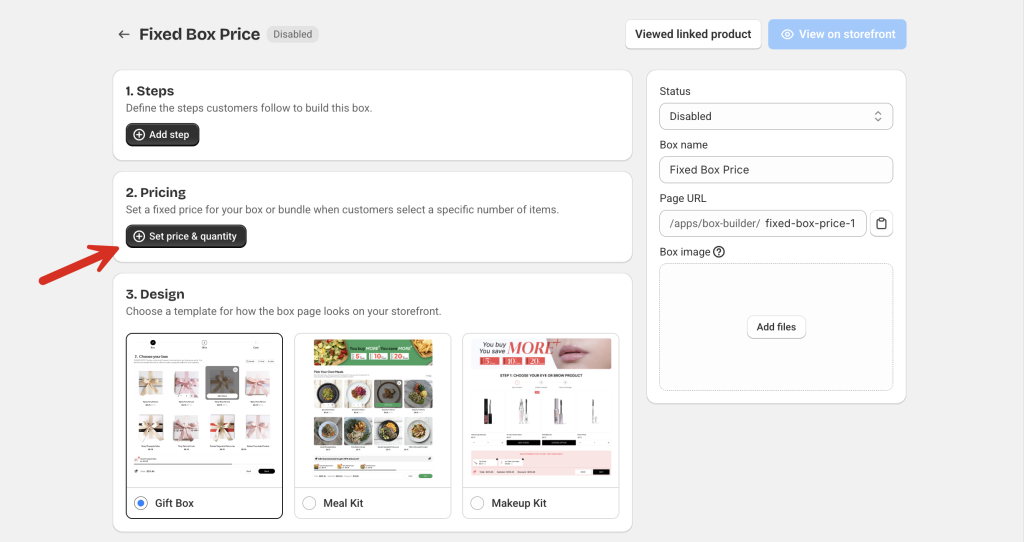
On the Pricing screen, set the following:
- Quantity: Choose the exact number of products customers must add. They must meet this number exactly – no more, no less – to get the fixed price.
- Price: Enter the fixed total price that applies when customers add the required quantity.

You can also customize:
- Progress message: Encourage customers to add the required number of items to unlock the special fixed price.
- Success message: Let them know once they’ve hit the exact quantity and qualified for the deal.
3. Design #
Choose from 3 ready-made templates for your box page: Gift Box, Meal Kit, and Makeup Kit. These 3 are just the beginning, we’re actively working on more stunning templates for you.
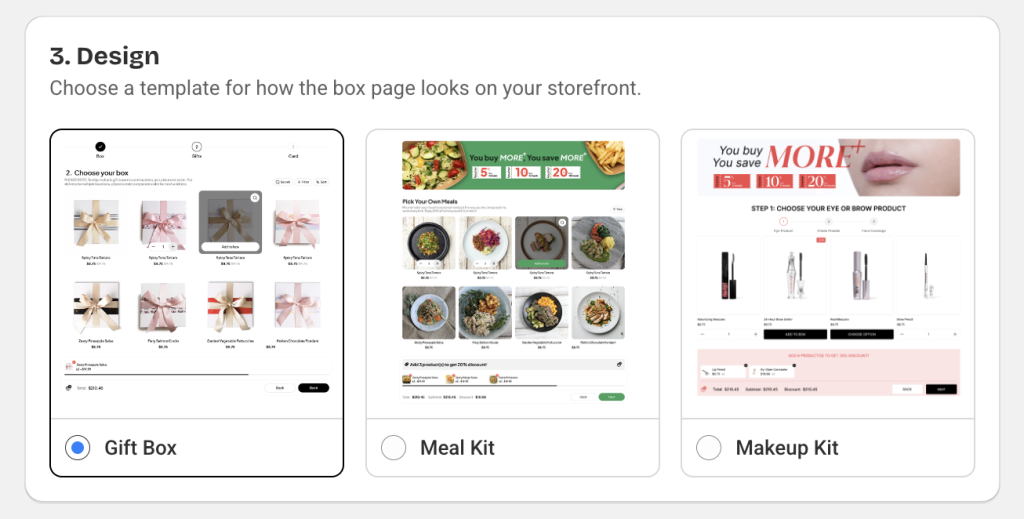
You don’t need to pick a template that matches your product type exactly, just go with the layout that fits your store’s vibe best.
Even better, we’re building a powerful Visual Editor so you’ll be able to customize templates easily and make them match your store’s look and feel.
Until then, if you select a template and want to make changes, just message our team via live chat. Tell us what you need, we’ll be happy to help.
✅ Step 3: Enable Your Box & View It on Storefront #
When you create a new box, its status is set to Disabled by default, and the View on storefront button will be inactive.
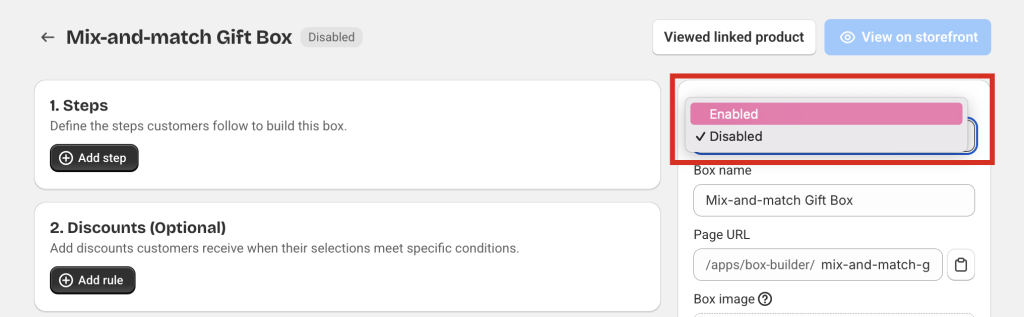
Once you’ve completed the setup and are ready to see your box live, simply change the box status to Enabled, then click Save.
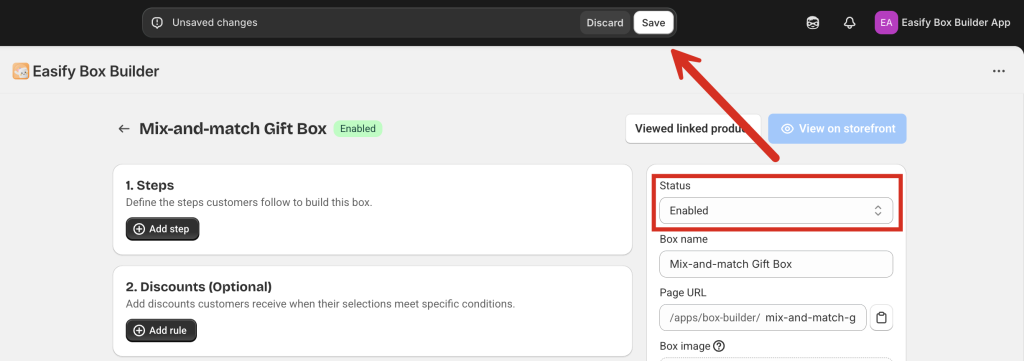
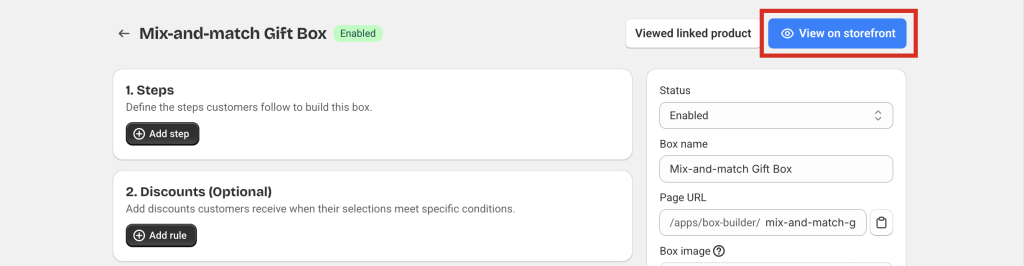
The View on storefront button will now become active. Click it to view your box page on your storefront.
💬 Need Help? #
If you run into any issues, feel free to reach out via our in-app live chat.
We’re always here to help!