
Creating a custom section in Shopify lets you showcase content exactly the way you want going beyond the default limitations. Whether it’s a special promotion, a featured product, or a unique design element. With a few simple steps, you can make your store stand out.
Let’s learn more about these custom sections here.
Why Do You Need a Custom Section in Shopify?
Shopify’s default sections are helpful but come with clear limits. You can’t easily add advanced sections, making your store look pretty basic.
While default themes offer essential sections like a hero banner, featured products, and an email signup form, they lack extra design features that can help to attract shoppers attention while they are scrolling through your store. Plus, no option to customize or add the needed elements.
Beside, lack of designing benefits, you won’t find some very unique sections that help to level-up your store. In the default method, you won’t find sections like:
- Interactive image galleries
- Scrolling logo/text marquees
- “Meet the Team” blocks
- Testimonial sliders
- Product comparison tables
Look at the difference between what’s possible with a default section and the custom one:
| Section | Overview | Key Features |
| Default “Image with Text” | A simple built-in section limited to one image and text layout | Single layoutBasic customizationNo media mix support |
| Custom “Image with Text” | A flexible section for creative, media-rich designs | Add multiple images/videos Custom layouts per blockLink, CTA button, and hover control |
Creating a custom section lets you overcome these restrictions, design freely, and craft every detail to your brand’s style and needs, from unique layouts to custom input fields that let customers add a personalized text box to products.
Ways to Create a Custom Section in Shopify
There are primarily two ways to add a Shopify custom section. Below is the overview of both.
- Use a section app – The fastest and easiest way to create a custom Shopify section is with a specialized app. This suits merchants needing a polished, advanced look quickly and avoiding theme code edits.
- Add a custom code – This one needs technical knowledge. You have to directly edit the theme code to theme files offering top performance and flexibility. Any mistake here could affect store stability.
Method 1: Easily Add Sections Using MIT Sections Pro App
This app offers numerous beautiful, different styles of featured collection sections without touching any code, and at very low pricing.
Let’s see the app working.
Step 1: Install & Find the Section
Install the MIT Sections Pro app by Meetanshi from the Shopify App Store. Then, from the app dashboard, click the Browse section and search for the featured collection section to add a custom section in Shopify.
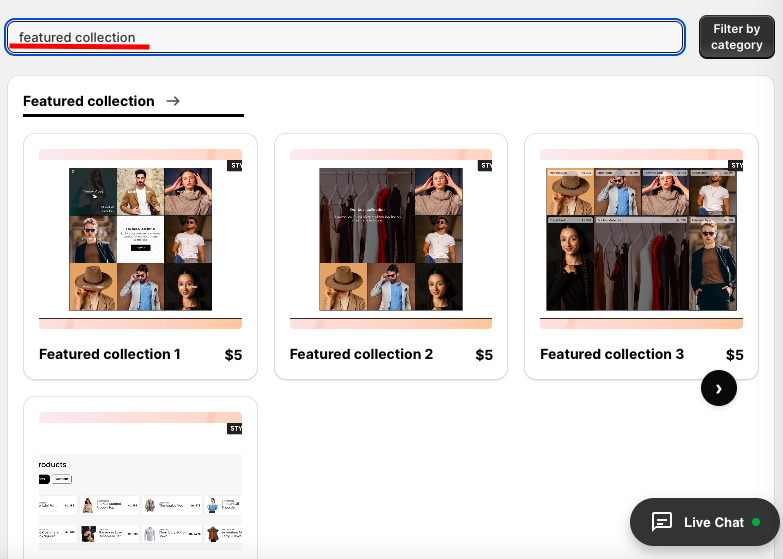
From the available options, choose the one you like. For this example, we will proceed with Featured Collection 2. Select the section, click on Try for Free option to get a preview before making any final commitment.
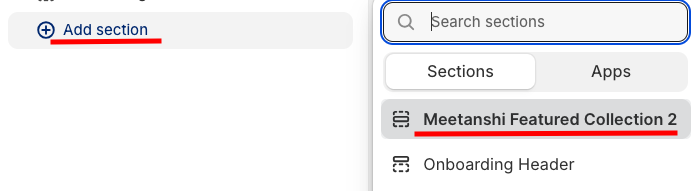
Now, click on the Add section and select Meetanshi Featured Collection 2.
Step 2: Customize the Section
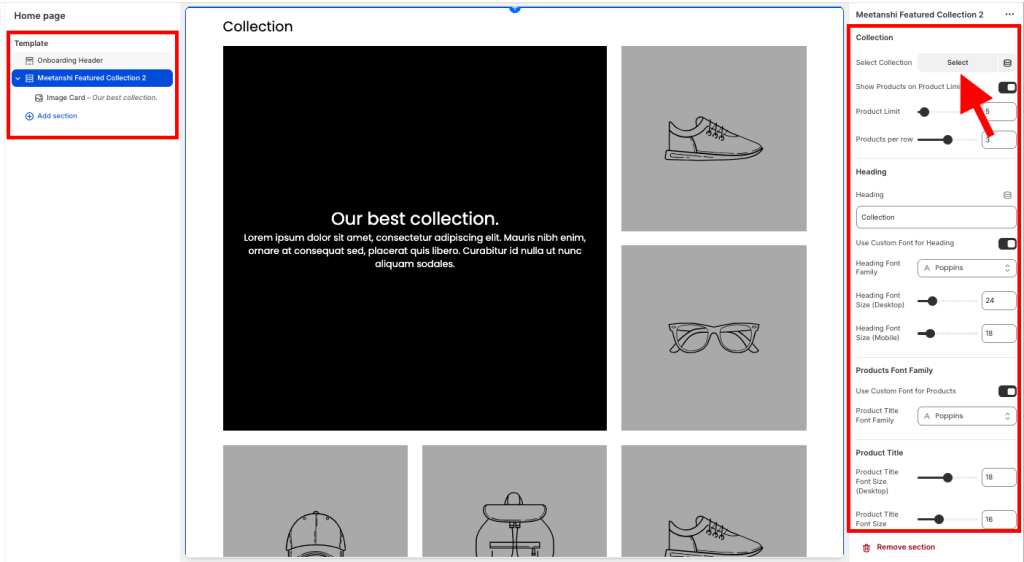
Click on the Meetanshi Featured Collection 2 block to expand the customization options for your collection. This section offers over 30 customization options, allowing you to design it to your exact specifications.
Step 3: Show it on Your Store
Once done making the edits, save it and preview it in your frontend. This is how stunning it will look.

Method 2: Create a Custom Section Using Code
Here, we will create a featured collection section using custom code. You will first need to create the needed custom code for the section and add it to your current Shopify theme.
Then, from the theme editor, you can add the section to your frontend with the needed customization.
Let’s see the steps for it.
- Go to Online stores > Themes > …(three dots) > Edit code.
- In the theme editor > sections folder, create a new section, add the preferred section liquid code and save it.
- Now, go to Online stores > Themes > Customize, click add the created section from the left panel.
You’ll also see the customization options for the section.
Which Method Should You Pick?
The app method is the preferred way because it lets you add new sections quickly within the theme editor, without needing custom code for each addition.
The custom coding method becomes time-consuming even if you want to change the background color of the section. If technicalities are your best suit, you can move ahead with it. But, if it is not, it causes development headaches and takes away your productive hours.
The MIT Sections Pro app by Meetanshi offers over 130+ pre-built, customizable sections that are readily available in the theme editor. So, you don’t need any editing if you want to design a section. Simply just add it to your store. These sections update automatically with design changes and don’t disturb your store theme code, as they are compatible with most of the Shopify themes.


