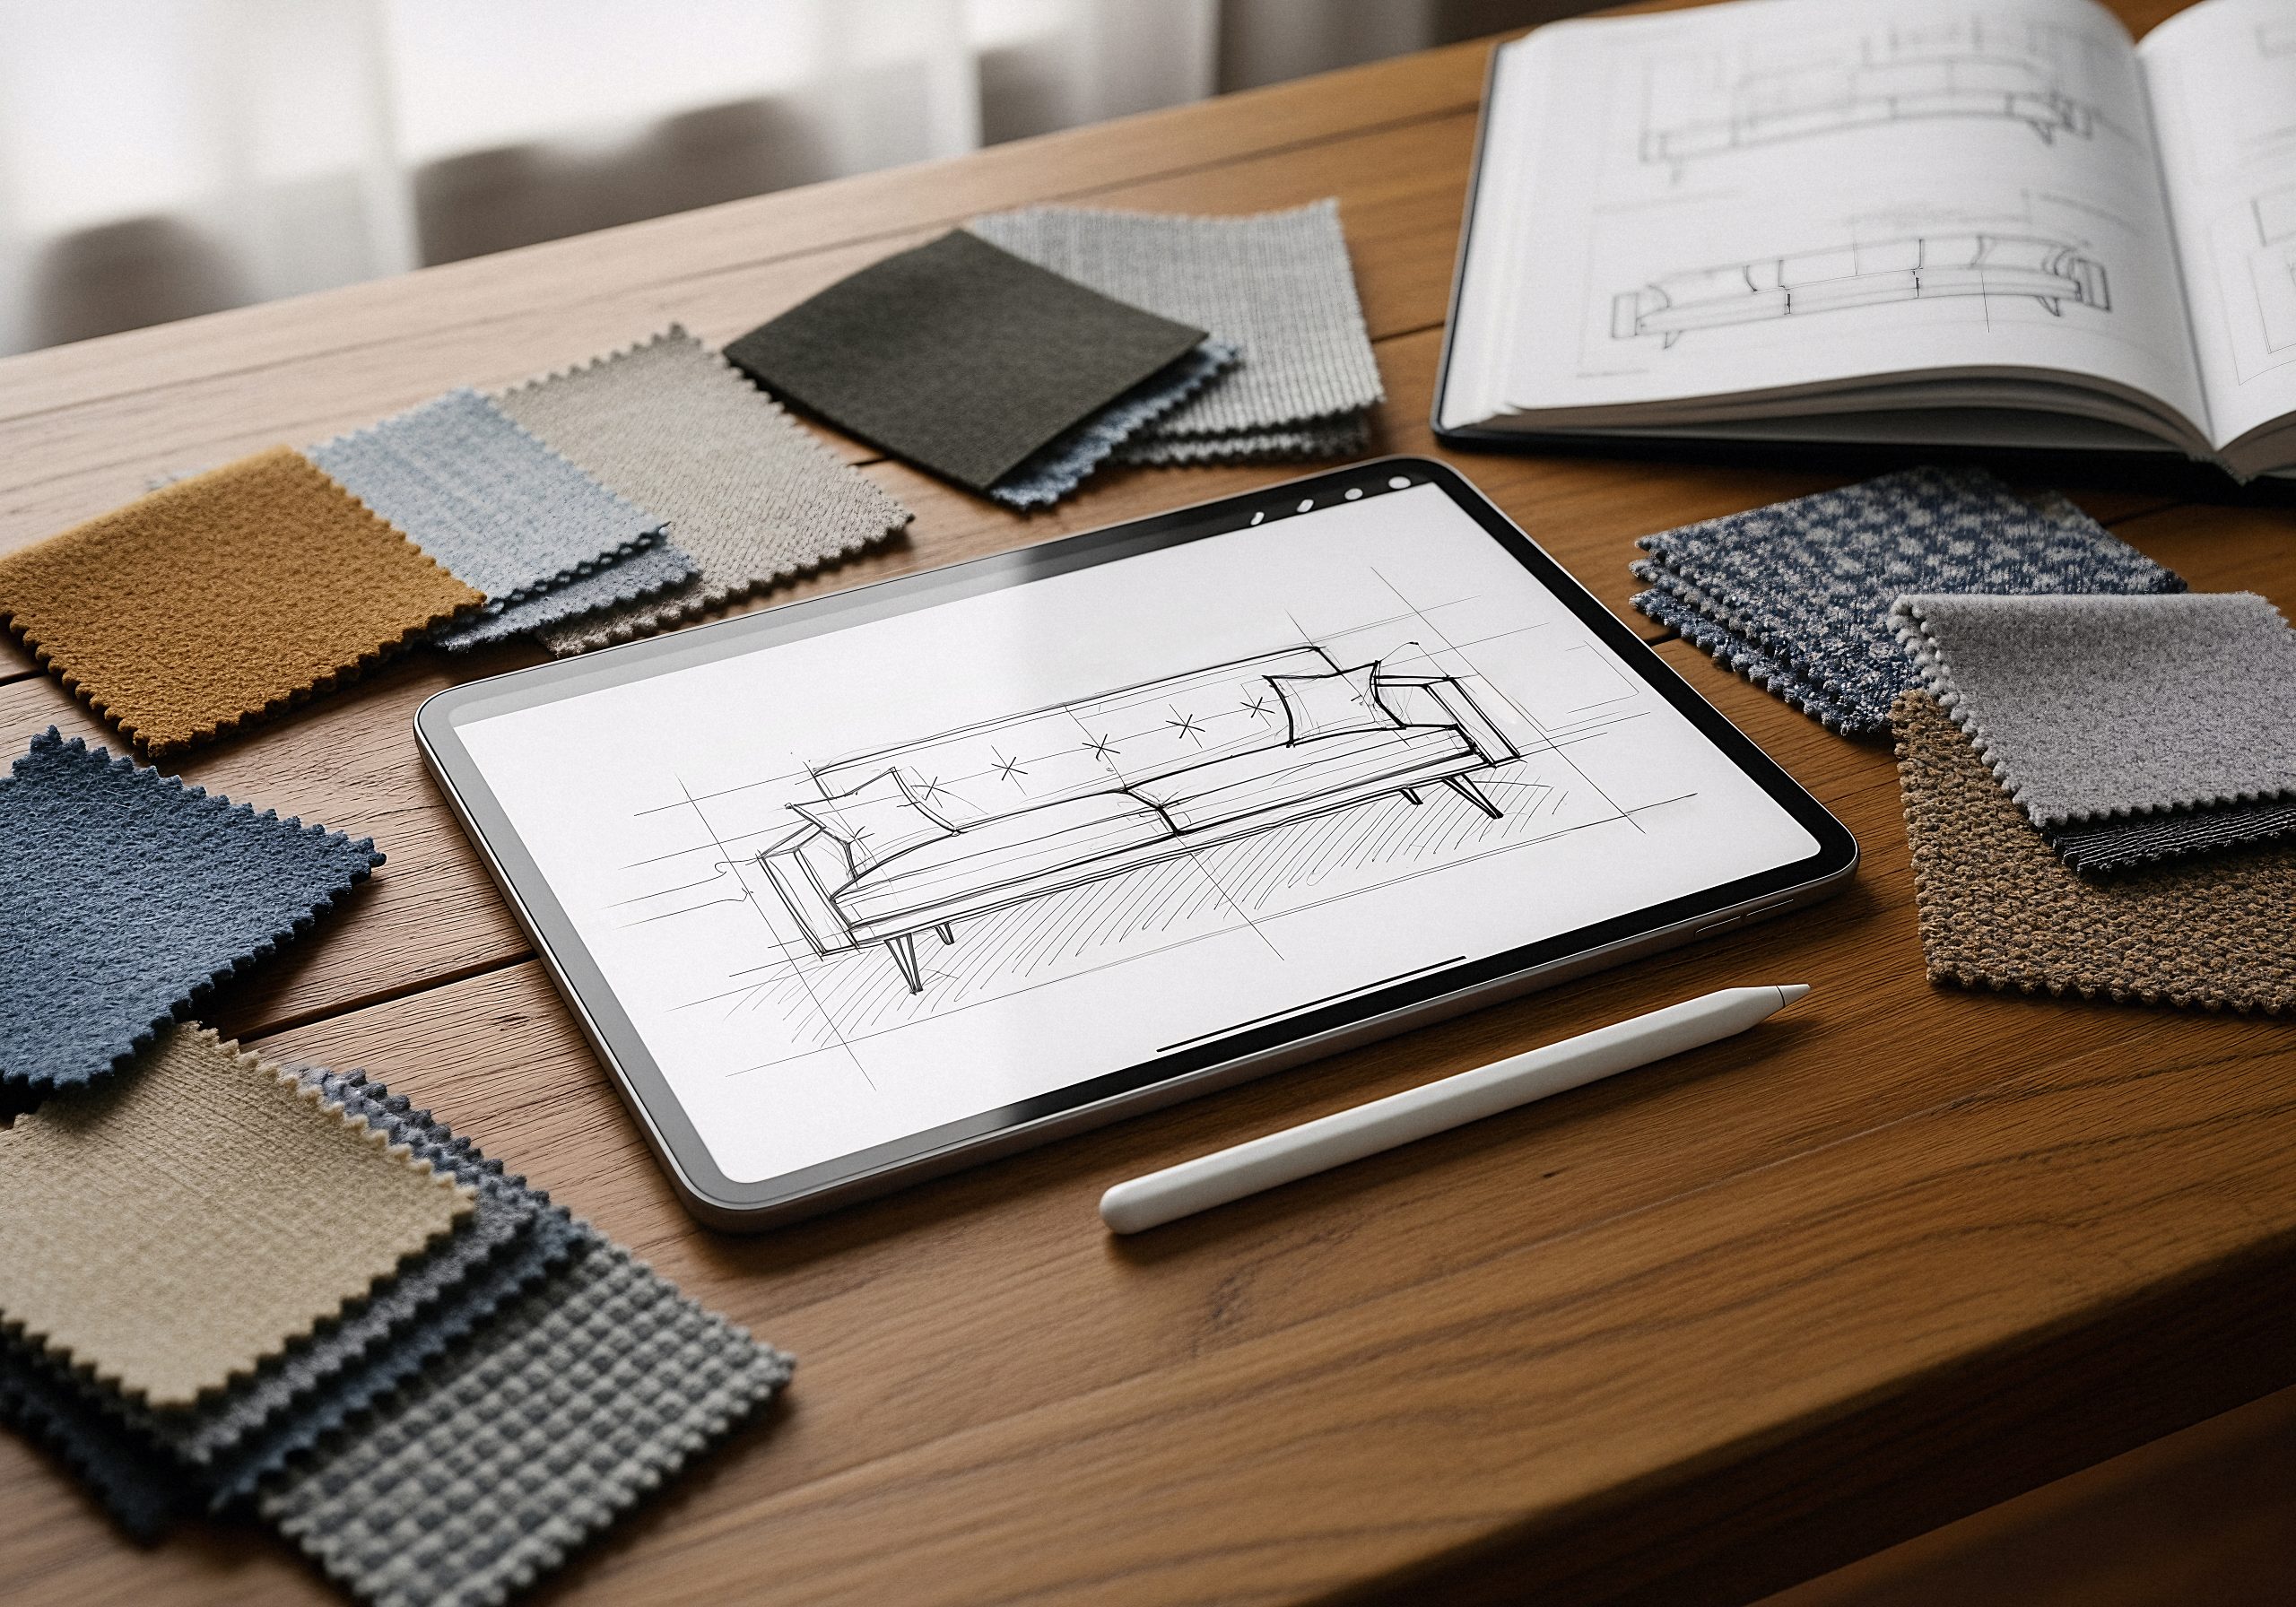
If you sell items where size really matters, like furniture, prints, packaging, or anything that comes in specific measurements, you’ve probably wondered: “How do I add dimensions on Shopify?” The tricky part is that Shopify doesn’t offer built-in fields for length, width, or height, so many store owners get stuck or end up using workarounds that don’t work well.
The good news? Adding dimensions is completely doable, and you have several options depending on how flexible or advanced you want things to be. In this guide, Easify’ll walk through the easiest ways to display dimensions, help customers understand your product better, and avoid unnecessary returns. Let’s keep it simple and get started.
Key Takeaway
- Shopify doesn’t offer built-in dimension fields, but you still have ways to display them.
- You can add dimensions directly in the product description for a quick setup.
Product option apps like Easify Product Options give you even more control if you want a polished, customizable layout. - Clear dimensions help customers buy with confidence and reduce pre-purchase questions.
Why Product Dimensions Matter
Adding dimensions to your Shopify products is more than just a detail, it’s a way to help customers fully understand what they’re buying. For products like furniture, packaging, or accessories, size really matters. Without clear measurements, shoppers might hesitate, guess, or even abandon their cart because they’re unsure if the product will fit their needs.
Clear dimensions also reduce returns and customer questions. When buyers know exactly what to expect in terms of length, width, height, or weight, they’re less likely to receive a product that doesn’t meet their expectations. This saves you time, reduces support inquiries, and improves customer satisfaction.
Finally, displaying product dimensions builds trust and professionalism. It shows that your store pays attention to detail and cares about giving shoppers all the information they need to make confident purchase decisions. For online shopping, where customers can’t physically touch the product, this transparency can make a big difference in sales and loyalty.
How to Add Dimensions on Shopify
There are two main ways to add dimensions to your Shopify products, depending on how detailed or flexible you want the setup to be.
The first method uses Shopify’s built-in metafields, a straightforward way to store and display measurements like length, width, height, or weight. This guide focuses on adding dimensions directly, but if you prefer presenting that information in other formats like table, you can explore this table creating tutorials:
The second method is using an app, which gives you more control over layout, formatting, and even advanced options like interactive or customer-entered dimension fields.
Let’s walk through both so you can choose the option that fits your store best.
Method #1: Using Shopify Built-in Metafields
First, let’s look at the native way to add dimensions using Shopify’s built-in metafields. This method works well if you want to display basic measurements like length, width, and height directly on your product pages without installing any apps. It’s simple, clean, and keeps everything within Shopify’s admin. Here’s how to set it up step by step.
Step 1: Go to Your Product and Set Up the Basics
In your Shopify Admin, select the product you want to edit (or create a new one). Add the essentials – name, description, price, and images – just like you normally would.
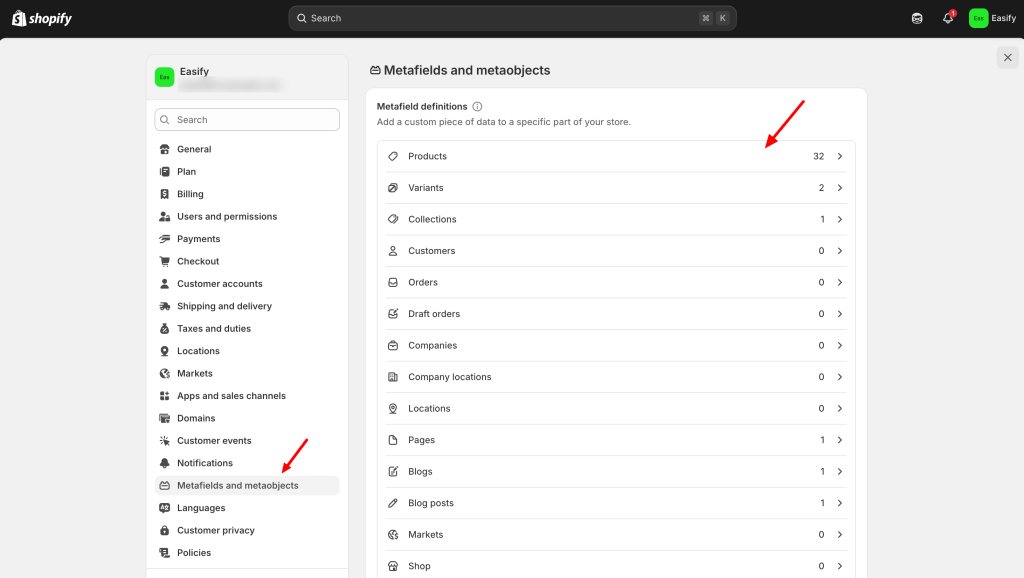
Step 2: Go to Shopify settings
From your Shopify Admin, go to Settings → Metafields and metaobjects.
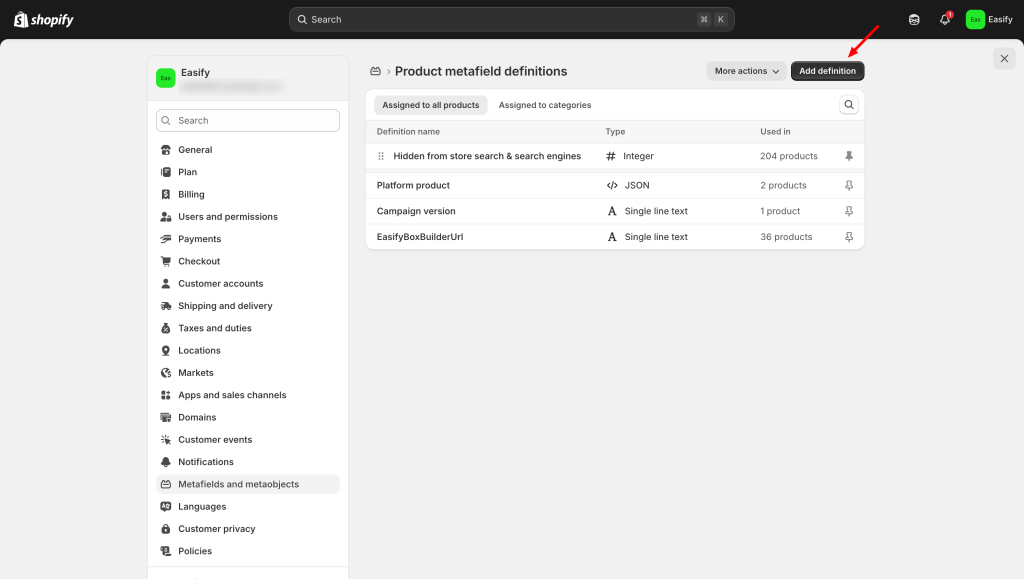
Under Metafields definition, select Products, then click Add definition.
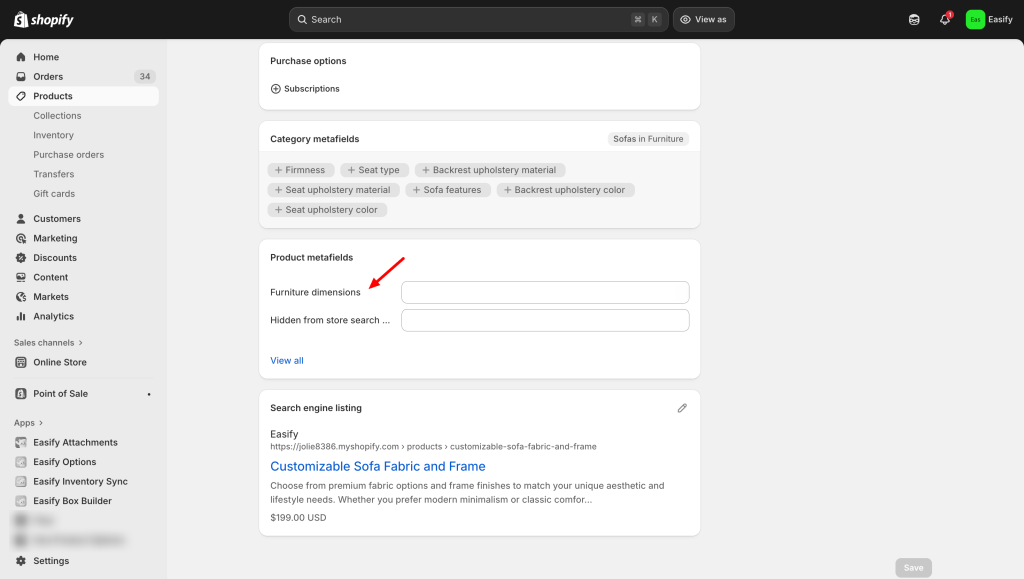
Step 3: Create the Metafield Definition
Enter a name (e.g., Furniture Dimensions)
The description field is for internal use only — it helps you remember what the metafield is for (customers won’t see it).
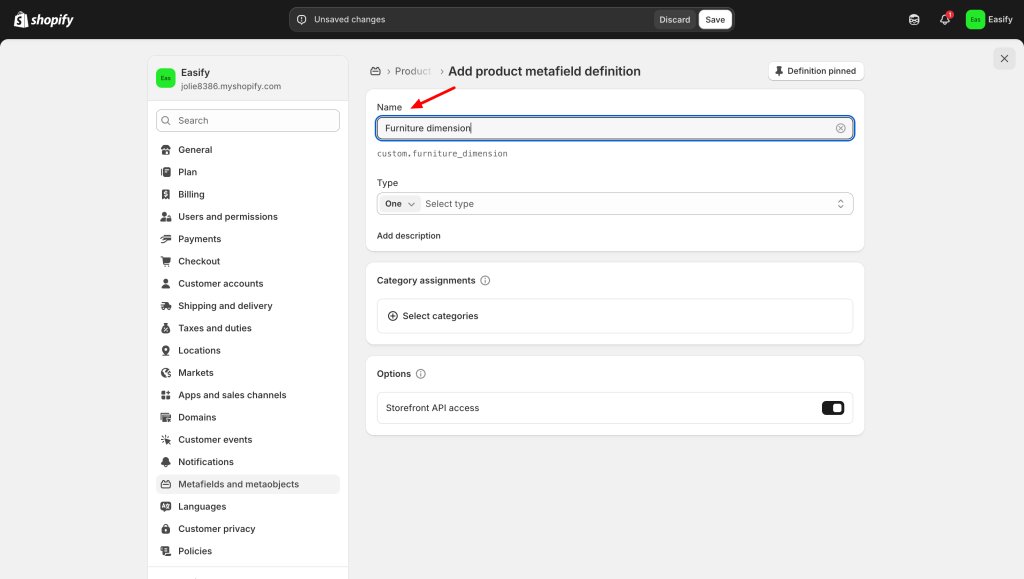
Then choose the content type: Single Line
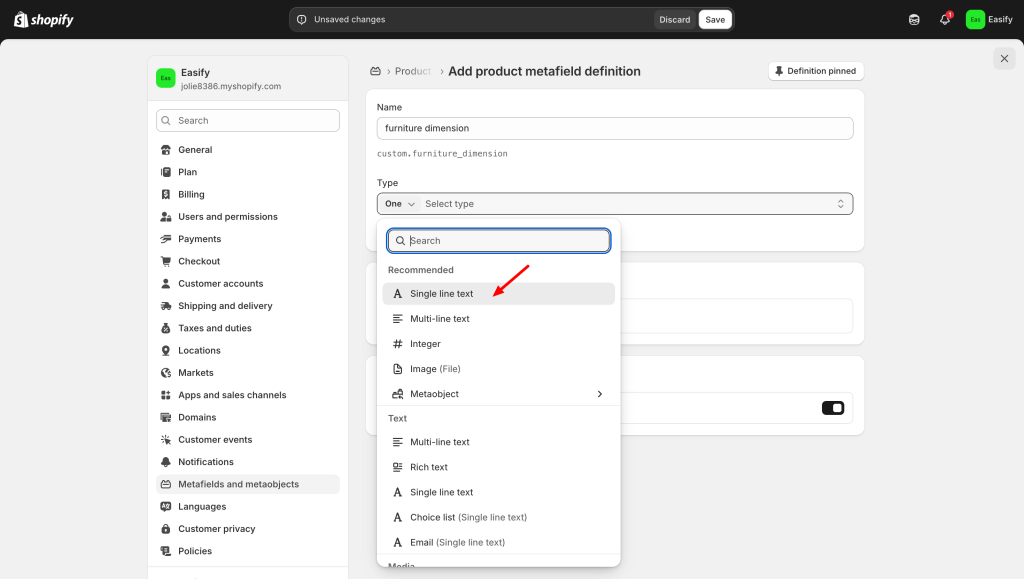
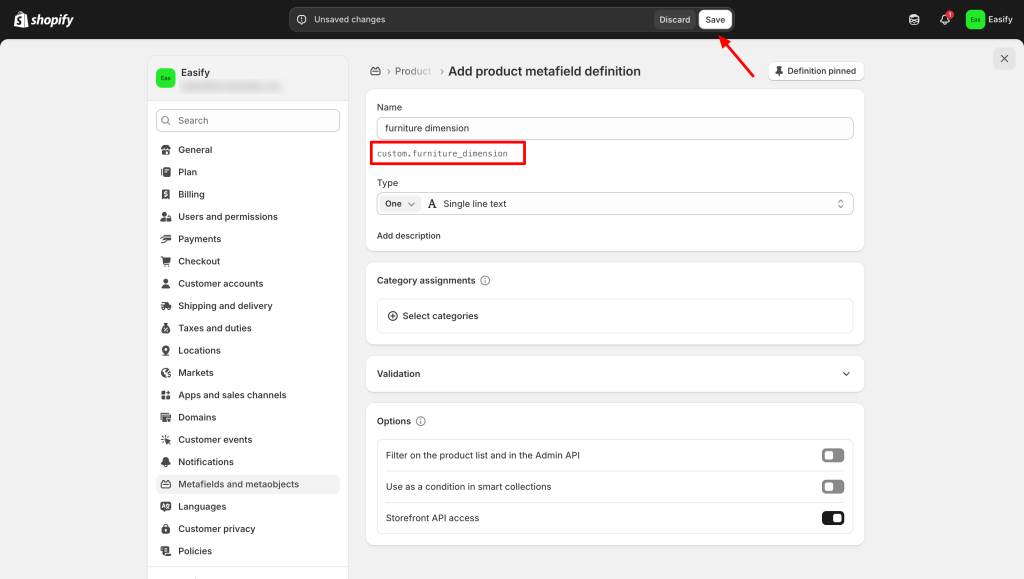
Step 4: Click save
Click Save. After saving, copy the Namespace and key — you’ll need this in the next step. Example: custom.furniture_dimension
Step 5: Add the Metafield to Your Product Page (Theme Editor)
Go to the theme editor. Open your Product Page template.
Add a new Block → Custom Liquid, and paste this code:
<p>Dimensions: {{ product.metafields.custom.description }}</p>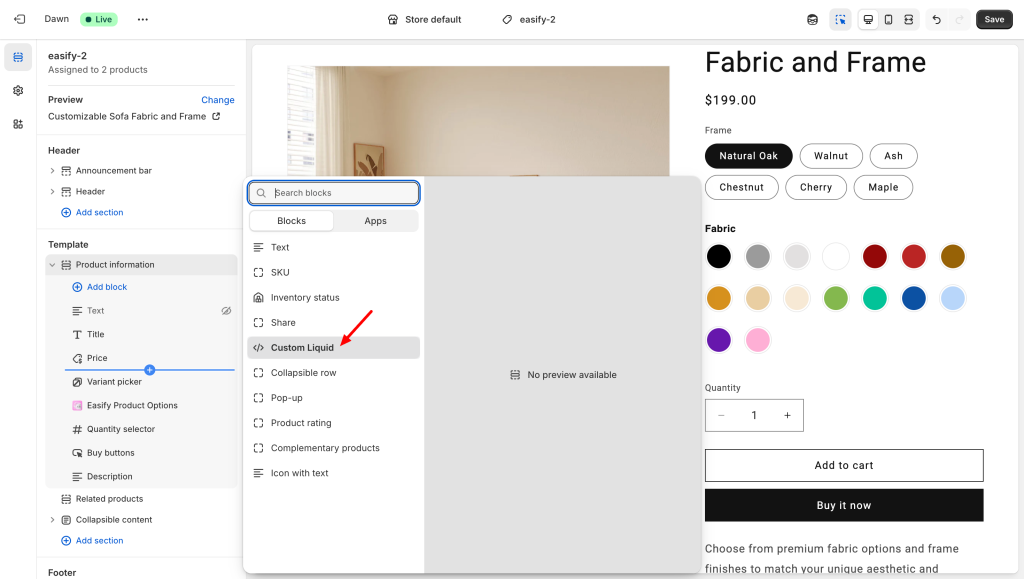
If your namespace and key are custom.furniture_dimensions, then use:
<p>Dimensions: {{ product.metafields.custom.furniture_dimension }}</p>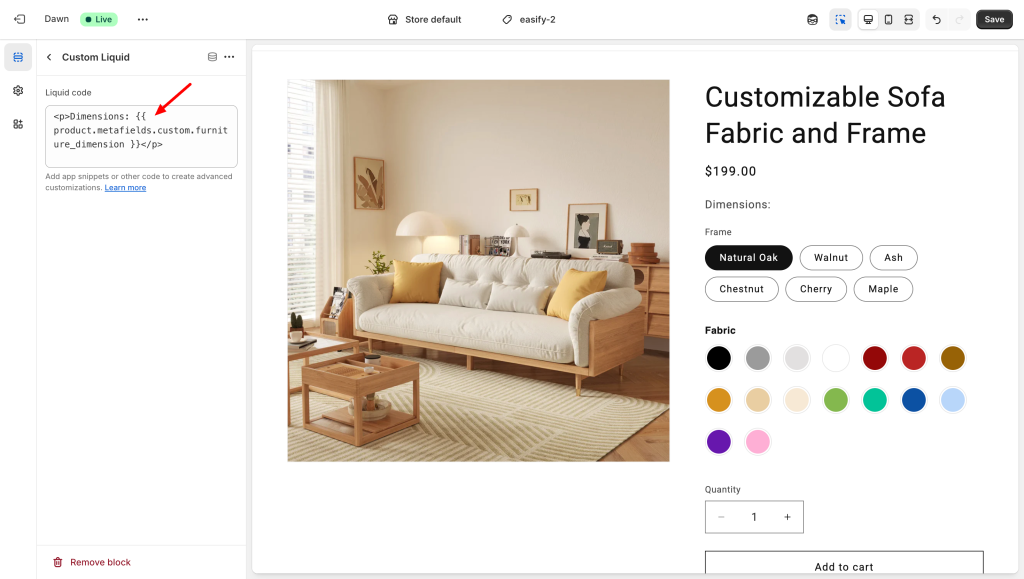
Click Save.
Step 6: Fill in Your Metafield Content
Go back to your product page in Shopify Admin. Scroll down — you’ll see the new metafield field (e.g., Furniture Dimension). Enter your content there.
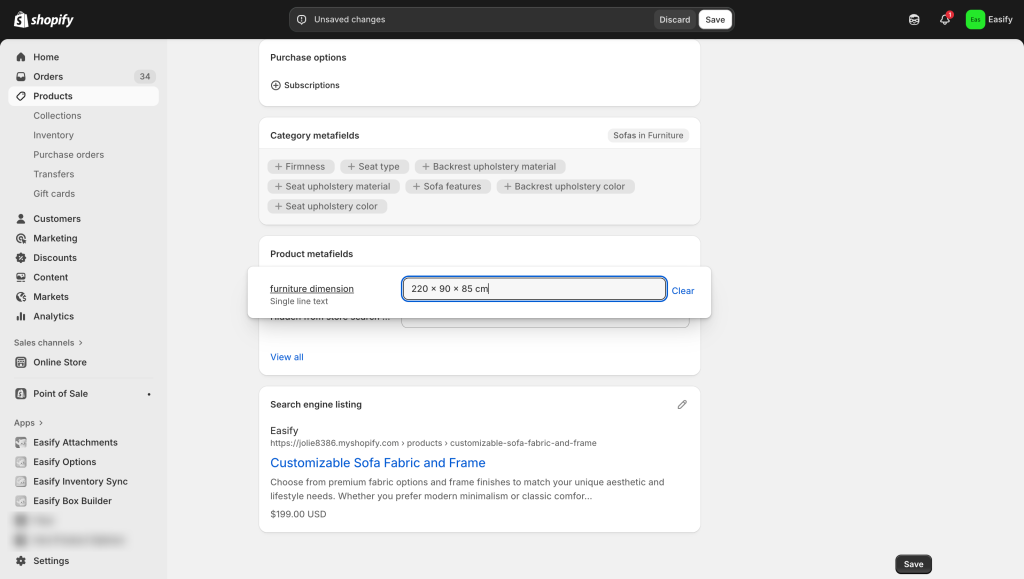
Important: if the field is left empty, Shopify won’t show anything on the frontend.
Step 7: Save and Preview Your Product
Once everything’s filled in, click Save, then preview your product page to check how it looks.
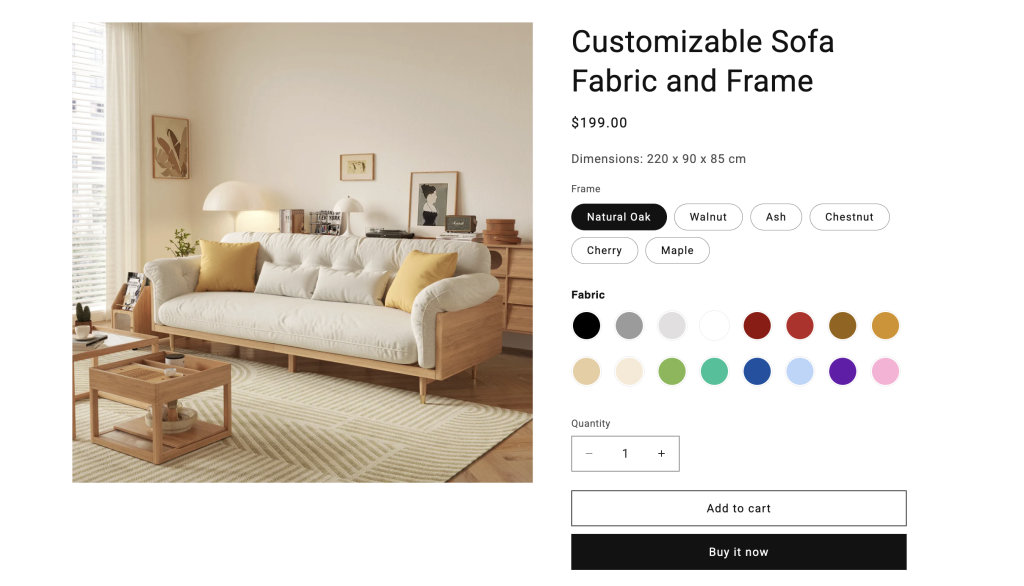
If you want to make the section look cleaner, you can add a few extra lines of code or use theme settings to style it.
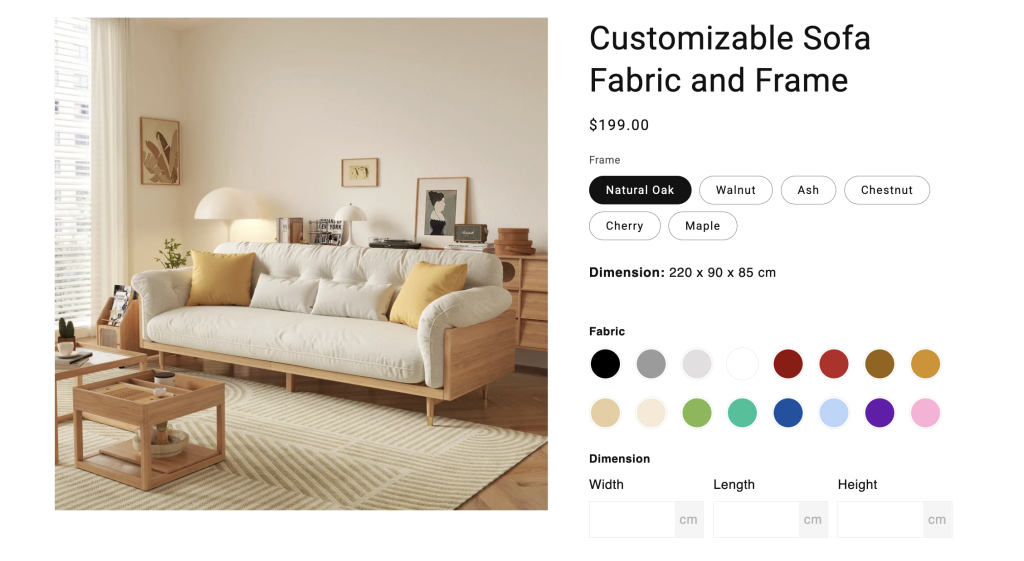
Method #2: Using Easify Product Options
For more flexibility, especially with customizable products, a Shopify app like Easify Product Options is the way to go. It lets you display dimensions more clearly and even allows customers to enter their own custom measurements in certain cases. This is perfect for products that require personalized sizing or when you want to offer a more interactive, user-friendly shopping experience. Here’s how to set it up step by step.
Step 1: Find and Install the App
Go to the Shopify App Store, search for Easify Product Options, and click Install. Once added to your store, open the app and follow the quick setup process to get started.
Step 2: Create a New Option Set
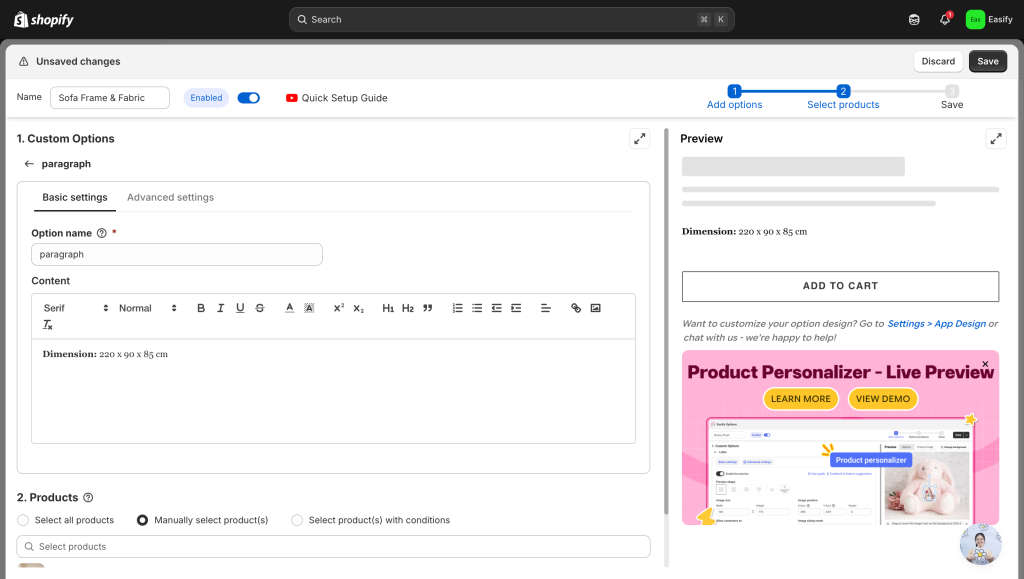
From your Easify dashboard, click Create New Option Set, then select the Paragraph option type.
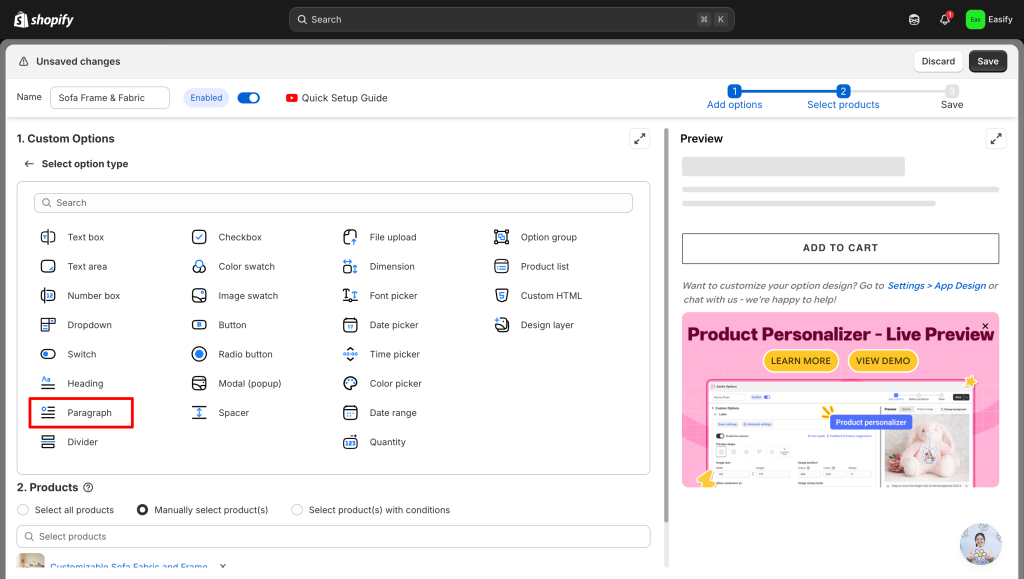
Step 3: Add Your Content
Enter the dimension details you want to display. You can format the text using bold, italic, underline, or alignment tools to make the information clearer and draw attention to the measurements.
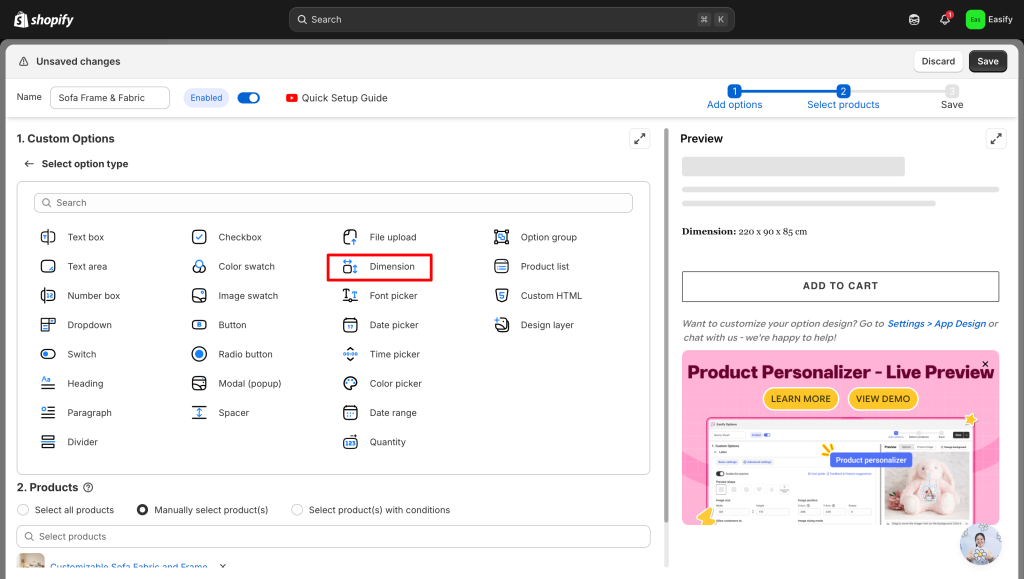
Step 4 (Optional): Add a Custom Dimension Field
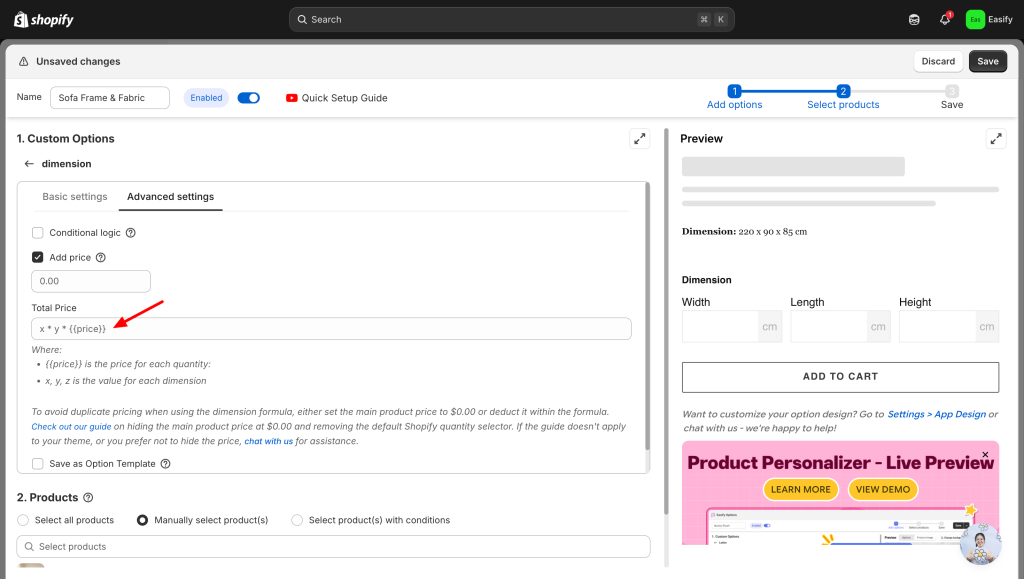
In some situations, you might want to go beyond simply showing dimensions and allow customers to enter their own measurements. If your product setup requires this, you can add the Dimension option type.
Then, in Advanced Settings, you’ll be able to set a price formula so the system automatically calculates the final price based on the customer’s input.
This step is optional, but it’s helpful to know if your store needs more than just a static dimension display.
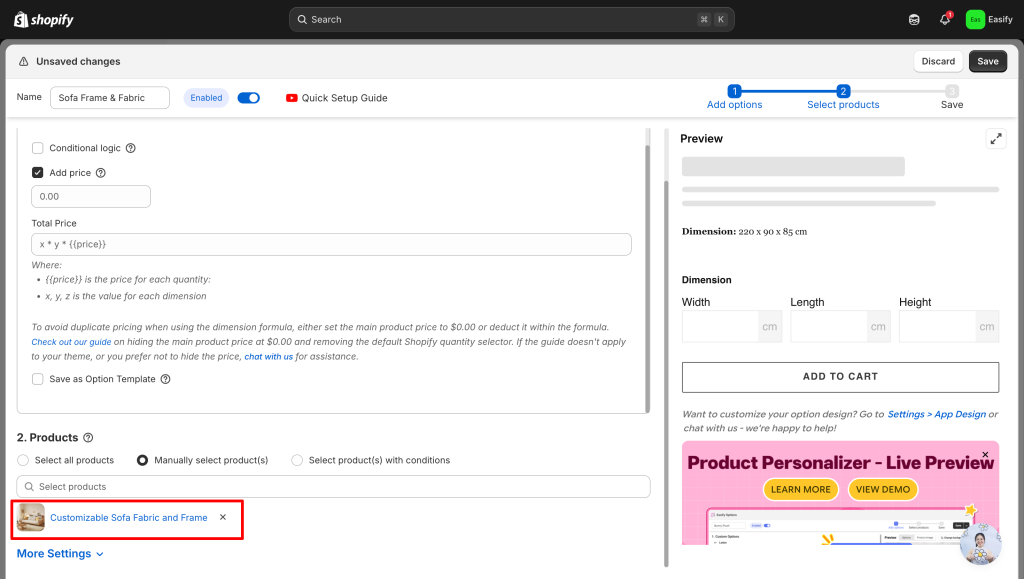
Step 5: Apply to Products
Choose the product(s) where you want the description to appear. You can apply the option set to a single item or multiple products at once.
Step 6: Save Changes
Click Save to finish. Your additional description will now appear on the product page — giving customers more information before making a purchase.
Final Thought
Adding dimensions to your Shopify products might seem like a small detail, but it plays a big role in helping customers feel confident about what they’re buying. Whether you’re simply displaying measurements or offering more advanced options, clear dimension information reduces confusion, lowers return rates, and creates a more seamless shopping experience.
With Shopify’s built-in metafields, you can handle the basics easily. And if you ever need more flexibility, especially for products that require custom measurements, Easify Product Options gives you a simple, no-code way to take things further.
If you’re ready to make product information clearer and more helpful, give Easify a try and see how much smoother your workflow can be.


